Transferring IIS 5/6 Certificate Files
Background
Want an easier way to export? Our management & troubleshooting tool works on all Windows-based servers.
Windows servers use .pfx files to contain the public key files (your SSL Certificate files, provided by DigiCert) and the associated private key file (generated by your server as part of the CSR).
Since both the public and private keys are needed for an SSL Certificate to function, you need a .pfx backup to transfer SSL server security certificates from one server to another.
This page explains how to back up your certificate on a working server, import the certificate to another server, and then enable the certificate for use on the new server. If you have not yet installed the certificate files that you received from DigiCert on the server that generated your CSR, please see our IIS 5/6 installation instructions page.
Exporting/Backing Up to a .pfx File
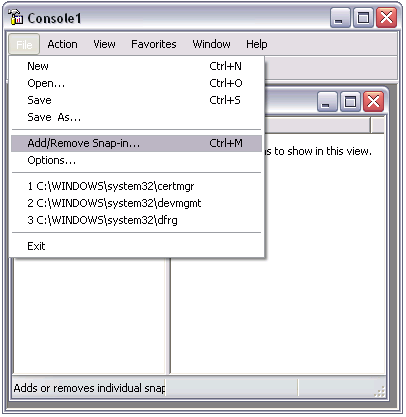
- On the Start menu click Run and then type mmc.
-
Click File > Add/Remove Snap-in.
-
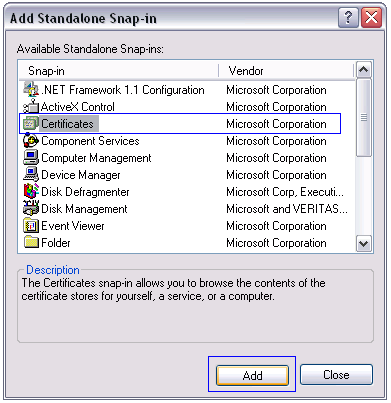
Click Add > Certificates > Add.
- Select Computer Account and then click Next. Select Local Computer and then click Finish. Then close the add standalone snap-in window and the add/remove snap-in window.
- Click the + to expand the certificates (local computer) console tree and look for the personal directory/folder. Expand the certificates folder.
- Right-click on the certificate you want to backup and select ALL TASKS > Export.
-
Choose Yes, export the private key and include all certificates in certificate path if possible.
Warning: Do not select the delete private key option. - Leave the default settings and then enter your password if required.
- Choose to save the file and then click Finish. You should receive an "export successful" message. The .pfx file is now saved to the location you selected.
Importing from a .pfx File
- On the Start menu click Run and then type mmc.
- Click File > Add/Remove Snap-in.
- Click Add > Certificates > Add.
- Select Computer Account and then click Next. Select Local Computer and then click Finish. Then close the add standalone snap-in window and the add/remove snap-in window.
- Click the + to expand the certificates (local computer) console tree and look for the personal directory/folder. Expand the certificates folder.
- Right-click on the certificate you want to backup and select ALL TASKS > Import.
- Follow the certificate import wizard to import your primary certificate from the .pfx file. When prompted, choose to automatically place the certificates in the certificate stores based on the type of the certificate.
Enabling a New Certificate on a Server
- On the Start menu, click Administrative Tools > Internet Information Services (IIS) Manager.
- In the IIS manager, right-click the site that you want to use the certificate for and select Properties.
- Navigate to Directory Security > Server Certificate. This will start the server certificate wizard.
-
If given the option, choose to Assign an existing certificate to the site and choose the certificate that you just imported.
If you do not have that option, you should be asked what you want to do with the current certificate on the site. Choose the option to replace your current certificate. - Browse to the .pfx file that you created earlier and then finish the certificate wizard. You may have to restart IIS or the server for it to recognize the new certificate.