Create a CSR & install your SSL certificate on your Ubuntu server with Apache2 using OpenSSL
Add trust to e-signing workflows with DigiCert Document Trust Manager.
Buy NowUse the instructions on this page to use OpenSSL to create your certificate signing request (CSR) and then to install your SSL certificate on your Ubuntu server with Apache2.
Restart Note: After you've installed your SSL/TLS certificate and configured the server to use it, you must restart your Apache2 instance.
For Apache instructions, see Apache: Create CSR & Install SSL Certificate (OpenSSL). For other OS/platform instructions, see Create a CSR (Certificate Signing Request).
You can use these instructions to create OpenSSL CSRs and install all types of DigiCert SSL certificates on your Ubuntu server with Apache2: Standard SSL, EV SSL, Multi-Domain SSL, EV Multi-Domain SSL, and Wildcard SSL.
-
To create your certificate signing request (CSR), see Ubuntu with Apache2: Creating Your CSR with OpenSSL.
-
To install your SSL certificate, see Ubuntu with Apache2: Installing & Configuring Your SSL Certificate.
I. Ubuntu with Apache2: Creating Your CSR with OpenSSL
Use the instructions in this section to create your own shell commands to generate your Ubuntu with Apache2 CSR with OpenSSL.
Recommended: Save yourself some time. Use the DigiCert OpenSSL CSR Wizard to generate an OpenSSL command to create your Ubuntu with Apache2 CSR. Just fill out the form, click Generate, and then paste your customized OpenSSL command into your terminal.
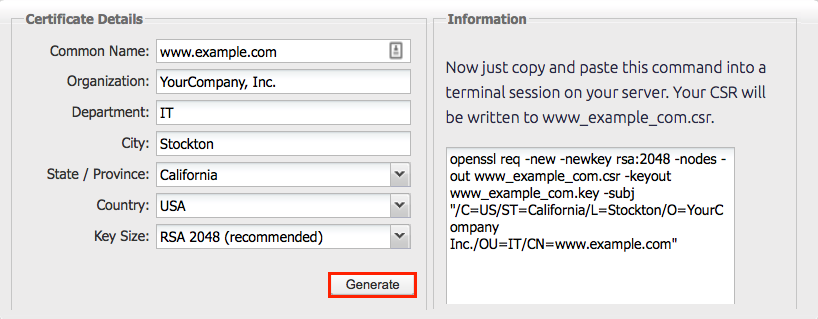
How to Generate a CSR for Ubuntu with Apache 2 Using OpenSSL
If you prefer to build your own shell commands to generate your Ubuntu with Apache2 CSR, follow the instructions below.
-
Log in to your server via your terminal client (ssh).
-
Run Command
At the prompt, type the following command:
Note: Make sure to replace server with the name of your server.
openssl req -new -newkey rsa:2048 -nodes -keyout server.key -out server.csr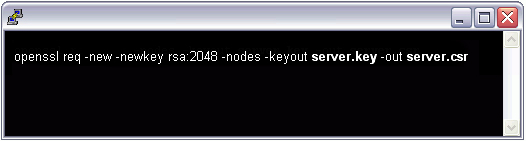
-
Generate Files
-
You've now started the process for generating the following two files:
- Private-Key File: Used to generate the CSR and later to secure and verify connections using the certificate.
- Certificate Signing Request (CSR) file: Used to order your SSL certificate and later to encrypt messages that only its corresponding private key can decrypt.
-
When prompted for the Common Name (domain name), type the fully qualified domain (FQDN) for the site that you are going to secure.
Note: If you're generating an Apache CSR for a Wildcard certificate, make sure your common name starts with an asterisk (e.g., *.example.com).
-
When prompted, type your organizational information, beginning with your geographic information.
Note: You may have already set up default information.
-
Now, your OpenSSL .csr file is created.
-
-
Order Your SSL/TLS Certificate
-
Open the .csr file you created with a text editor.
-
Copy the text, including the -----BEGIN NEW CERTIFICATE REQUEST----- and -----END NEW CERTIFICATE REQUEST----- tags, and paste it in to the DigiCert order form.
-
-
Save Private Key
Save (back up) the generated .key file. You need it later to install your SSL certificate.
-
Install Certificate
After you've received your SSL certificate from DigiCert, you can install it on your server.
II. Ubuntu with Apache2: Installing and Configuring Your SSL Certificate
If you still need to create a certificate signing request (CSR) and order your certificate, see Ubuntu with Apache2: How to Use OpenSSL to Create Your CSR.
After we've validated and issued your SSL certificate, you can install it on your Ubuntu with Apache2 server (where the CSR was generated) and configure the server to use the certificate.
How to Install and Configure the SSL Certificate on Your Ubuntu Server with Apache2
-
Copy the certificate files to your server.
-
Log in to your DigiCert account and download the intermediate (DigiCertCA.crt) and your primary certificate (your_domain_name.crt) files.
-
Copy these files, along with the .key file you generated when creating the CSR, to the directory on the server where you keep your certificate and key files.
Note: Make them readable by root only to increase security.
-
-
Find the Apache configuration file you need to edit.
The location and name of the configuration file can vary from server to server-especially if you're using a special interface to manage your server configuration.
-
The Ubuntu server with Apache2 main configuration file for your SSL/TLS site is typically found in /etc/apache2/sites-enabled/your_site_name.
-
If it's not found in the 'sites-enabled' directory, run the command below.
sudo a2ensite your_site_name -
Open the file with a text editor and find the <VirtualHost> blocks that contain the Apache settings.
-
-
Identify the SSL <VirtualHost> block you need to configure.
If your site needs to be accessible through both secure (https) and non-secure (http) connections, you need two separate files in /etc/apache2/sites-enabled/. One file is for port 80 and the other file is for port 443. Configure both files for SSL as described in step 4.
If your site only needs to be accessed securely, configure the existing virtual host for SSL as described in step 4.
-
Configure the <VirtualHost> block for the SSL-enabled site
-
Below is a very simple example of a virtual host configured for SSL. The parts listed in blue are the parts you must add to configure the SSL configuration; they may be spread throughout the file.
<VirtualHost 192.168.0.1:443>
DocumentRoot /var/www/
SSLEngine on
SSLCertificateFile /path/to/your_domain_name.crt
SSLCertificateKeyFile /path/to/your_private.key
SSLCertificateChainFile /path/to/DigiCertCA.crt
</VirtualHost> -
Make sure to adjust the file names to match your certificate files.
-
SSLCertificateFile is your DigiCert certificate file (e.g., your_domain_name.crt).
-
SSLCertificateKeyFile is the .key file generated when you created the CSR (e.g., your_private.key).
-
SSLCertificateChainFile is the DigiCert intermediate certificate file (e.g., DigiCertCA.crt)
Note: If the SSLCertificateChainFile directive doesn't work, try using the SSLCACertificateFile directive instead.
-
-
-
Test your Apache2 configuration file before restarting.
As a best practice, check your Apache2 configuration file for any errors before restarting Apache.
Caution: Apache2 won't start again if your configuration files have syntax errors.
Run the following command to test your configuration file (on some systems, it's apache2ctl):
apachectl configtest -
Restart Apache2.
You can use apachectl commands to stop and start Apache2 with SSL support.
                            apachectl stop

                            apachect1 start
Restart Notes:
If Apache2 doesn't restart with SSL support, try using apachectl startssl instead of apachectl start. If SSL support only loads with apachectl startssl, we recommend you adjust the apache startup configuration to include SSL support in the regular apachectl start command. Otherwise, your server may require you to manually restart Apache2 using apachectl startssl in the event of a server reboot. This usually involves removing the <IfDefine SSL> and </IfDefine> tags that enclose your SSL configuration.
-
Congratulations! You've successfully installed your SSL certificate.
Testing Your SSL/TLS Certificate Installation
-
Browser Test
-
For best results, make sure to close your web browser first and then re-launch it.
-
Visit your site with the secure https URL (i.e., go to https://www.example.com not http://www.example.com).
-
Be sure to test your site with more than just Internet Explorer. IE downloads missing intermediate certificates; whereas, other browsers give an error if all the certificates in the certificate chain aren't installed properly.
-
-
DigiCert® SSL Installation Diagnostic Tool
If your site's publicly accessible, use our Server Certificate Tester to test your SSL/TLS certificate installation; it detects common installation problems.
Configuration and Useful Commands
Install Apache2
Required to use SSL/TLS certificates:
sudo apt-get install apache2
Enable SSL Module
-
Replace 'default-ssl' with the real site name you set up in /etc/apache2/sites-available/.
sudo a2enmod ssl -
Once the site listed in the command above is enabled, the site appears in /etc/apache2/sites-enabled.
Apply SSL Module to Site
                        sudo a2ensite default-ssl

                        sudo /etc/init.d/apache2 restart
Cipher Suite
-
Once you run the sudo a2enmod ssl command, edit the ssl.conf file in /etc/apache2/mods-enabled.
-
If you haven't run the a2enmod command yet, preconfigure the ssl.conf file in /etc/apache2/mods-available.