- Contact Us
-

choose your language

Knowledge Base
Adobe AIR® application signing guide
Digitally sign Adobe AIR applications
To run your applications on Adobe AIR, you must digitally sign them first. Using a DigiCert Code Signing certificate to sign your applications allows users to trust and run the applications you create and modify. When your users install one of your applications signed with a DigiCert Code Signing certificate, Adobe AIR gives your application the Publisher Identity: VERIFIED green checkmark.
| Is your certificate on a hardware token? See Sign Adobe AIR® applications with a hardware token-based code signing certificate. |
The following topics are included in these instructions:
- Step 1: Export your code signing certificate as a .PFX file
- Step 2: Sign your application using the PFX file
Step 1: Export your code signing certificate as a .PFX file
To sign your application for Adobe AIR, you need your code signing certificate in a .pfx format (a certificate and private key file combined into one). If you already have your certificate .pfx file, you are ready to sign your AIR applications.
Export your certificate as a .PFX file
IE stores your code signing certificate in the Windows certificate store.
- In IE, go to Internet Options.
- In the Internet Options window, on the Content tab, select Certificates.
- In the Certificates window, on the Personal tab, select your code signing certificate and then select Export.
- Follow the Certificate Export Wizard to export your certificate as a .pfx file.
Items to note:- If, during the export process, you do not have the option to export the private key with your certificate, you must request a new certificate. Your PFX file must include the private key. See Reissue your Code Signing certificate.
- Remember the password that you use during this process. This password is required when using the certificate to sign your code. If you forget your password, you need to re-export your certificate.
- See Internet Explorer: Exporting Your Code Signing Certificate as a PFX File for detailed export instructions.
If you used Chrome, your code signing certificate was installed in the Windows certificate store.
- In Chrome, go to Settings.
- On the Settings page, below Default browser, select Show advanced settings.
- Under HTTPS/SSL, select Manage certificates.
- In the Certificates window, on the Personal tab, select your code signing certificate and then select Export.
- Follow the Certificate Export Wizard to export your certificate as a .pfx file.
Items to note:- If, during the export process, you do not have the option to export the private key with your certificate, you must request a new certificate. Your PFX file must include the private key. See Reissue your Code Signing certificate.
- Remember the password that you use during this process. This password is required when using the certificate to sign your code. If you forget your password, you need to re-export your certificate.
- For detailed export instructions, see Chrome: Exporting Your Code Signing Certificate as a PFX File.
If you used Firefox, your new code signing certificate was installed in the Firefox certificate store.
- In Firefox, go to Options.
- In the Options window, select Advanced, select the Certificates tab, and then select View Certificates.
- In the Certificate Manager window, select your code signing certificate on the Your Certificates tab and then select Backup.
- In the File Name to Backup window, save your code signing certificate (w/ private key) .p12 file.
Note: A .p12 file uses the same PKCS#12 format as a .pfx file. - In the Choose a Certificate Backup Password window, create a Certificate backup password and select OK.
Items to note:- If, during the export process, you do not have the option to export the private key with your certificate, you must request a new certificate. Your PFX file must include the private key. See Reissue your Code Signing certificate.
- Remember the password that you use during this process. This password is required when using the certificate to sign your code. If you forget your password, you need to re-export your certificate.
- See Firefox: Exporting Your Code Signing Certificate as a P12 File for detailed export instructions.
Step 2: Sign your application using the PFX file
Sign your AIR application using the command-line AIR Developer Tool (ADT) or the GUI.
Sign an AIR application using ADT (CLI option)
- Open the command prompt as an admin (right-click and select run as administrator)
- Navigate to your application's source directory (i.e., where the application.xml file is located).
Note: Verify that the code signing certificate .pfx file used for signing is not in the source directory. - Now, run the command below at the command line modifying the bold red text to match your file names:
adt -package -storetype pkcs12 -keystore
"c:\path\to\your\certificate.pfx" "c:\path\to\your\file.air"
"application.xml" - When prompted, enter the password created while exporting the certificate as a .pfx file.
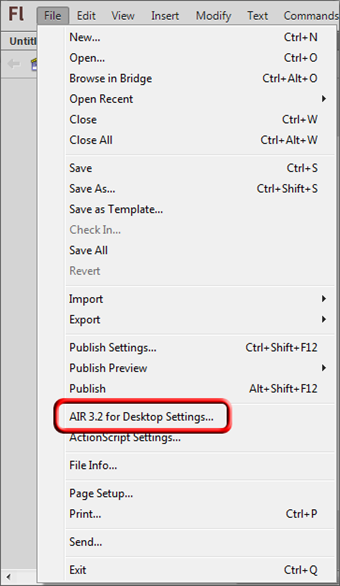
Sign an AIR application using Flash (GUI option)
- Open the program you are using to sign the AIR document.
According to Adobe documentation, you can use Adobe Flash Builder 4.5, Adobe Flash CS 5.5 Professional, or Flex SDK. - In the program, select Adobe AIR Settings.
This setting is listed with a number based on the version of AIR you are using.
- In the AIR Settings window, on the Signature tab, select Use a code signing certificate (.p12, .pfx).
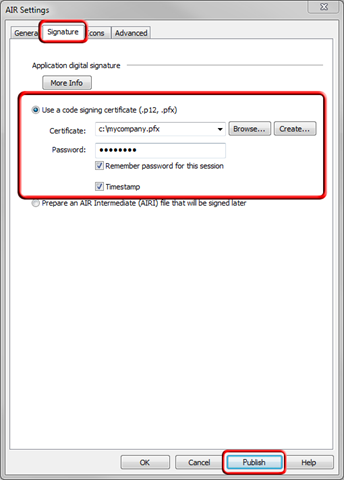
- In the Certificate box, use the drop-down list or select Browse to locate and select your code signing certificate .pfx file.
- In the Password box, enter the password you created when exporting the certificate .pfx file and then select Publish.
-

The most-trusted global provider of high-assurance TLS/SSL, PKI, IoT and signing solutions.
-


-
© 2022-2024, DigiCert, Inc. All rights reserved.
Cookie Settings
