IIS 8 and IIS 8.5: Host Headers, Secure Site Bindings, and SSL
Background
In IIS 7, if you used host headers with an SSL Certificate, the same certificate had to be used for every site that was secured. If multiple SSL Certificates were used, the server usually had a problem with providing the correct SSL Certificate when an HTTPS connection was established, which caused a certificate name error. See Name Mismatch in Web Browser.
For IIS 7, see Configuring SSL Host Headers in IIS 7.
For IIS 6, see Configuring SSL Host Headers in IIS 6.
Server Name Indication (SNI) with Multiple SSL Certificates
IIS 8 supports the TLS Server Name Indication (SNI) extension. From a single IP address and port, you can use multiple SSL certificates to secure various websites on a single domain (e.g., www.yourdomain.com, site2.yourdomain.com) or across multiple domains (e.g., www.domain1.com, www.domain2.com). For example, instead of requiring a different IP address for each SSL site, you can use SNI to install and configure multiple SSL sites to one IP address.
For more information about installing multiple certificates using SNI, see How to install and configure your SSL Certificate on Windows Server 2012 - IIS 8 and Windows Server 2012 R2 - IIS 8.5 (Multiple Certificates Using SNI).
Since Server Name Indication (SNI) is a new feature, not all browsers support it.
For information about broswer support for IIS 8, see IIS 8 and IIS 8.5 SNI Browser Support.
Host Headers with SSL Certificates that Cover Multiple Websites
If you use host headers in combination with certificates that can cover more than one website (Wildcard or Multi-Domain (SAN) Certificates) you can secure multiple sites on one IP.
A Wildcard Certificate secures any subdomain of the domain to which it was issued. For example, a DigiCert® Wildcard Plus™ Certificate that is issued to *.domain.com will cover something.domain.com, anything.domain.com, and whatever.domain.com.
A single DigiCert Multi-Domain (SAN) Certificate can secure multiple fully qualified domain names, and DigiCert Multi-Domain (SAN) Certificates are compatible with almost all major server types. The difference between DigiCert Multi-Domain (SAN) Certificates and DigiCert® Wildcard Plus™ Certificates is that while DigiCert® Wildcard Plus™ Certificates work on multiple websites because of the * character in the domain name, DigiCert Multi-Domain (SAN) Certificates include a Subject Alternative Name (SAN) field that allows the certificate to include multiple names. For example, a Multi-Domain (SAN) Certificate can include www.domain.com, www.domain2.com, www.domain3.com, and mail.domain3.com. The certificate can then be installed to all four sites. When connecting to any of those sites, a browser checks the name that it is connecting to against the list of SAN names in the certificate. As long as a valid match is found, no error message is displayed.
There are two ways to set up host headers in IIS 8. We recommend using the DigiCert® Certificate Utility for Windows and the IIS 8 GUI to set up the host headers and site bindings. However, you can also use the command line to configure SSL host headers.
-
To use the DigiCert® Certificate Utility for Windows and IIS 8:
See IIS 8 and IIS 8.5: Using the DigiCert® Certificate Utility for Windows and IIS Interface to Set Up Host Headers. -
To use the command line:
See IIS 8 and IIS 8.5: Using the Command Line to Set Up Host Headers.
IIS 8 and IIS 8.5: Using the DigiCert® Certificate Utility for Windows and IIS Interface to Set Up Host Headers
To set up host headers in IIS 8, you need to format the friendly name to start with an * character. Using our DigiCert® Certificate Utility for Windows to reformat the friendly name is very easy. After you format the friendly name, you can use IIS 8 to set up host headers and site bindings.
-
On your Microsoft server, download and run the DigiCert® Certificate Utility for Windows.
-
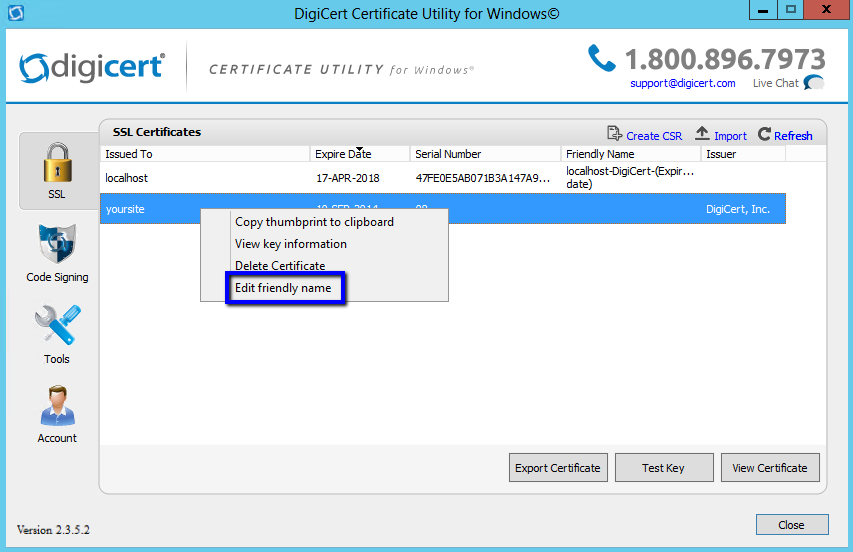
In DigiCert Certificate Utility for Windows©, right-click on your certificate and then, click Edit friendly name.
-
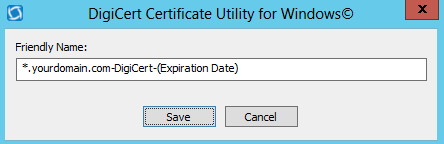
Enter a friendly name for the certificate and make sure that the name starts with an *. You will use this name to identify this certificate.
We recommend that you add DigiCert and the expiration date to the end of your friendly name, for example: *.yourdomain.com (DigiCert)(Expiration date). This information helps identify the issuer and expiration date for the certificate.
-
Click Save.
-
After you give your SSL Certificate a friendly name, you can now use the IIS interface to configure the host headers and site bindings.
For a website without a binding for https, see Adding Site Bindings (Website Does Not Have Binding for https).
For a website with a binding for https, see Editing Site Bindings (Website Has Binding for https).
Adding Site Bindings (Website Does Not Have Binding for https)
-
Open Internet Information Services (IIS) Manager.
From the Start screen, type and click Internet Information Services (IIS) Manager.
-
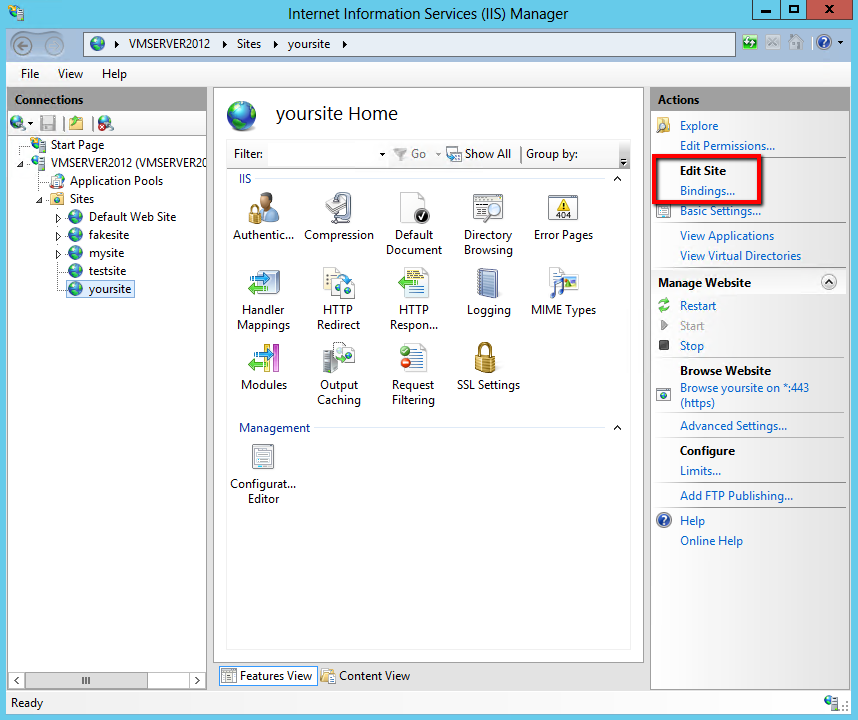
In Internet Information Services (IIS) Manager, under Connections, expand your server’s name, expand Sites, and then, click the site that you want to secure.
-
In the Actions menus, under Edit Site, click Bindings.
-
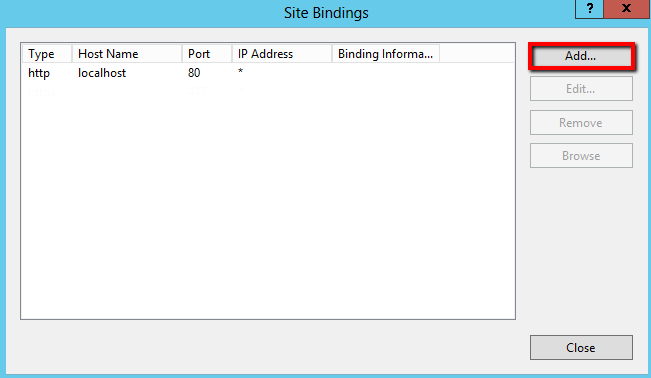
In the Site Bindings window, click Add.
-
In the Add Site Binding window, enter the following information:
Type In the drop-down list, select https. IP address In the drop-down list, select All Unassigned. Port Enter 443. Host name Enter your website’s DNS name (e.g. website1.domain.com). Require Server Name Indication Do not check this check box; not required. SSL certificate In the drop-down list, select the SSL Certificate by its friendly name (*YourCertificateFriendlyName). 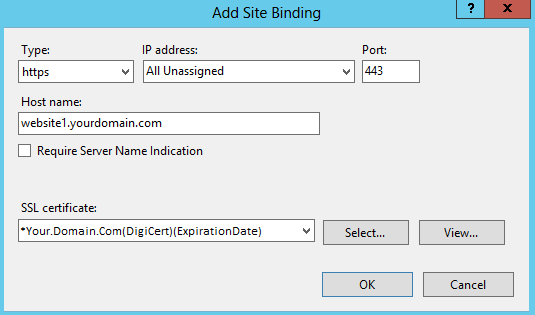
-
Click OK.
The host headers should now be properly configured for that website.
-
Repeat these steps as needed for all sites to which you want to assign SSL host headers.
Note: In step 5, change the host name to match the website's DNS name each time.
-
You can verify the changes by opening each site in a web browser.
If the wrong page is displayed for any URL, your SSL host headers have not been configured correctly.
Editing Site Bindings (Website Has Binding for https)
-
Open Internet Information Services (IIS) Manager.
From the Start screen, type and click Internet Information Services (IIS) Manager.
-
In Internet Information Services (IIS) Manager, under Connections, expand your server’s name, expand Sites, and then, click the site that you want to secure.
-
In the Actions menus, under Edit Site, click Bindings.
-
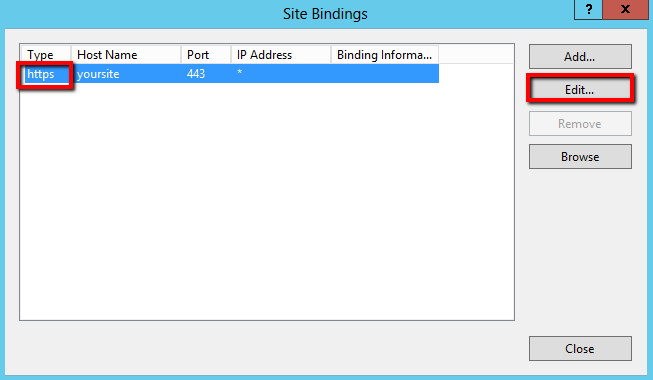
In the Site Bindings window, select the https binding for this website and then, click Edit.
-
In the Edit Site Binding window, set the following options:
IP address In the drop-down list, select All Unassigned. If your server has multiple IP addresses, select the one that applies. Host name Enter your website’s DNS name (e.g. website1.yourdomain.com). SSL certificate In the drop-down list, select the SSL Certificate by its friendly name (*YourCertificateFriendlyName). 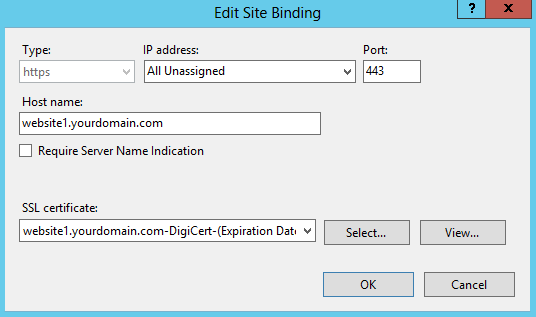
-
Click OK.
-
Repeat these steps as many times as needed for all of the sites to which you want to assign SSL host headers.
Note: In step 5, change the host name to match the website's DNS name each time.
-
You can verify the changes by opening each site in a web browser.
If the wrong page is displayed for any URL, your SSL host headers have not been configured correctly.
IIS 8 and IIS 8.5: Using the Command Line to Set Up Host Headers
Using the Command Line to Set Up Host Headers
If the friendly name does not have a * character, you need to use the command line to configure SSL host headers to use your SSL Certificate on multiple websites.
-
Install the SSL Certificate to the server that hosts the site where you will secure https bindings.
For instructions about installing the SSL Certificate on a IIS 8 server, refer to the IIS 8 and IIS 8.5 SSL Certificate Installation instructions.
-
On the server, open a command line.
On the Start screen, type and click Command Prompt.
-
To change the directory where you manage SSL host headers, in the Command Prompt, type cd C:\Windows\System32\Inetsrv\ and then press Enter.
-
On one line, type the following command:
appcmd set site /site.name:"Name of Website in IIS" /+bindings.[protocol='https',bindingInformation='*:443:Host Header']To find the Name of Website in IIS and the Host Header:
-
Open Internet Information Services (IIS) Manager.
On the Start screen, type and click Internet Information Services (IIS) Manager.
-
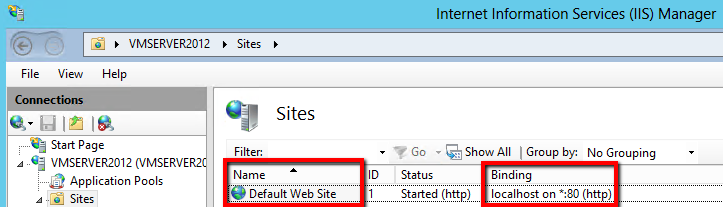
In Internet Information Services (IIS) Manager, under Connections, click Sites.
-
In the center section, the name of website in IIS is listed in the Name column.
-
In the Binding column, the host header value is the value that is assigned to it.
-
-
In the Command Prompt, you should see a response message “SITE object ‘your site’ changed”.
-
Repeat these steps as needed until you have set up SSL host headers for all websites that need them.
If you need to enter the command for multiple sites, we recommend that you use our DigiCert IIS 8 and IIS 8.5 SSL Host Header Command Generator.
-
You may need to restart the IIS sites for the changes to take effect.
-
To verify your changes, open each site in a web browser.
If the browser displays the wrong page for any URL, you have not configured your SSL host headers correctly.