- Contact Us
-

choose your language

Knowledge Base
Sign Adobe AIR® applications with a hardware token-based code signing certificate
Signing Adobe AIR® applications
To run your applications on Adobe AIR or publish your Adobe Flash code on your Adobe Air applications, you must digitally sign them first. When your customers install one of your applications signed with a DigiCert Code Signing or EV Code Signing certificate, Adobe AIR gives your application the Publisher Identity: VERIFIED green checkmark.
The following topics are included in these instructions:
- Step 1: Configure the Java JDK to use your eToken
- Step 2: Sign code using the command-line utility Air Development Tool (ADT)
- Additional keytool and ADT command options
- Troubleshooting
- Issues running the ADT command with the 64-bit version of Windows
Step 1: Configure the Java JDK to use your eToken
Before you can begin signing your applications with your PKCS#11 token-based code signing certificate, you must configure Java to use the token.
If you are using different versions of the Java Runtime Environment (JRE) or Java Development Kit (JDK) than those listed below, you must modify the folder paths to match the version installed on your computer.
Configure Java JDK
Wherever you see the double asterisks (**), replace them (**) with the specific version of JRE or JDK that you are using, for example, C:\Program Files (x86)\Java\jdk1.7.0_67\bin.
- Download the JDK from Oracle.com.
- Open a text editor (such as Notepad) and do the following:
- Copy and paste the following 2 lines into the text (Notepad) document:
name=eToken
library=c:\WINDOWS\system32\eTPKCS11.dll
- Save this file as eToken.cfg in the appropriate directory for your version of the JDK, for example:
- JDK 1.6
C:\Program Files (x86)\Java\jdk1.6.0_**\bin - JDK 1.7
C:\Program Files (x86)\Java\jdk1.7.0_**\bin - JDK 1.8
C:\Program Files (x86)\Java\jdk1.8.0_**\bin
Note: If you are running a 32-bit version of Windows, the Java JDK is installed in C:\Program Files\Java\...
- JDK 1.6
- Run WordPad (Start > Accessories > WordPad).
- Open the java.security file from your Java Runtime Environment (JRE) installation (e.g., C:\Program Files\Java\jdk1.7**\jre\lib\security), and then do the following:
- Search the file (Ctrl + F) for the following line:
security.provider.10=sun.security.mscapi.SunMSCAPI
- If the following line isn't already present in the file, add it right after the line above:
security.provider.11=sun.security.pkcs11.SunPKCS11 ./etoken.cfg
Note: ./etoken.cfg is the path to the etoken.cfg file, and cannot contain a drive letter (i.e., it must be on the same drive as the JDK installation).
- When WordPad asks if you want to save the file as a text-only document, select yes.
- Search the file (Ctrl + F) for the following line:
- Open Windows Explorer and go to the JDK installation folder (e.g., C:\Program Files\Java\jdk1.7**\).
- Hold shift down, right-click on the bin folder, and select Open command window here.

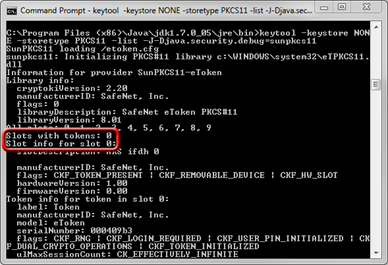
- Run the following command to find out in which token slot your certificate is stored:
keytool -keystore NONE -storetype PKCS11 -list -J-Djava.security.debug=sunpkcs11
Note: This command displays a lot of information.
- Go to the top of the information display where the information starts, and search for a line like this:
Slots with tokens:#
- Where # is a number such as 0 or 2.
- If the slot used is "0", skip to Step 10.
- Remove the eToken device from the USB drive for a few seconds and then plug it back in. It only allows you to run one keytool command at a time.
- Open the file etoken.cfg you created in Step 2 and change the value after slot= to match the slot from the previous keytool command then save the file.
name=eToken
library=c:\WINDOWS\system32\eTPKCS11.dll
slot=0
Note: 0 is the default slot. If you have added additional certificates to the token or re-keyed/re-issued your certificate, you may have a different number than the default.
- Copy and paste the following 2 lines into the text (Notepad) document:
Step 2: Sign code using the command-line utility Air Development Tool (ADT)
Configure the ADT command to use the 32-bit version of Java
For JDKs Version 7 and Older: Before running the ADT command, make sure that it is using the 32-bit version of Java instead of the 64-bit one. |
- Go to the folder where you downloaded the Adobe Air SDK, and then to the bin subfolder.
- Make a backup of the file adt.bat (i.e., make a copy so it says adt - copy.bat).
- Update adt.bat to point to the 32-bit JDK installation:
"C:\Program Files (x86)\Java\jdk1.7.0_05\bin\java.exe" -jar "%~dp0\..\lib\adt.jar" %*
Sign code through the command-line utility ADT
Follow the steps below to use the command-line tool Air Development Tool (ADT) to sign your Adobe AIR applications with your token-based code signing certificate.
- Run the ADT command on a single line to sign your app:
adt -sign -tsa http://timestamp.digicert.com -storetype PKCS11 -providerName SunPKCS11-eToken "path\to\YourApp.air"
- If the command runs successfully, it should ask you for your password and then have a blank line after completion and return you to the command line.
You have now signed your AIR file with your token-based code signing certificate.
Additional keytool and ADT command options
Make sure you plugged the eToken into your computer before running any of the commands below.
- List all certificates in the current user account.
Run the command below to list all of the certificates in the current user account. This list includes personal, code signing, and EV code signing certificates.
keytool -list -storetype Windows-MY
- List all certificates by their alias.
To list certificates by their alias, run the command below.
keytool -list -keystore NONE -storetype PKCS11 -providerClass sun.security.pkcs11.SunPKCS11 -providerArg "c:\eToken.cfg"
- Specify the certificate you want to use.
With the ADT -alias command, you can specify a particular certificate to use with -alias CN=YourCompany, Inc. as shown below.
keytool -list -keystore NONE -storetype PKCS11 -providerClass sun.security.pkcs11.SunPKCS11 -providerArg "c:\eToken.cfg"
Troubleshooting
Error Messages
- "requested provider is not available"
This error message could mean:
- You may be trying to use the ADT command using the 64-bit java installation.
- You don't have security.lib file configured correctly pointing to the etoken.cfg file.
- "Could not generate timestamp: handshake alert: unrecognized_name"
Generally, this error means the "-tsa" directive was not included in the signing command.
- "Unable to build a valid certificate chain for the signer"
This error means you don't have the chain certificate (e.g., intermediate CA and root certificates) installed on your device. You need to reinitialize your device and re-key your certificate. See Reissue your Code Signing certificate or Reissue an EV Code Signing certificate.
- "keytool error: java.security.KeyStoreException: PKCS11 not found"
Typically, this error occurs when trying to run the keytool command from the 64 bit Java installation (C:\Program Files\Java\jdk**\bin\) instead of the 32 bit one (C:\Program Files (x86)\Java\jdk**\bin\).
Issues running the ADT command with the 64-bit version of Windows
If you are using a 64-bit version of Windows, you may have issues when running the ADT command. Note that PKCS11 access is only supported in the 32-bit version of the JRE. Therefore, you may need to make sure the path listed for the JRE is pointing to the 32-bit version of Java instead of the 64-bit version.
Point JRE to the 32-bit version of Java
- Open Advanced System Settings.
Go to Start > Control Panel > System > Advanced System Settings. - In the Advanced System Settings window, on the Advanced tab, select Environment Variables.
- Add the path to your installed 32-bit version of the JDK to the end of the path Variable Value as shown below.
{existing path variables};C:\Program Files\Java\jdk1.6.0_**\bin
- After editing that path, paste it into the Variable Value and select OK.
-

The most-trusted global provider of high-assurance TLS/SSL, PKI, IoT and signing solutions.
-


-
© 2022-2024, DigiCert, Inc. All rights reserved.
Cookie Settings
