- Contact Us
-

choose your language
-

Knowledge Base
How to create a CSR using OpenSSL & install your SSL certificate on a Nginx server
Use the instructions on this page to use OpenSSL to create your certificate signing request (CSR) and then to install your SSL certificate on your Nginx server.
Note: After you've installed your SSL/TLS certificate and configured the server to use it, you must restart your Nginx instance.
Nginx: Creating Your CSR with OpenSSL
Use the instructions in this section to create your shell commands for generating your Nginx CSR using OpenSSL.
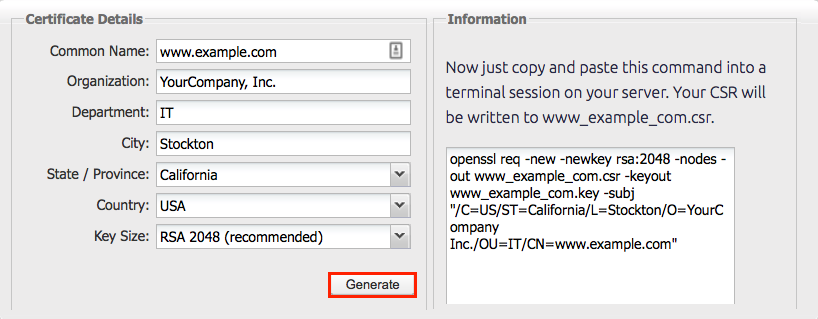
Recommended: Save yourself some time. Use the DigiCert OpenSSL CSR Wizard to generate an OpenSSL command for creating your Nginx CSR. Just fill out the form, click Generate, and then paste your customized OpenSSL command into your terminal.
How to Generate a CSR for Nginx Using OpenSSL
If you prefer to build your shell commands to generate your Nginx CSR, follow the instructions below:
- Log in to your server via your terminal client (ssh).
- Run Command
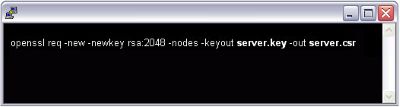
At the prompt, type the following command:
openssl req –new –newkey rsa:2048 –nodes –keyout server.key –out server.csr
Note: Make sure to replace server with the name of your server.
- Generate Files
- You've now started the process for generating the following two files:
- Private-Key File: Used to generate the CSR and later to secure and verify connections using the certificate.
- Certificate Signing Request (CSR) file: Used to order your SSL certificate and later to encrypt messages that only its corresponding private key can decrypt.
- When prompted for the Common Name (domain name), type the fully qualified domain (FQDN) for the site that you are going to secure.
Note: If you're generating a Nginx CSR for a Wildcard certificate, make sure your common name starts with an asterisk (e.g., *.example.com). - When prompted, type your organizational information, beginning with your geographic information.
Note: You may have already set up default information. - Now, your .csr file will be created.
- You've now started the process for generating the following two files:
- Order Your SSL/TLS Certificate
- Open the .csr file that you created with a text editor.
- Copy the text, including the -----BEGIN NEW CERTIFICATE REQUEST----- and -----END NEW CERTIFICATE REQUEST----- tags, and paste it in to the DigiCert order form.
- Save Private Key
Save (back up) the generated .key file. You'll need it later when installing your SSL certificate. - Install Certificate
After you've received your SSL certificate from DigiCert, you can install it on your server.
Nginx: Installing & Configuring Your SSL Certificate
If you still need to create a certificate signing request (CSR) and order your certificate, see Nginx: Creating Your CSR with OpenSSL.
After we've validated and issued your SSL certificate, you can install it on the Nginx server where the CSR was generated and configure the server to use it.
How to Install and Configure Your SSL Certificate
- Primary and intermediate certificates
- You should've received a your_domain_name.pem file from DigiCert in an email when your certificate was issued. This .pem file contains both your primary certificate and the intermediate certificate. If you have that .pem file, you can skip to step 4.
- If you need to concatenate your primary certificate and your intermediate certificate in to a single file, see step 2.
- Copy the certificate files to your server
- Log in to your DigiCert account and download the intermediate (DigiCertCA.crt) and your primary certificate (your_domain_name.crt) files.
- Copy these files, along with the .key file you generated when creating the CSR, to the directory on the server where you'll keep your certificate and key files.
Note: Make them readable by root only to increase security.
- Concatenate the primary and intermediate certificates
- You need to concatenate your primary certificate file (your_domain_name.crt) and the intermediate certificate file (DigiCertCA.crt) into a single .pem file.
- To concatenate the files, run the following command:
cat your_domain_name.crt DigiCertCA.crt >> bundle.crt
- Edit the Nginx virtual hosts file
- Open your Nginx virtual host file for the website you're securing.
- Make a copy of the existing non-secure server module and paste it below the original.
Note: If you need your site to be accessible through both secure (https) and non-secure (http) connections, you'll need a server module for each type of connection. - Next, add the lines in bold below:
server {
listen 443;
ssl on;
ssl_certificate /etc/ssl/your_domain_name.pem; (or bundle.crt)
ssl_certificate_key /etc/ssl/your_domain_name.key;
server_name your.domain.com;
access_log /var/log/nginx/nginx.vhost.access.log;
error_log /var/log/nginx/nginx.vhost.error.log;
location / {
root /home/www/public_html/your.domain.com/public/;
index index.html;
}
}
- Adjust the file names to match your certificate files:
- ssl_certificate should be your primary certificate combined with the intermediate certificate that you made in the previous step (e.g., your_domain_name.crt).
- ssl_certificate_key should be the .key file generated when you created the CSR.
- Restart Nginx.
Run the following command to restart Nginx:
sudo /etc/init.d/nginx restart
- Congratulations! You've successfully installed your SSL certificate.
Troubleshooting:
Use the DigiCert® SSL Installation Diagnostics Tool
If your website is publicly accessible, our SSL Certificate Checker can help you diagnose common problems.
Use a browser and visit your site
Open a web browser and visit your site using https. We recommend testing your site with Firefox; this browser will give you a warning if your intermediate certificate is not installed. You shouldn't receive any browser warnings or errors.
If you immediately receive a browser message about the site not being available, then Nginx may not yet be listening on port 443.
If your web request takes a very long time and times out, a firewall may be blocking traffic on TCP port 443 to the web server.
If you receive a "not trusted" warning, view the certificate to see if it is the certificate you expect.
When you view the certificate, check the Subject, Issuer, and Valid To fields
If you had to concatenate the certificate files, your primary certificate (e.g., your_domain_name.crt) may not be correctly combined with the intermediate certificate.
For more information, see the Nginx SSL documentation.
Nginx Server Configuration
For information about Nginx server configurations that can strengthen your SSL environment:
-

The most-trusted global provider of high-assurance TLS/SSL, PKI, IoT and signing solutions.
-
-


-
© 2022-2025, DigiCert, Inc. All rights reserved.
Cookie Settings
