- Contact Us
-

choose your language
-

Knowledge Base
Microsoft Exchange 2013 | Import and Configure your SSL Certificate
Exchange 2013 | Importing and Configuring a Copy of Your SSL Certificate on Your Server
Before importing a copy of your SSL Certificate to your Exchange 2013 server, you must first export it from the server on which it is installed. See DigiCert Certificate Utility SSL Certificate Export Instructions.
To Import and Configure a Copy of Your SSL Certificate:
After exporting your SSL Certificate and Private Key file as a .pfx file, you can copy (import) that file to your Exchange 2013 server and assign the services to the certificate.
With the DigiCert Certificate Utility, import your certificate .pfx file to your Exchange 2013 server.
How to Import Your .pfx File to Your Exchange 2013 Server using the DigiCert Utility
In the Exchange Admin Center, assign services to your SSL Certificate.
How to Assign Services to Your SSL Certificate in the Exchange Admin Center
How to Import Your .pfx File to Your Exchange 2013 Server using the DigiCert Utility
On your Exchange 2013 server to which you want to import your certificate, download and save the DigiCert® Certificate Utility for Windows executable (DigiCertUtil.exe).
Run the DigiCert® Certificate Utility for Windows.
Double-click DigiCertUtil.
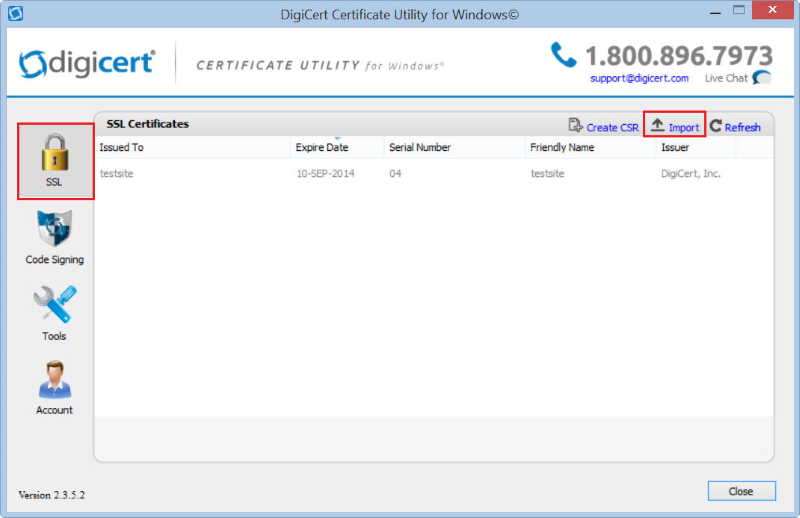
In DigiCert Certificate Utility for Windows©, click SSL (gold lock) and click Import.
In the Certificate Import wizard, click Browse to browse to the .pfx certificate file (i.e., mail_yourdomain_com.pfx), select the file, and click Open, and click Next.

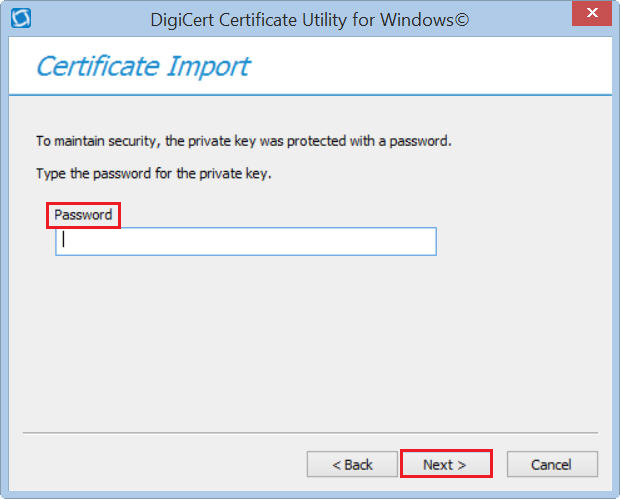
In the Password box, enter the password for the .pfx file and then click Next.
In the Enter a new friendly name or you can accept the default box, type a friendly name for the certificate.
Note: The friendly name is not part of the certificate; instead, it is used to identify the certificate.
We recommend that you add DigiCert and the expiration date to the end of your friendly name, for example: yoursite-digicert-(expiration date). This information helps identify the issuer and expiration date for each certificate. It also helps distinguish multiple certificates with the same domain name.
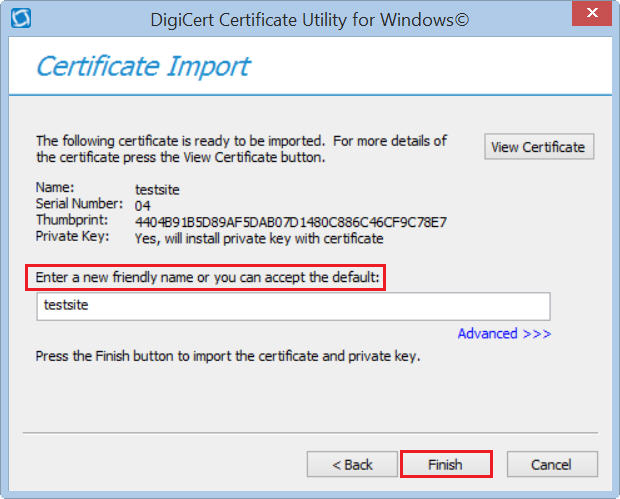
Click Finish to import the SSL Certificate (.pfx file) to your Exchange 2013 server.
You should receive a message that the certificate was successfully imported. You should now see your SSL Certificate in the DigiCert Certificate Utility for Windows©, under SSL Certificates.
You can now assign services to your SSL Certificate in the Exchange Admin Center.
How to Assign Services to Your SSL Certificate in the Exchange Admin Center
Open the Exchange Admin Center (navigate to https://localhost/ecp).
In Exchange Admin Center, in the menu on the left, click Servers, and in the menu at the top of the Servers section, click Certificates.
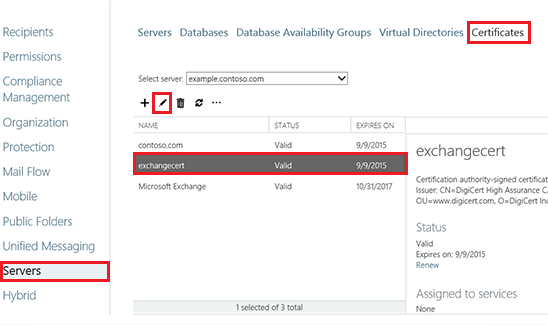
In the Certificates section, select your newly imported certificate (listed by its Friendly Name) and click the Edit symbol (pencil).
On your "Certificates" page, in the menu on the left, click Services.
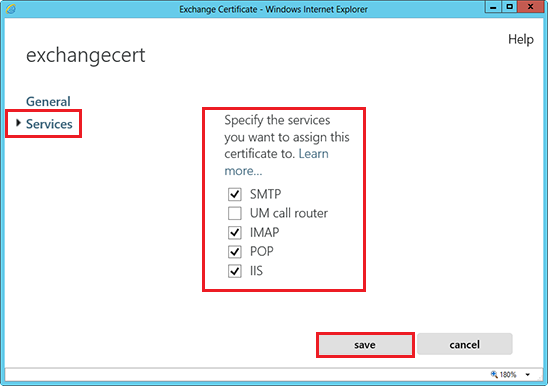
In the Specify the services that you want to assign this certificate section, check the services (i.e., SMTP, IMAP, POP, and IIS ) that you want to enable for your new SSL Certificate and click save.
Your SSL Certificate should now be installed and configured with the services that you selected for use with Exchange 2013.
Test Your Installation
To verify that the installation is correct, use our DigiCert® SSL Installation Diagnostics Tool and enter the DNS name of the site (i.e., www.yourdomain.com, or mail.yourdomain.com) that you are securing to test your SSL Certificate.
Troubleshooting
If you run into certificate errors, try repairing your certificate trust errors using DigiCert® Certificate Utility for Windows. If this does not fix the errors, contact support.
-

The most-trusted global provider of high-assurance TLS/SSL, PKI, IoT and signing solutions.
-
-


-
© 2022-2025, DigiCert, Inc. All rights reserved.
Cookie Settings
