Instructions for SonicWALL SSL VPN devices
If you have not yet created a Certificate Signing Request (CSR) and ordered your certificate, see
Create a CSR on a SonicWALL SSL VPN.
How to Install Your SSL Certificate for SonicWALL SSL VPN
These instructions cover how to install your SSL (server), Intermediate, and Root Certificates. Depending on which SonicWALL SSL VPN appliance you are using, you may need to modify these instructions accordingly.
I. Installing the DigiCert Root and Intermediate Certificate
Because you cannot install the Root and Intermediate Certificates at the same time, install the Root Certificate first, and then repeat the steps to install the Intermediate Certificate.
-
Log into the SonicWALL VPN SSL appliance portal.
-
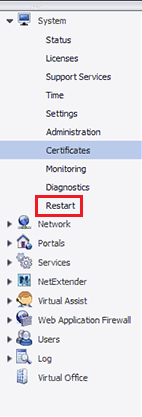
In the portal, expand System and click Certificates.

-
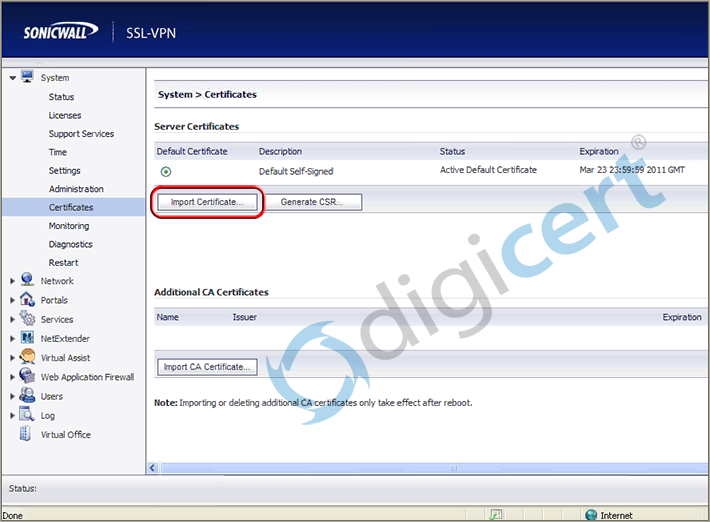
On the System > Certificates page, in the Additional CA Certificates section, click Import CA Certificate.
-
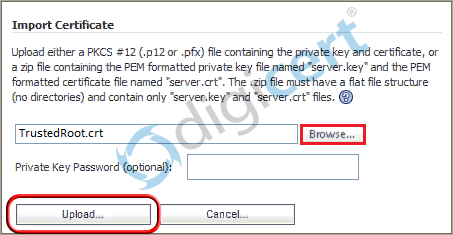
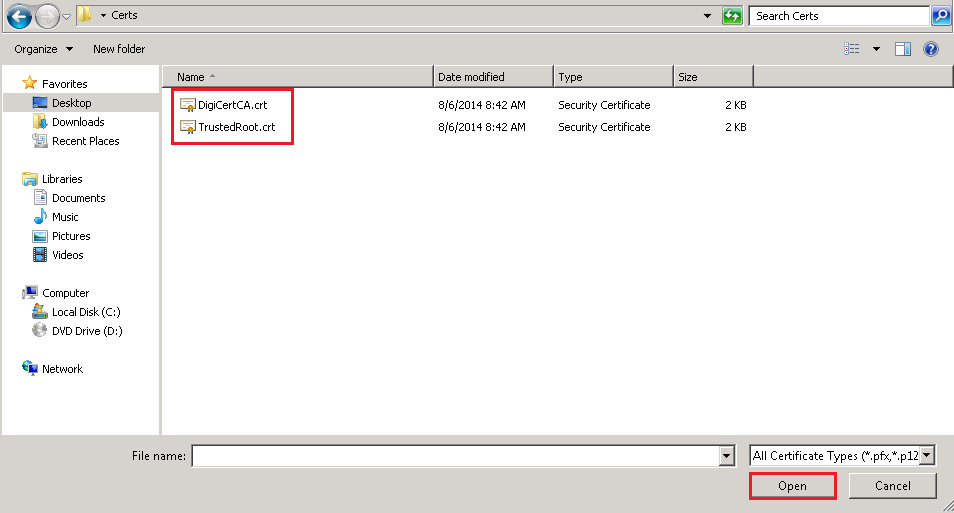
In the Import Certificate window, click Browse to locate and open the DigiCert Root Certificate (TrustedRoot.crt) or the Digicert Intermediate Certificate (DigiCertCA.crt).
-
In the Import Certificate window, click Upload.
After the certificate is imported, it appears in the Additional CA Certificates list on the System > Certificates page.
II. Installing Your SSL Certificate
If you are installing an SSL Certificate corresponding to a pending CSR, use this instruction to install your SSL Certificate.
-
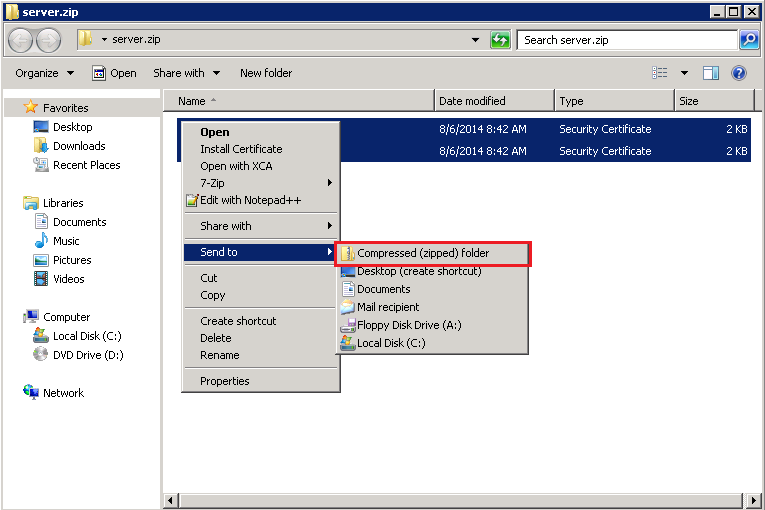
Create your server.zip file.
-
Locate your SSL Certificate .crt file (i.e your_domain_com.crt) that DigiCert sent to you, and rename it server.crt.
-
Take your server.crt file and your server.key file (generated during the creation of your CSR) and combine them into a .zip file named server.zip.
-
An easy way to create the zip file is to copy both files into a specific folder, select both files, right-click on them, and then, click Send to > Compressed Folder.
Note: You may need to provide the password that you created to protect your server.key file during the creation of your CSR.
-
-
Log into the SonicWALL VPN SSL appliance portal.
-
In the portal, expand System and click Certificates.
-
On the System > Certificates page, in the Server Certificates section, click Import Certificate.
-
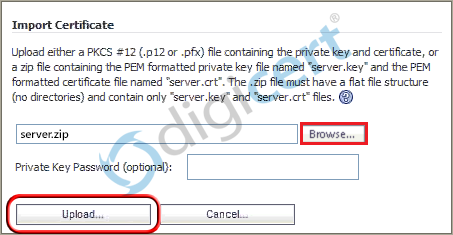
In the Import Certificate window, click Browse to locate and open the server.zip file that you created.
-
In the Import Certificate window, click Upload.
After the certificate is imported, it appears in the Server Certificates list on the System > Certificates page.
-
Configure your SSL Certificate:
-
On the System > Certificates page, in the Server Certificates section, to the right of your SSL Certificate with the pending request, click the Configure icon.
-
When prompted for you password, enter the password that you created to protect your server.key file during the creation of your CSR.
-
Click Submit.
-
-
Implement your changes:
-
On the System > Certificates page, in the Server Certificates section, select the certificate that you want activated.
-
On the top right of the System > Certificates page, click Apply.
-
If you are not prompted to restart your SonicWALL SSL VPN device, restart your device.
To restart your device, expand System and then click Restart.
-
-
You have successfully installed your SSL Certficiate.
SSL Installation Guide for Sonic Wall SSL VPN Devices
Install SSL onto an Sonic Wall VPN