Apache SSL Certificate Installation in Ensim Webppliance
If you have not yet created a Certificate Signing Request (CSR) and ordered your certificate, see
SSL Certificate CSR Creation :: Apache Ensim Server.
Installing the Primary SSL Certificate file (your_domain_name.crt)
-
To begin, save your certificate into the directory for your SSL Certificates. We will use /etc/ssl/crt/ as an example. The public and private key files should be in the same directory already. In the example below, the private key will be private.key. The public key will be labeled yourdomainname.crt. Make this directory readable only by root.
-
Log in to the Administrator console and choose the website you are securing.
-
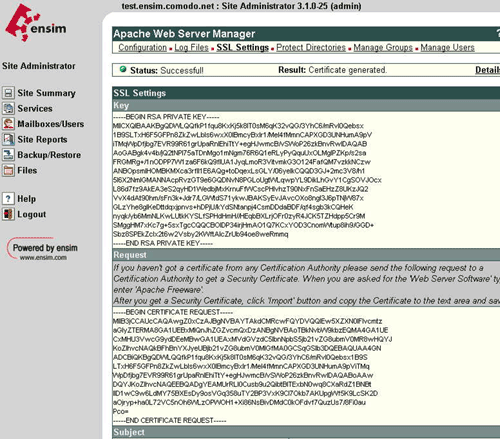
Click on Services, then click on Actions next to Apache Web Server. Now choose SSL Settings. (A 'Self Signed' certificate should already be saved.)
-
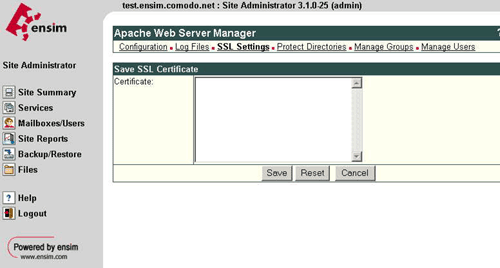
Choose 'Import'. Copy your certificate (including the BEGIN and END tags) into the box shown.
-
Save your certificate, then log out.
Installing the Intermediate Certificate file (DigiCertCA.crt)
Ensim currently does not provide a User Interface (UI) to install an Intermediate Root CA Certificate. This installation will need to be completed directly using SFTP or SSH. The Intermediate certificate must be installed on your server before your certificate will be trusted.
-
Locate the Virtual Site File
-
Locate which Virtual Site File you will edit. To do this, go to the following directory on your Ensim Server.
/etc/httpd/conf/virtual
Example of files you might see under the virtual directory (the number of Site Files depends on how many virtual sites you are hosting on your Ensim Server):
site1
site2
site3
etc... -
Now view each Site File (using an html/text editor) until the Site# File for the site/domain you seek is identified. At that top of the Site Files you will find for example the following information:
<VirtualHost 000.00.00.000:80>
ServerName www.yourdomain.com
-
Once you have identified the Site File you seek please note the number for future reference. You will now edit this same file (see instructions below).
-
-
Edit the Virtual Site File
-
Now you will Edit your Site File by adding the following line below (this line is bolded). Make sure you replace the site# with the actual virtual site number (example: site1)
</Directory>
SetEnv SITE_ROOT /home/virtual/site#/fst
SetEnv SITE_HTMLROOT /home/virtual/site#/fst/var/www/html
Include /etc/httpd/conf/site#SSLEngine on
SSLCertificateFile /home/virtual/site#/fst/etc/httpd/conf/ssl.crt/server.crt
SSLCertificateKeyFile /home/virtual/site#/fst/etc/httpd/conf/ssl.key/server.key
SSLCACertificateFile /home/virtual/site#/fst/etc/httpd/conf/ssl.crt/DigiCertCA.crt</VirtualHost>
< /IfDefine> -
Copy the Intermediate CA Root Certificate file (DigiCertCA.crt) to the directory where your sever certificate has been saved as in the example above:
/home/virtual/site#/fst/etc/httpd/conf/ssl.crt/DigiCertCA.crtAgain you will need to substitute site#
-
Back up your current Site File.
-
Save your edited Site File.
-
-
Restart Apache
Once you have copied/uploaded the Intermediate Root (DigiCertCA.crt) file. You will now restart Apache.
Note: The instructions above are for installing your certificate to a site managed through Ensim. If you wish to install the SSL Certificate to Ensim itself rather than a site managed through Ensim, the host configuration is basically the same, but the host configuration file for the Ensim interface is /usr/lib/opcenter/fastcgi/httpd-templ.conf
Installing your SSL Certificates in Ensim Webppliance for Apache
How to install your SSL Digital Certificate.