These instructions are for Microsoft Active Directory LDAP on a Windows Server 2012/2012R2.
For Microsoft Active Directory LDAP on a Windows Server 2008/2008R2 instructions, see
Microsoft Active Directory LDAP (2008): SSL Certificate Installation.
If you have not yet created a Certificate Signing Request (CSR) and ordered your certificate, see Microsoft Active Directory LDAP (2012): SSL Certificate CSR Creation.
Microsoft Active Directory LDAP (2012): Installing Your SSL Certificate
To install the SSL Certificate on your Microsoft Active Directory LDAP server, complete the steps below.
-
Import your SSL Certificate to your LDAP server (2012) using the DigiCert® Certificate Utility for Windows.
Importing a SSL Certificate Using the DigiCert Certificate Utility
-
Export the SSL Certificate in a .pfx format using the DigiCert® Certificate Utility for Windows.
Exporting a SSL Certificate in .pfx format Using the DigiCert Certificate Utility
-
Install the SSL Certificate .pfx file into the Active Directory Domain Services Personal Store (2012).
Microsoft AD LDAP (2012): Importing Your Certificate .pfx File into the AD DS Personal Store
Importing a SSL Certificate Using the DigiCert Certificate Utility
After we validate and issue your SSL Certificate, you can use the DigiCert® Certificate Utility for Windows to import the file to your Microsoft Active Directory LDAP server.
-
On your Windows 20012/2012 R2 LDAP Server where you created the CSR, save the SSL Certificate .cer file (i.e. your_domain_com.cer) that DigiCert sent to you.
-
Run the DigiCert® Certificate Utility for Windows.
Double-click DigiCertUtil.
-
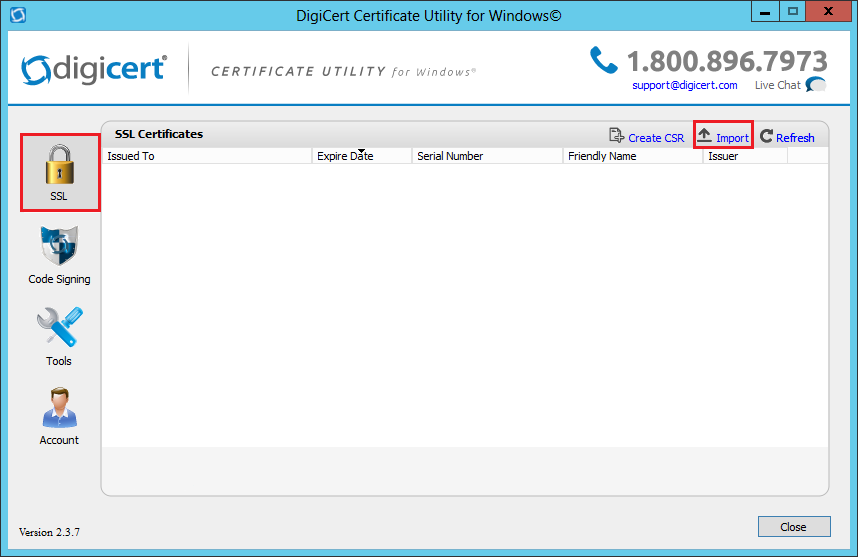
In DigiCert Certificate Utility for Windows©, click SSL (gold lock) and then, click Import.
-
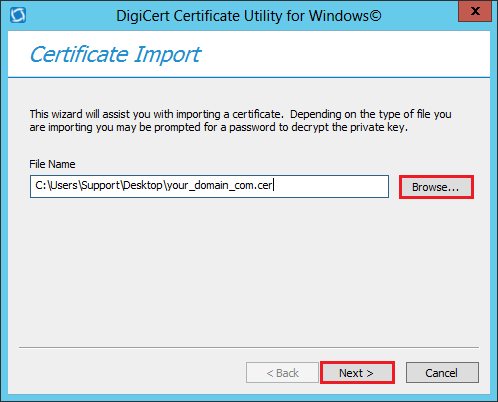
In the Certificate Import window, under File Name, click Browse to browse to the .cer (i.e. your_domain_com.cer) certificate file that DigiCert sent you, select the file, click Open, and then, click Next.
-
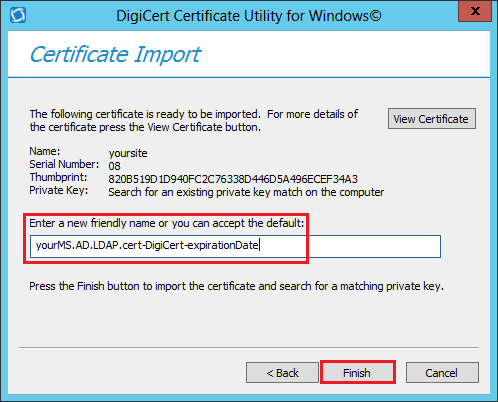
In the Enter a new friendly name or you can accept the default box, enter a friendly name for the certificate. The friendly name is not part of the certificate; instead, it is used to identify the certificate.
We recommend that you add DigiCert and the expiration date to the end of your friendly name, for example: yoursite-DigiCert-expirationDate. This information helps identify the issuer and expiration date for each certificate. It also helps distinguish multiple certificates with the same domain name.
-
Click Finish.
Exporting a SSL Certificate in .pfx Format Using the DigiCert Certificate Utility
After you import the SSL Certificate to your Microsoft AD LDAP server, use the DigiCert® Certificate Utility for Windows to export the SSL Certificate as a .pfx file.
-
Run the DigiCert® Certificate Utility for Windows.
Double-click DigiCertUtil.
-
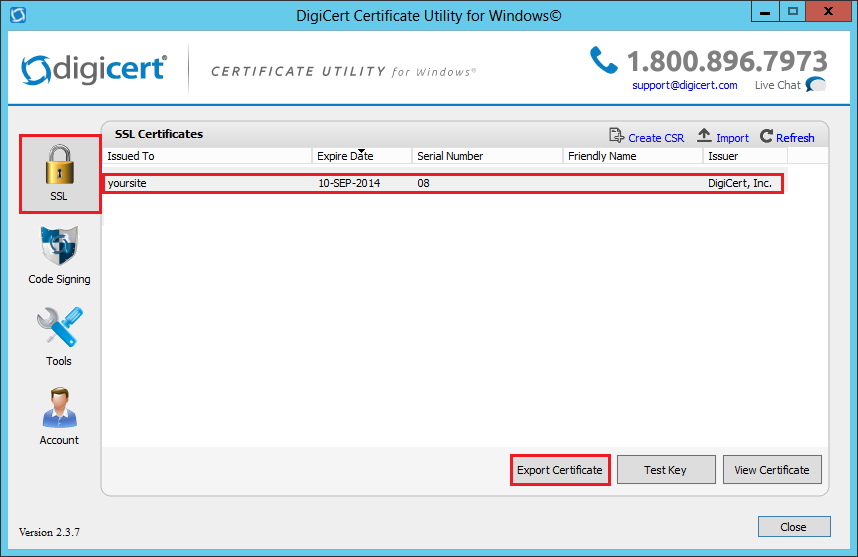
In DigiCert Certificate Utility for Windows©, click SSL (gold lock), select the SSL Certificate you want to export, and then, click Export Certificate.
-
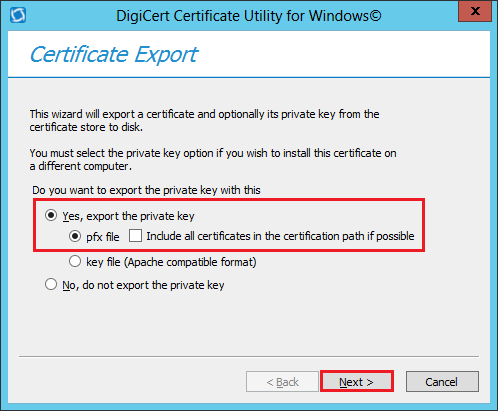
In the Certificate Export wizard, select Yes, export the private key, select pfx file, uncheck Include all certificates in the certification path if possible, and then, click Next.
-
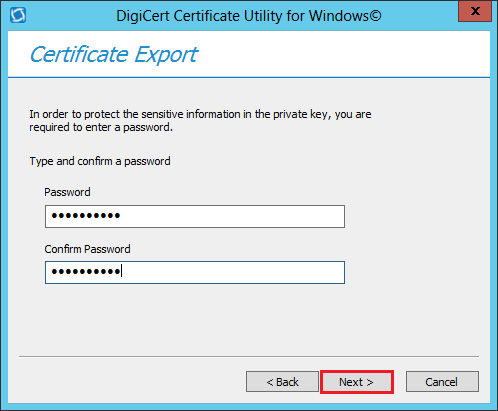
In the Password and Confirm Password boxes, enter and confirm your password, and then, click Next.
Note: You use this password when importing the SSL Certificate onto other Windows type servers or other servers or devices that accept a .pfx file.
-
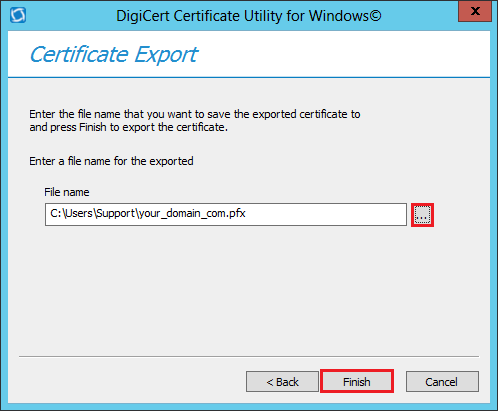
In the File name box, click … to browse for and select the location and file name where you want to save the .pfx file, and then, click Finish.
-
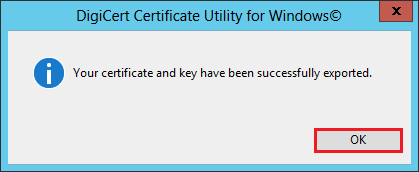
After you receive the "Your certificate and key have been successfully exported" message, click OK.
You have successfully exported your SSL Certificate as a .pfx file.
Microsoft AD LDAP (2012): Importing Your Certificate .pfx File into the AD DS Personal Store
Once you have your .pfx certificate file, use Microsoft Management Console (MMC) to import it into the Active Directory Domain Services Personal Store.
Importing the .pfx Certificate File
-
Open the Microsoft Management Console (MMC) as an admin.
-
From the Windows Start screen, type mmc.
-
Right-click on mmc.exe.
-
In the menu at the bottom of the screen, click Run as administrator.
-
-
In the User Account Control window, click Yes to allow the program to make changes to the computer.
-
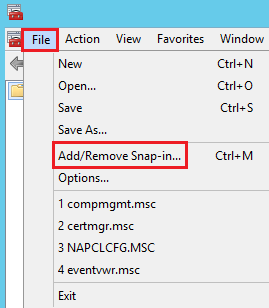
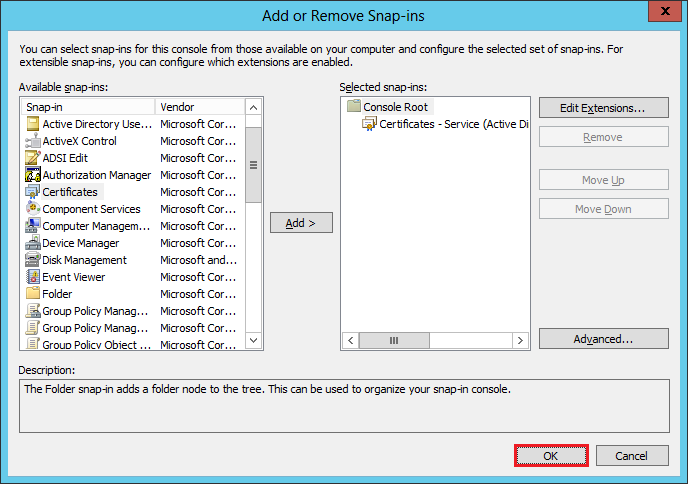
In the MMC Console, click File > Add/Remove Snap-in.
-
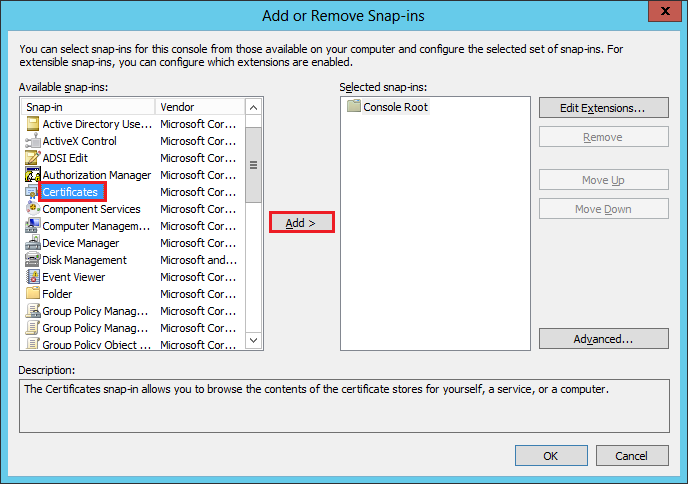
In the Add or Remove Snap-ins window, under Available snap-ins, select Certificates and then, click Add.
-
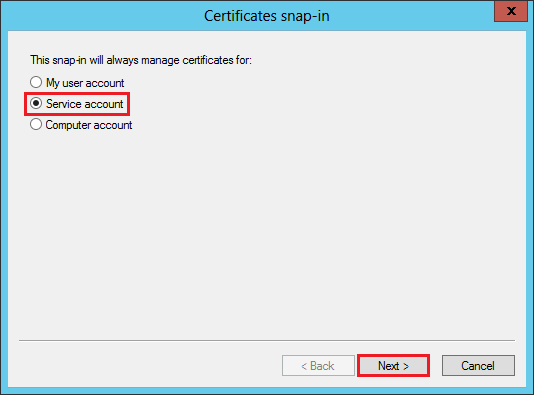
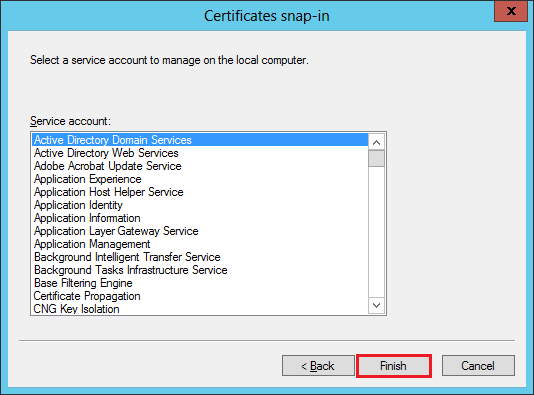
In the Certificates snap-in window, select Service account and then, click Next.
-
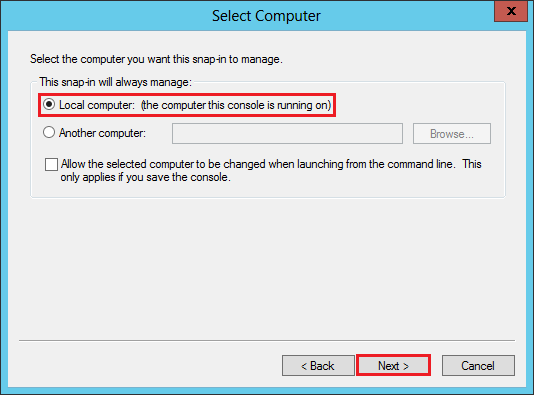
In the Select Computer window, select Local computer: (the computer this console is running on) and then, click Next.
-
In the Certificates snap-in window, select Active Directory Domain Services and then, click Finish.
-
In the Add or Remove snap-ins window, click OK.
-
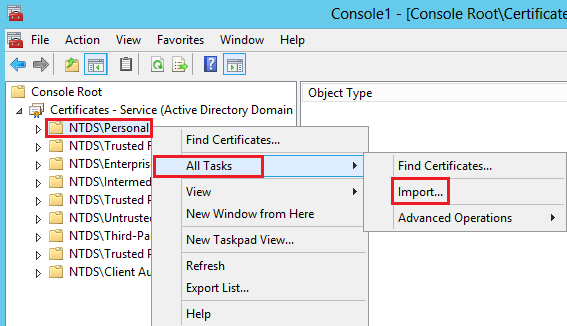
In the MMC Console, in the console tree, expand Certificates - Service (Active Directory Domain Services), right-click on NTDS/Personal, and select Import.
-
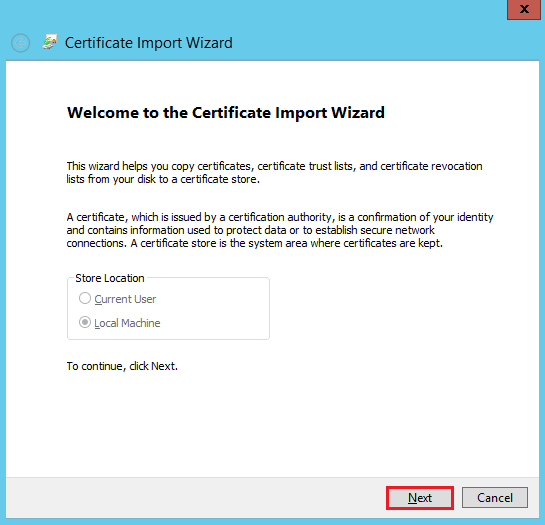
In the Certificate Import Wizard, on the Welcome to the Certificate Import page, click Next.
-
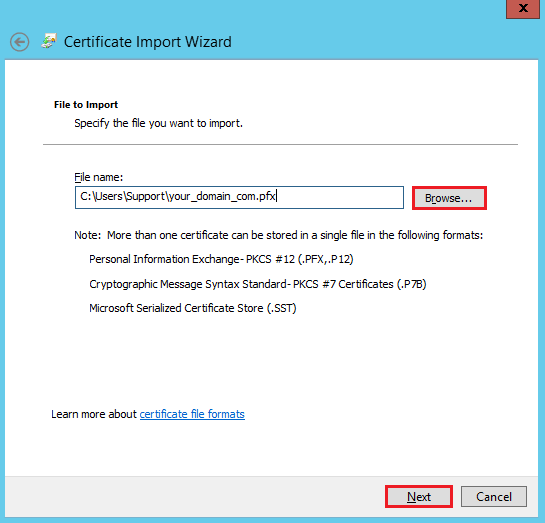
On the File to Import page, click Browse to browse for and select the .pfx certificate file (e.g. your_domain_com.pfx) that you exported using the DigiCert Certificate Utility, select the file, click Open, and then, click Next.
-
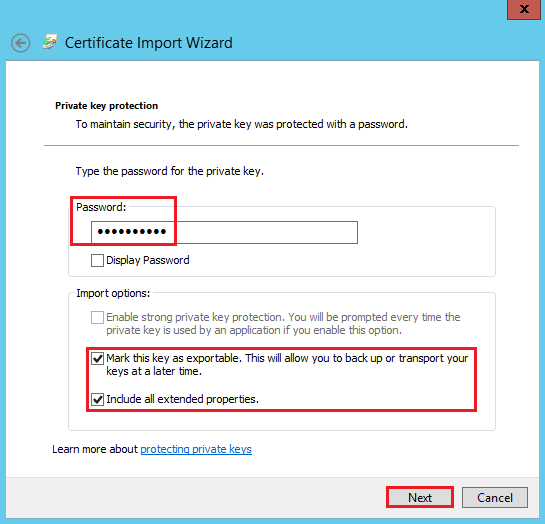
On the Password page, do the following:
-
In the Password box, enter the password that you created when you exported the .pfx certificate file.
-
Check Include all extended properties.
-
Check Mark this key as exportable.
-
Click Next.
-
-
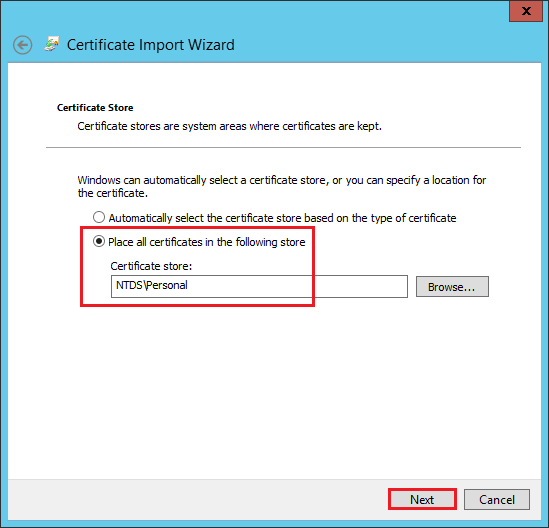
On the Certificate Store page, leave the default settings and click Next.
Default Settings:
-
Place all certificates in the following store.
-
Certificate store: NTDS\Personal
-
-
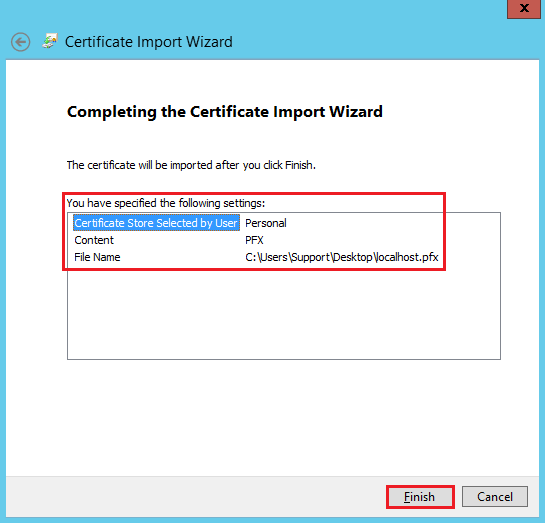
On the Completing the Certificate Import page, review your settings and then, click Finish.
-
All your client computers should now be able to make SSL connections to all your domain controllers in the forest.
Verify SSL Was Successfully Configured
-
Open the LDP snap-in as and admin.
-
From the Windows Start screen, type ldp.
-
Right-click on ldp.exe.
-
In the menu at the bottom of the screen, click Run as administrator.
-
-
In the User Account Control window, click Yes to allow the program to make changes to the computer.
-
In Ldp, click Connection > Connect.
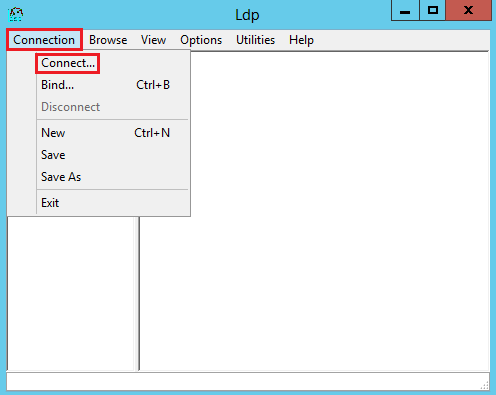
-
In the Connect window, do the following:
-
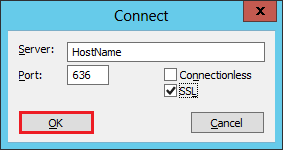
In the Server box, enter the hostname of to which you are connecting.
-
In the Port box, enter 636.
-
Check SSL.
-
Uncheck Connectionless.
-
Click OK.
-
-
The command output should display the user name and the domain name for the binding.
-
If you receive the Cannot open connection message, LDAP-over-SSL binding is not configured properly.
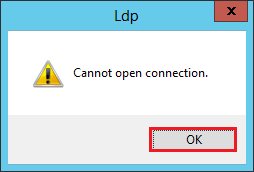
-
Click OK.
-
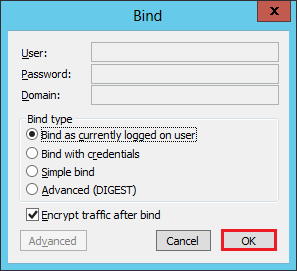
Next, in LDP, click Connection > Bind.
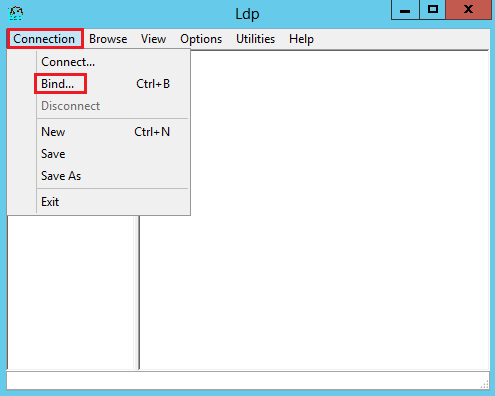
-
In the Bind window, click OK.
-
The command output should now display the user name and the domain name for the binding.