Export a copy of your SSL certificate w/private key from any Microsoft server and
import and configure it on your (different) Windows Server 2016
To transfer a copy of an SSL certificate from any Microsoft server to your (different) Windows server 2016, you must first export a copy of the SSL certificate and its private key as a .pfx file from the server on which the certificate is installed. Then, you can transfer that .pfx file to your (different) Windows server 2016 and configure the server to use the certificate.
To simplify the export/import process, we recommend using the DigiCert® Certificate Utility for Windows.
To transfer a copy of an SSL certificate, do the following:
-
Use the DigiCert Certificate Utility to export the SSL certificate with private key as .pfx file from the Microsoft server where it’s installed.
How to Export Your SSL Certificate w/Private Key Using the DigiCert Certificate Utility
-
Use the DigiCert Certificate Utility to import the SSL certificate/private key .pfx file to your (different) Windows server 2016.
How to Import the SSL Certificate w/Private Key .pfx File Using the DigiCert Certificate Utility
-
Use IIS 10 to configure your Windows server 2016 to use the SSL certificate.
How to Configure Your Windows Server 2016 to Use the Imported SSL Certificate Using IIS 10
I. How to Export Your SSL Certificate w/Private Key Using the DigiCert Certificate Utility
Microsoft servers use .pfx files that contain the public key file (SSL certificate file) and the associated private key file. A CA provides your SSL certificate file (public key file). Your server generates the associated private key file as part of the CSR.
When transferring an SSL certificate from one Microsoft server to another, you must first export the certificate with its private key as a .pfx file from the server on which its installed.
-
On the Microsoft server where the SSL certificate is installed, download and save the DigiCert® Certificate Utility for Windows executable (DigiCertUtil.exe).
-
As an administrator, run the DigiCert® Certificate Utility for Windows.
Right-click DigiCertUtil and select Run as administrator.
-
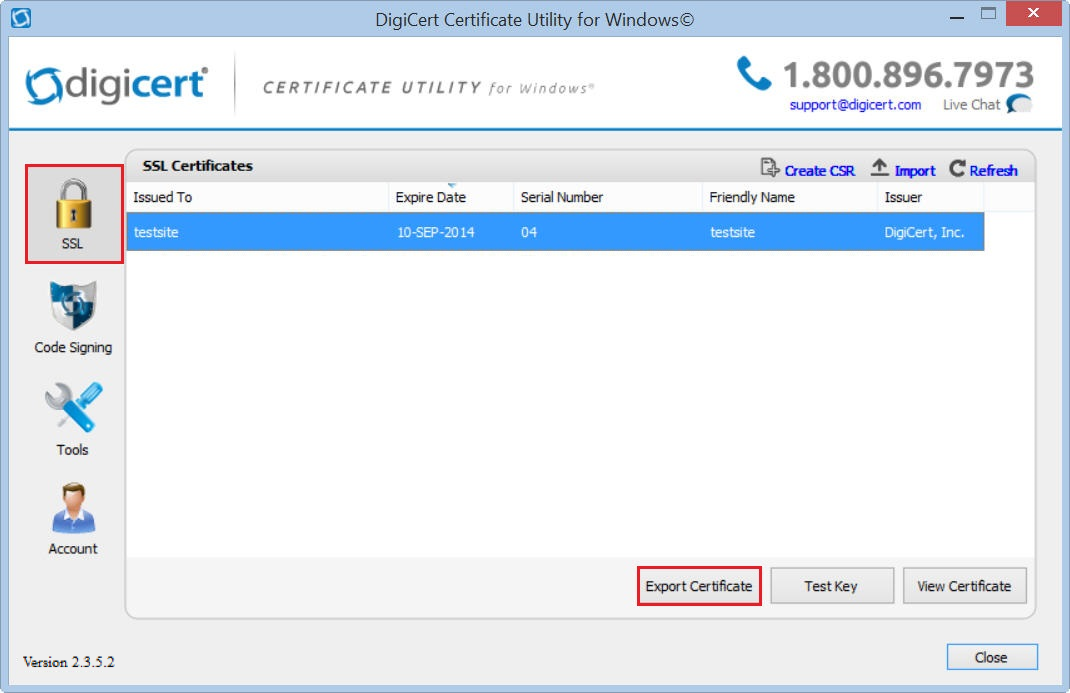
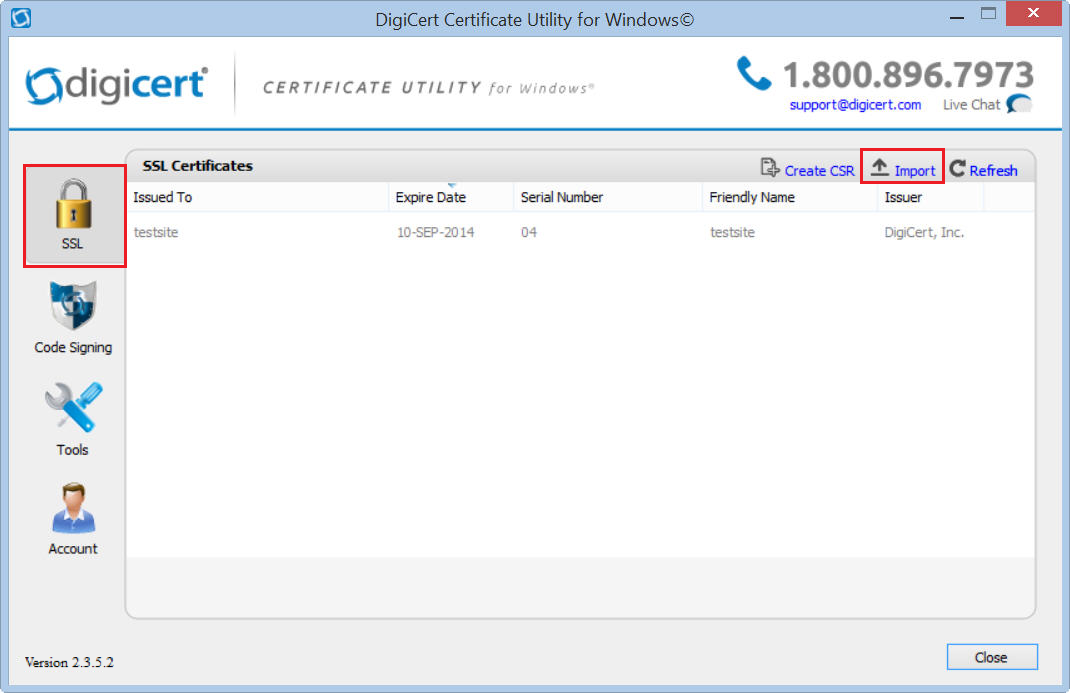
In the DigiCert Certificate Utility for Windows©, click SSL (gold lock), select the certificate that you want to export as a .pfx file, and then click Export Certificate.
-
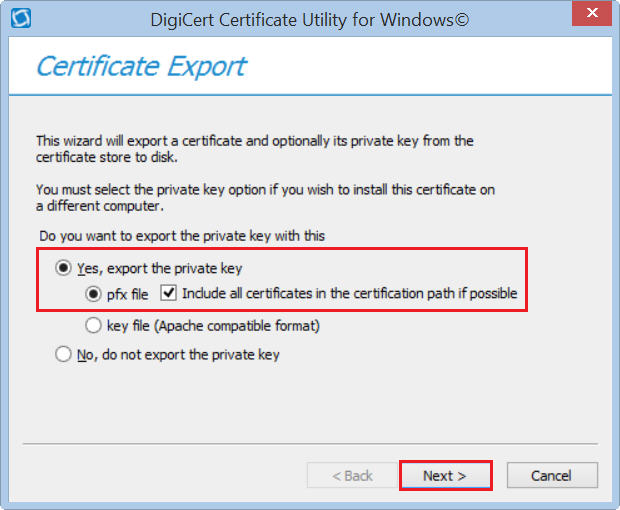
In the Certificate Export wizard, select Yes, export the private key, select .pfx file, then check Include all certificates in the certification path if possible, and finally, click Next.
Note: You must export the SSL certificate along with its private key as .pfx file. If you don't include the private key in the SSL certificate .pfx file, you will have problems when trying to install it on a different server. A .pfx file uses the same format as a .p12 or PKCS12 file.
-
In the Password and Confirm Password boxes, create and confirm your password, and then click Next.
Note: This password is used when you import this SSL certificate onto a different Microsoft server or another server or device that accepts certificate .pfx files.

-
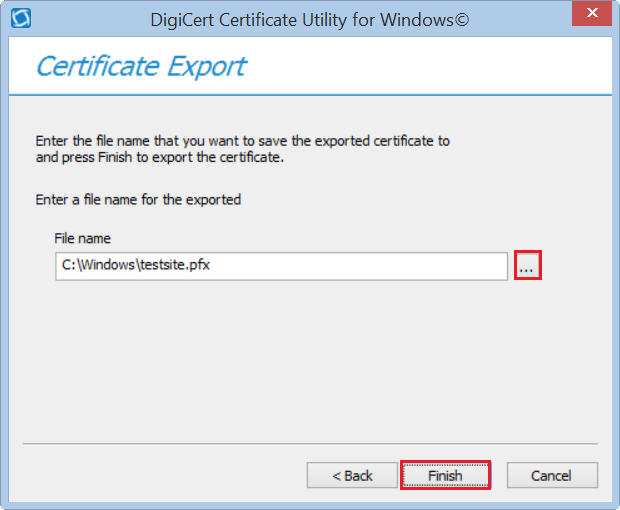
In the File name box, click …, browse to and select the location where you want to save the .pfx file, provide a file name (e.g., your_domain_com.pfx), click Save, and then click Finish.
-
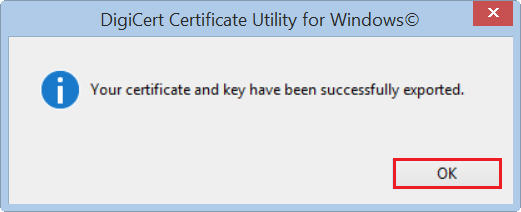
After receiving the "Your certificate and key have been successfully exported" message, click OK.
II. How to Import Your SSL Certificate w/Private Key .pfx File Using the DigiCert Certificate Utility
If you have not yet exported the SSL certificate and its private key as a .pfx file from the server on which the certificate is installed, see How to Export Your SSL Certificate w/Private Key Using the DigiCert Certificate Utility.
Microsoft Certificate Store
When you use the DigiCert® Certificate Utility for Windows to import/install your SSL certificates on your Windows server 2016, the utility places the certificates in the Personal store instead of the Web Hosting store. If you have less then 20 to 30 certificates, this will not be a problem.
However, if you are managing 30 or more certificates, you will need to move your certificates to the Web Hosting store, which was designed to scale to a greater number of certificates. See Move a Certificate from the Personal Store to the Web Hosting Certificate Store.
Using the DigiCert Utility to Importing the Certificate .pfx file
-
On the Windows server 2016 you want to install the SSL certificate on, download and save the DigiCert® Certificate Utility for Windows executable (DigiCertUtil.exe).
-
Run the DigiCert® Certificate Utility for Windows.
Double-click DigiCertUtil.
-
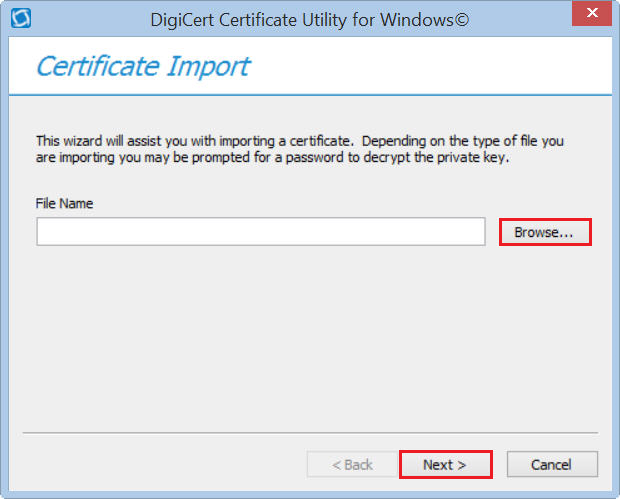
In DigiCert Certificate Utility for Windows©, click SSL (gold lock) and then, click Import.
-
In the Certificate Import wizard, click Browse, browse to the .pfx certificate file (e.g., your_domain_com.pfx), select the file, click Open, and then, click Next.
-
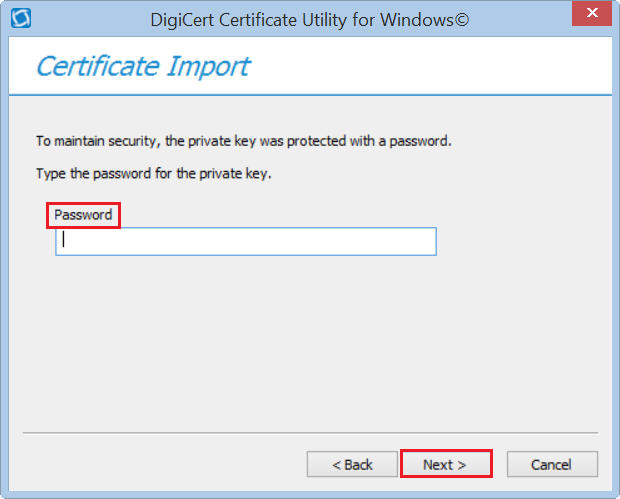
In the Password box, type the password for the .pfx file and then click Next.
-
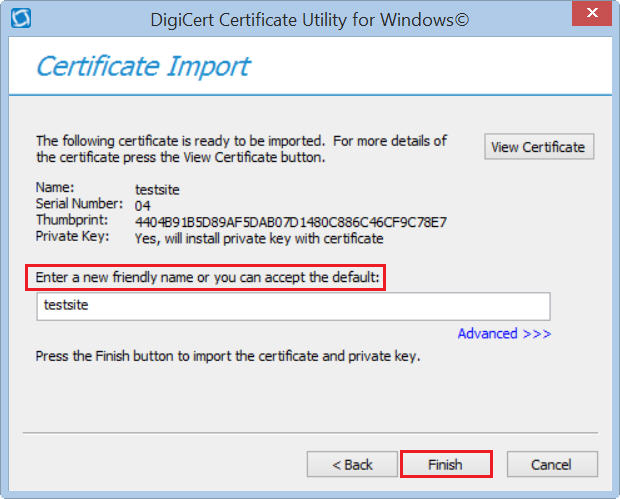
In the Enter a new friendly name or you can accept the default box, type a friendly name for the certificate.
Note: The friendly name is not part of the certificate; instead, it is used to identify the certificate.
We recommend that you add DigiCert and the expiration date to the end of your friendly name, for example: yoursite-digicert-(expiration date). This information helps identify the issuer and expiration date for each certificate. It also helps distinguish multiple certificates with the same domain name.
-
To import the SSL certificate (.pfx file) to your Windows server 2016, click Finish.
You should receive a message that the certificate was successfully imported. You should now see your SSL certificate in the DigiCert Certificate Utility for Windows© under SSL Certificates.
-
Now, you can configure the Windows server 2016 to use the imported SSL certificate.
Note: If you are managing 30 or more certificates, you will need to move your certificate to the Web Hosting store. See Move a Certificate from the Personal Store to the Web Hosting Certificate Store.
III. How to Configure the Windows Server 2016 to Use the Imported SSL Certificate Using IIS 10
If you have not yet installed the certificate .pfx file on your (different) Windows server 2016, see How to Import the SSL Certificate w/Private Key .pfx File Using the DigiCert Certificate Utility.
After you've installed the SSL certificate on your Windows server 2016, you must use IIS 10 to assign the SSL certificate to secure your website.
- (Single Certificate) How to configure the Windows server 2016 to use your SSL certificate
- (Multiple Certificates) How to assign your SSL certificates and configure the Windows server 2016 to use them using SNI
(Single Certificate) How to configure the Windows server 2016 to use your SSL certificate
-
On the Windows Server 2016 where you imported your SSL certificate with the DigiCert Certificate Utility, open Internet Information Services (IIS) Manager.
In the Windows start menu, type Internet Information Services (IIS) Manager and open it.
-
In Internet Information Services (IIS) Manager, in the Connections menu tree (left pane), expand the name of the server on which the certificate was installed. Then, expand Sites and select the site you want to use the SSL certificate to secure.
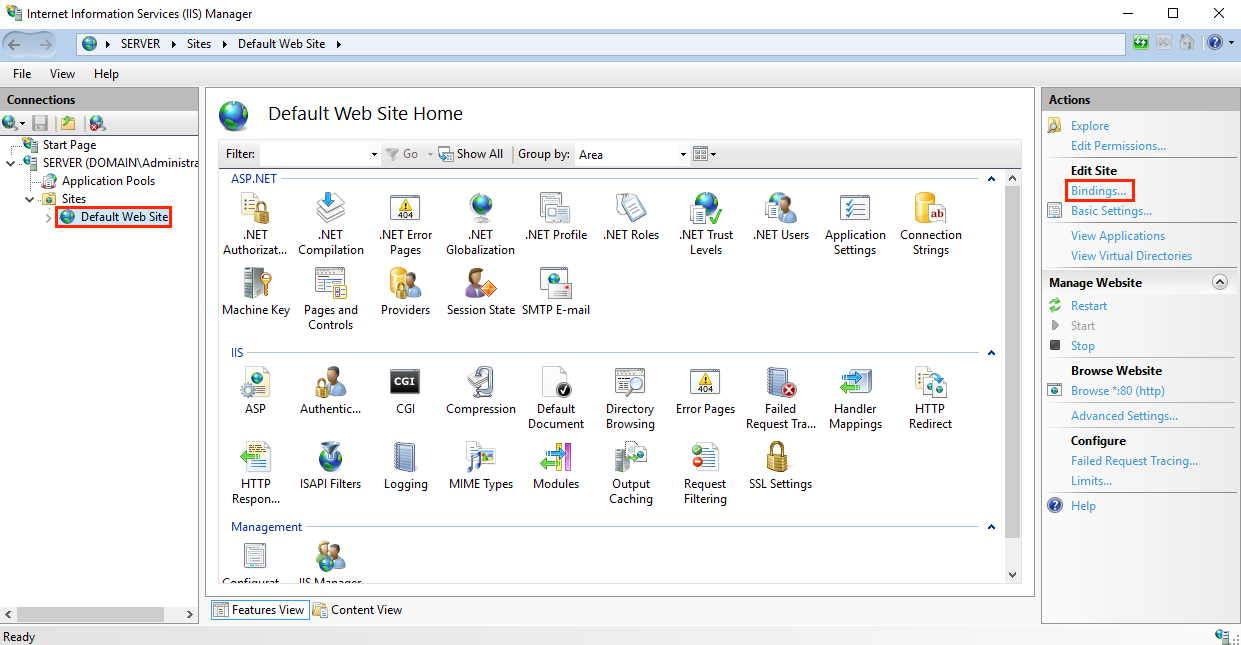
-
On the website Home page, in the Actions menu (right pane), under Edit Site, click the Bindings… link.
-
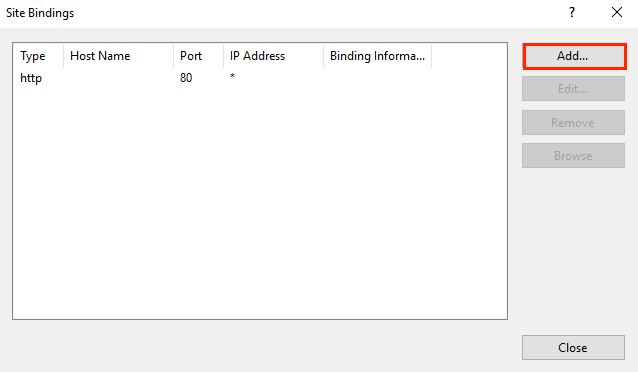
In the Site Bindings window, click Add.
-
In the Add Site Binding window, do the following and then click OK:
Type In the drop-down list, select https. IP address In the drop-down list, select the IP address of the site or select All Unassigned. Port Type port 443. The port over which traffic is secured by SSL is port 443. SSL certificate In the drop-down list, select the recently imported SSL certificate by its friendly name (e.g., yourdomain.com). 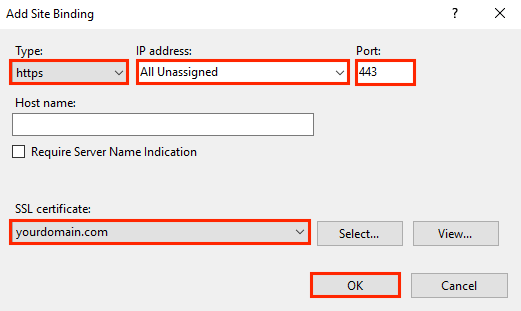
-
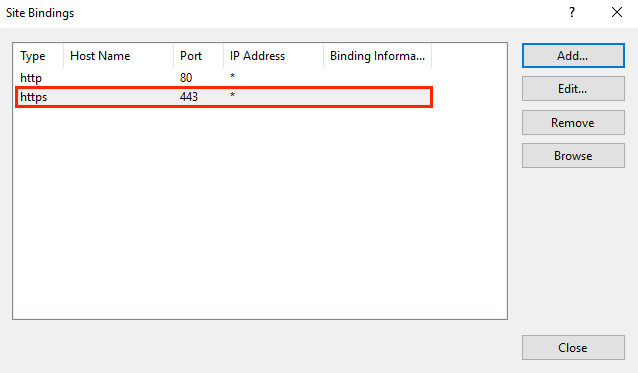
Your SSL certificate is now assigned, and the website configured to accept secure connections.
(Multiple Certificates) How to assign your SSL certificates and configure the Windows server 2016 to use them using SNI
If you have not imported all your SSL certificates to your (different) Windows server 2016, see How to Import the SSL Certificate w/Private Key .pfx File Using the DigiCert Certificate Utility.
This instruction explains how to assign multiple SSL certificates using SNI. The process is split into two parts as follows:
Assign the First SSL Certificate
Do this first set of instructions only once, for the first SSL certificate.
-
On the Windows Server 2016 where you imported your SSL certificates with the DigiCert Certificate Utility, open Internet Information Services (IIS) Manager.
In the Windows start menu, type Internet Information Services (IIS) Manager and open it.
-
In Internet Information Services (IIS) Manager, in the Connections menu tree (left pane), expand the name of the server on which the certificate was installed. Then expand Sites and click the site you want to use the SSL certificate to secure.
-
On the website Home page, in the Actions menu (right pane), under Edit Site, click the Bindings… link.
-
In the Site Bindings window, click Add.
-
In the Add Site Bindings window, do the following and then click OK:
Type: In the drop-down list, select https. IP address: In the drop-down list, select the IP address of the site or select All Unassigned. Port: Type port 443. The port over which traffic is secured by SSL is port 443. SSL certificate: In the drop-down list, select your new SSL certificate (e.g., yourdomain.com).
-
Your first SSL certificate is now assigned, and the website configured to accept secure connections.
Assign All Additional SSL Certificates
To assign each additional SSL certificate, repeat the steps below, as needed.
-
In Internet Information Services (IIS) Manager, in the Connections menu tree (left pane), expand the name of the server on which the certificate was installed. Then expand Sites and click the site you want to use the SSL certificate to secure.
-
On the website Home page, in the Actions menu (right pane), under Edit Site, click the Bindings… link.
-
In the Site Bindings window, click Add.
-
In the Add Site Bindings window, do the following and then click OK:
Type: In the drop-down list, select https. IP address: In the drop-down list, select the IP address of the site or select All Unassigned. Port: Type port 443. The port over which traffic is secured by SSL is port 443. Host name: Type the host name that you want to secure. Require Server After you enter the host name, check this box. Name Indication: This is required for all additional certificates/sites, after you've installed the first certificate and secured the primary site. SSL certificate: In the drop-down list, select an additional SSL certificate (e.g., yourdomain2.com). 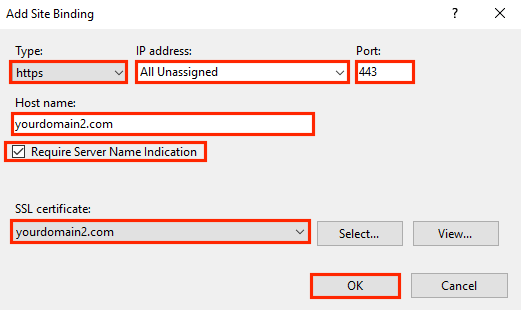
-
You have successfully assigned another SSL certificate and configured the website to accept secure connections.
Test Your Installation
To verify that the installation is correct, use our DigiCert® SSL Installation Diagnostics Tool and enter the DNS name of the site (i.e. www.yourdomain.com, or mail.yourdomain.com) that you are securing to test your SSL Certificate.
Troubleshooting
If you run into certificate errors, try repairing your certificate trust errors using DigiCert® Certificate Utility for Windows. If this does not fix the errors contact support.