![]()
Use these instructions to create your CSR (certificate signing request) and then, to install your SSL and intermediate certificates.
-
To create your CSR, see Citrix NetScaler VPX: Create Your CSR (Certificate Signing Request).
-
To install your SSL Certificate, see Citrix NetScaler VPX: Install Your SSL Certificate.
If you are looking for a simpler way to create CSRs and install and manage your SSL Certificates, we recommend that you use the DigiCert® Certificate Utility for Windows. If you have a Microsoft server or workstation, you can use the DigiCert® Certificate Utility for Windows to generate your CSR and more. See NetScaler: Create CSR & Install SSL Certificate (DigiCert Utility).
These instructions were created using Citrix NetScaler 10.1 VPX (50). Depending on which version of Citrix NetScaler VPX you are using, you may need to modify these instructions accordingly. For example, in these instructions, the SSL node is a sublevel node to the top level Traffic Management node. In some situations, the SSL node is a top level node.
These instructions may be applicable to the following versions of Citrix NetScaler VPX (10, 50, 200, 1000, and 3000):
- Citrix NetScaler 10.5+ VPX
- Citrix NetScaler 10.1+ VPX
- Citrix NetScaler 10.0+ VPX
- Citrix NetScaler 9.3+ VPX
1. Citrix NetScaler VPX: Create Your CSR (Certificate Signing Request)
To generate a CSR (certificate signing request), you must first create an RSA key (Rivest, Shamir, and Adleman). Once the RSA key is created, you can generate your CSR (certificate signing request).
i. NetScaler VPX: How to Create an RSA Key
You need to create an RSA Key before you can create your CSR.
-
Log into your NetScaler device console.
-
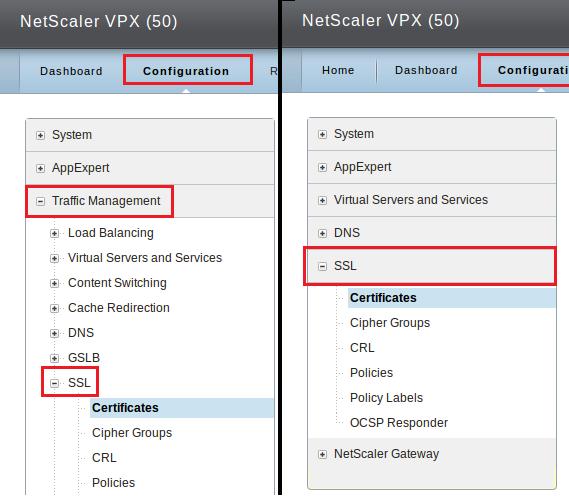
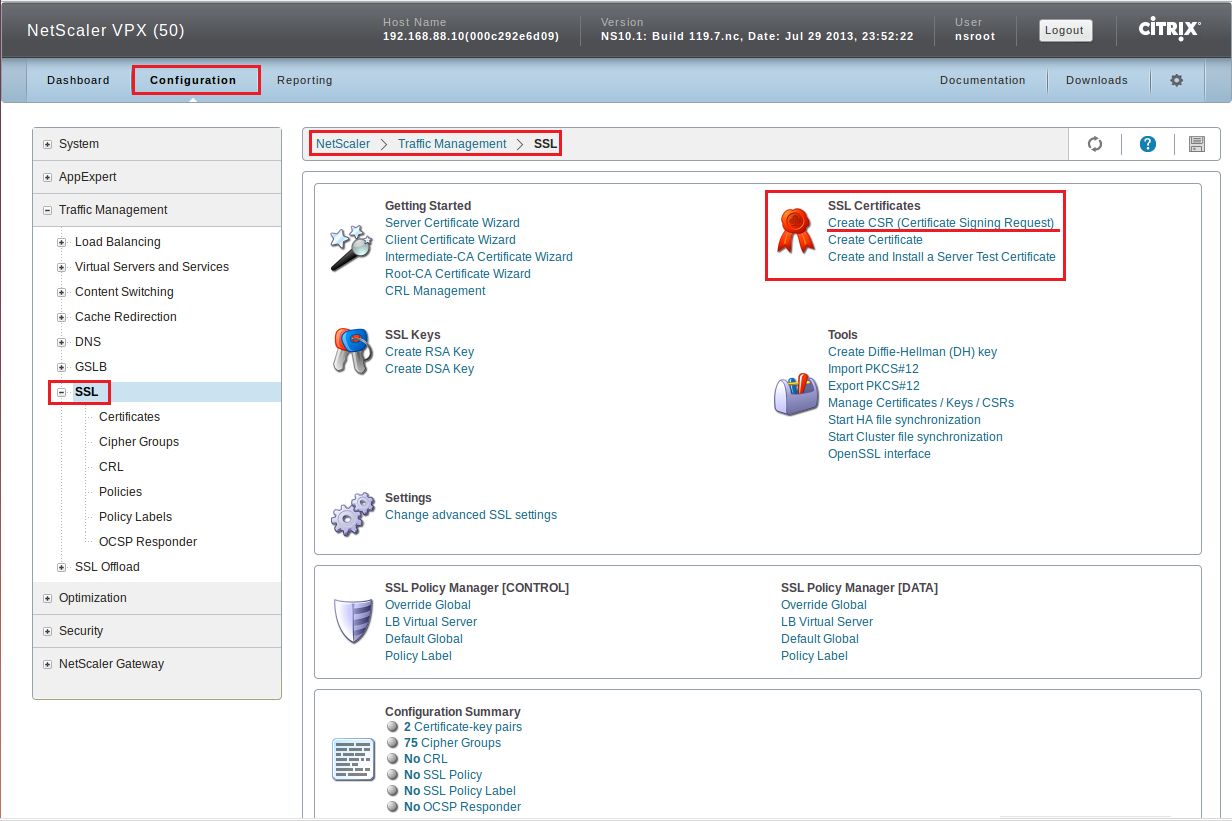
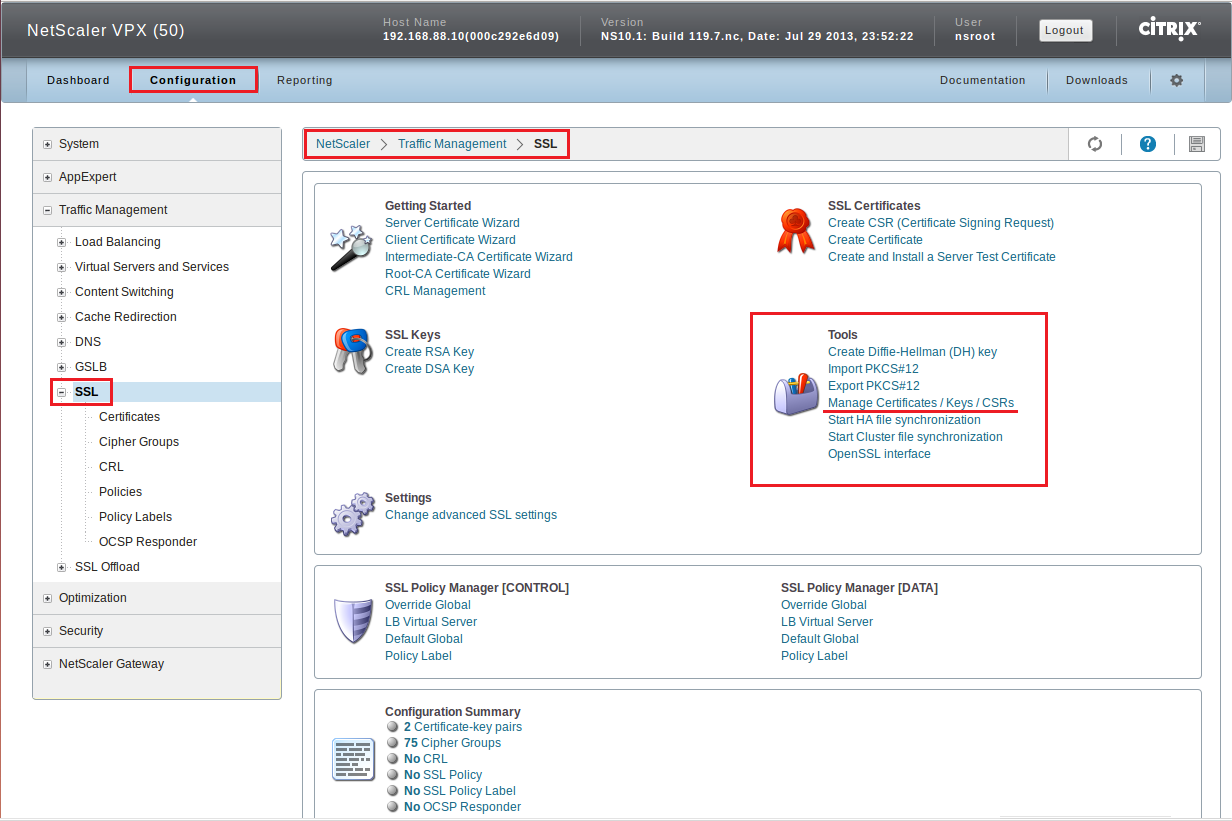
In the NetScaler console, on the Configuration tab, in the tree menu, expand Traffic Management and then click SSL.

-
On the NetScaler > Traffic Management > SSL page, under SSL Keys, click Create RSA Key.
-
In the Create RSA Key window, enter the following RSA key information:
Key Filename* Create a name for your file in which the RSA key is stored, making sure to take note of the name (i.e. example.key). Key Size(bits)* Enter 2048. Public Exponent Value* In the drop-down list, select 3 (Hex: 0x3) or F4 (Hex: 0x10001). If you do not have a preference, use the default value. This value is part of the cipher algorithm which is required to create your RSA key. Key Format* In the drop-down list, select PEM. PEM is the recommended format for your SSL Certificate. PEM Encoding Algorithm (Optional) In the drop-down list, select the algorithm (DES or DES3) that you want to use to encrypt the generated. RSK key. If you leave this box blank, you are not required to enter a passphrase. PEM Passphrase (Optional) Enter a passphrase used for encryption, making sure to take note of it for use later. If you left the PEM Encoding Algorithm box blank, you cannot enter a passphrase. Confirm PEM Passphrase (Optional) Enter your passphrase again. If you left the PEM Encoding Algorithm box blank, you cannot confirm a passphrase. 
-
When you are finished, click OK and then click Close. Proceed to creating your CSR.
ii. NetScaler VPX: How to Create Your CSR
After creating an RSA key, you are ready to create your CSR and submit it to a trusted CA (like DigiCert) and order your SSL Certificate.
-
In the NetScaler console, on the Configuration tab, in the tree menu, expand Traffic Management and then click SSL.
-
On the NetScaler > Traffic Management > SSL page, under SSL Certificates, click Create CSR (Certificate Signing Request).
-
In the Create CSR (Certificate Signing Request) window, enter the following information:
Request File Name* Create a request file name (i.e. example.csr). Key Filename* i. In the Browse drop-down list, select Appliance. ii. Click Browse to browse to and select your RSA key file you created earlier (i.e. example.key). iii. Click Select and then click Open. Key Format Select PEM. PEM is the recommended format for your SSL Certificate. Key Format* In the drop-down list, select PEM. PEM is the recommended format for your SSL Certificate. PEM Passphrase (Optional) Enter your passphrase. If you left the PEM Encoding Algorithm box blank when you created your RSA key, (For Encrypted Key) you are not required to enter a passphrase. 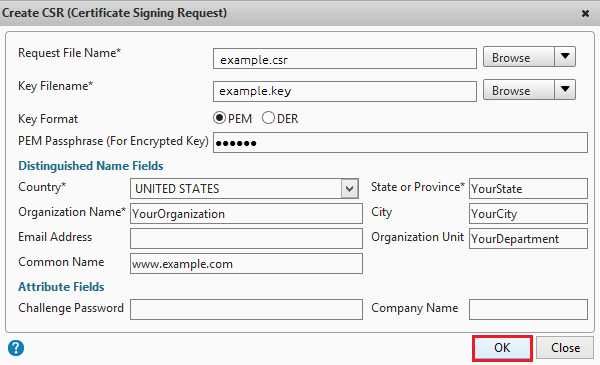
-
In the Distinguished Name Fields section, enter the following certificate information:
Country* In the drop-down list, select the country where your company is legally located. State or Province* Enter the state or providence where your company is legally located. Organization Name** Enter your company’s legally registered name (i.e. YourCompany, Inc.). City Enter the city where your company is legally located. Email Address (Optional) Unless you have reason for providing an email address, you can leave this box blank. Organization Unit (Optional) Enter the department within your organization that you want to appear on the SSL Certificate. Common Name Enter the name to be used to access the certificate. This name is usually the fully qualified domain name (FQDN). For example, www.yourdomain.com or yourdomain.com -
In the Attribute Fields section, enter the following information:
Challenge Password Enter a password, making sure to take note of it for use later during certificate installation. Company Name (Optional) Enter your company name (i.e. YourCompany). -
When you are finished, click OK and then Close.
-
In the NetScaler console, on the Configuration tab, in the tree menu, expand Traffic Management and then click SSL.

-
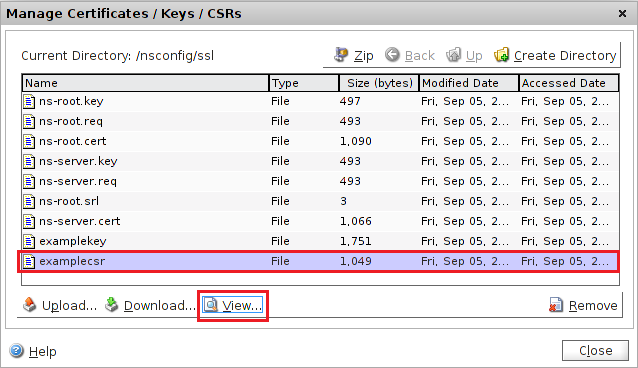
On the NetScaler > Traffic Management > SSL page, under Tools, click Manage Certificates / Keys / CSRs.
-
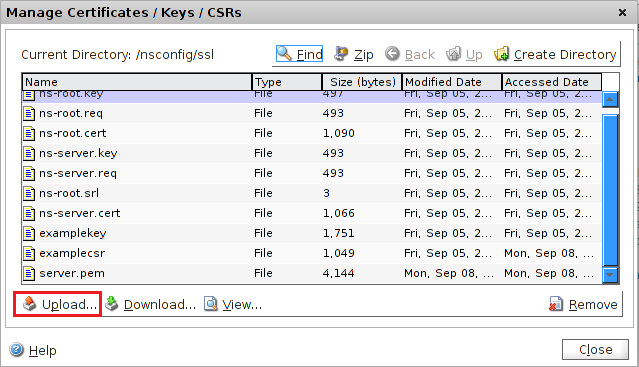
In the Manage Certificates / Keys / CSRs window, select your CSR or request file (i.e. example.csr) and then click View.
-
In the your “CSR” window (i.e. example.csr), copy the text of your CSR, including the -----BEGIN NEW CERTIFICATE REQUEST----- and -----END NEW CERTIFICATE REQUEST----- tags, and paste it into the DigiCert order form.
Note: During your DigiCert SSL Certificate ordering process, make sure that you select Citrix (Other) when asked to Select Server Software. This option ensures that you receive all the required certificates for Citrix NetScaler Certificate Installation (Intermediate and SSL Certificates).


-
After you receive your SSL Certificate from DigiCert, you can install it.
![]()
2. Citrix NetScaler VPX: Install Your SSL Certificate
If you have not yet created your RSA key and certificate signing request (CSR) and ordered your certificate, see Citrix NetScaler VPX: Create Your CSR (Certificate Signing Request).
After receiving your SSL Certificate, you need to install it on your NetScaler VPX device and then, you can bind it to your virtual server.
To install and configure your SSL Certificate, do the following:
-
Download your combined SSL and Intermediate Certificate .pem file.
How to Download Your Combined SSL and Intermediate Certificate .pem File.
Note:
If you selected Citrix (Other) as your server software when you ordered your SSL Certificate from DigiCert, the certificate file that we sent you contains both your SSL Certificate and the DigiCertCA Intermediate Certificate and is in the .pem format required for Citrix NetScaler VPX.
You can simply open the ZIP file containing your SSL Certificate that we sent to you, save the SSL Certificate file (yourdomain_com.pem) to the Citrix NetScaler VPX device where you generated the CSR, and proceed to the next step: ii. Install your SSL Certificate combined .pem file.
-
Install your SSL Certificate.
-
Bind your SSL Certificate to a virtual server.
NetScaler VPX: How to Bind Your SSL Certificate to a Virtual Server
i. How to Download Your Combined SSL and Intermediate Certificate .pem File
-
Log into your DigiCert® Management Console.
-
On the My Orders tab, in the list of your current certificates, select the order number for your new Citrix NetScaler VPX SSL Certificate.
-
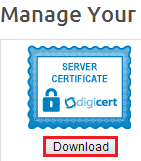
On the Manage Your…Certificate - Order page, under your Server Certificate image, click Download.
-
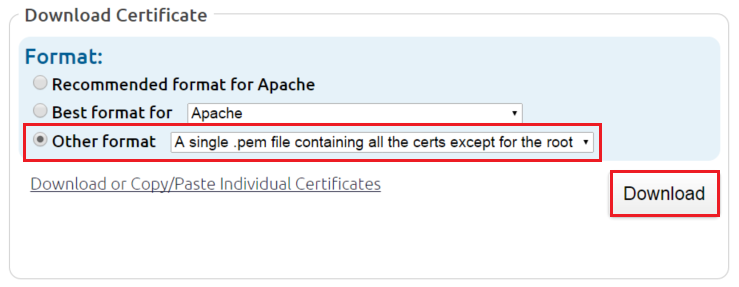
In the Download Certificate section, select Other format, in the drop-down list select A single .pem file containing all the certs except for the root, and then, click Download.
-
Save your SSL Certificate combined .pem file (i.e. yourdomain_com.pem) to your Citrix NetScaler VPX device.
ii. NetScaler VPX: How to Install Your SSL Certificate
-
Log into your NetScaler device console.
-
In the NetScaler console, on the Configuration tab, in the tree menu, expand Traffic Management and then click SSL.
-
On the NetScaler > Traffic Management > SSL page, under Tools, click Manage Certificates / Keys / CSRs.
-
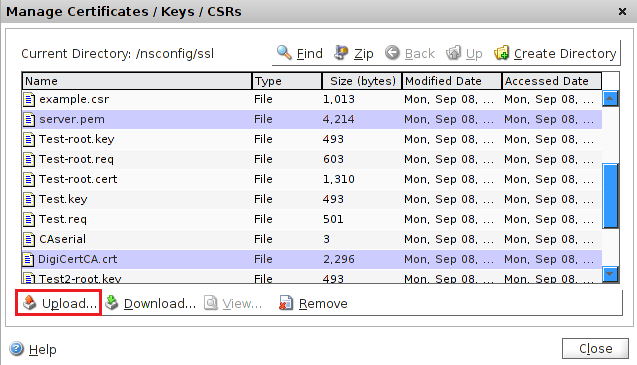
In the Manage Certificates / Keys / CSRs window, click Upload to locate, select, and upload your SSL Certificate .pem file (i.e. yourdomain_com.pem).
-
In the NetScaler console, on the Configuration tab, in the tree menu, expand Traffic Management > SSL and then click Certificates.
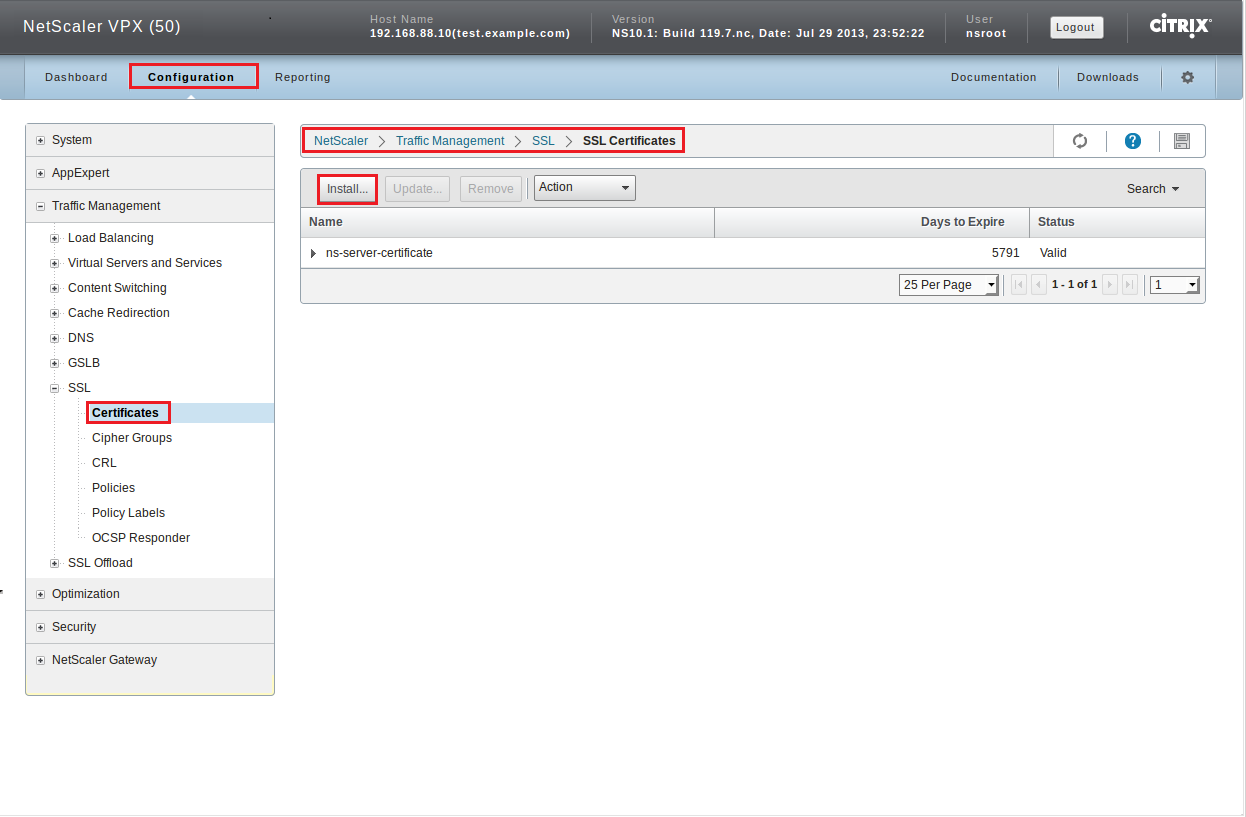
-
On the NetScaler > Traffic Management > SSL > SSL Certificates page, click Install.
-
In the Install Certificate window, enter the following information:
Certificate-Key Pair Name* Create a name for the certificate (i.e. Example). Certificate File Name* i. In the Browse drop-down list, select Appliance. ii. Click Browse to browse to and select your SSL Certificate file (i.e. /nsconfig/ssl/yourdomain_com.pem). iii. Click Select and then click Open. Key File Name i. In the Browse drop-down list, select Appliance. ii. Click Browse to browse to and select your RSA key file (i.e. /nsconfig/ssl/example.key) that you created. iii. Click Select and then click Open. Certificate Format Select PEM. Password Enter the password that you used when creating your CSR. Certificate Bundle Check this box. If you do not have the Certificate Bundle feature, finish installing your SSL Certificate. Then, follow the instructions in the Certificate Bundle Note. Notify When Expires Select Enabled to be notified before your certificate expires. Notification Period Enter the number of days before the certificate expires that you want to be notified. 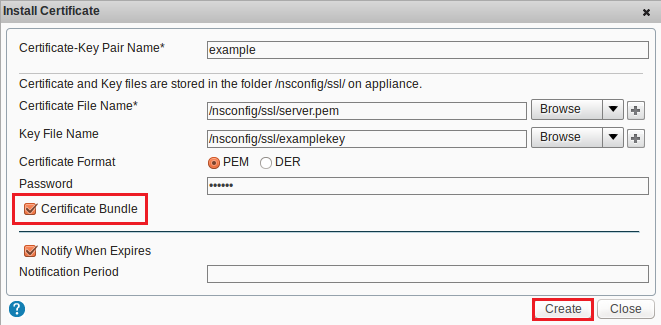
-
Click Create and then click Close.
-
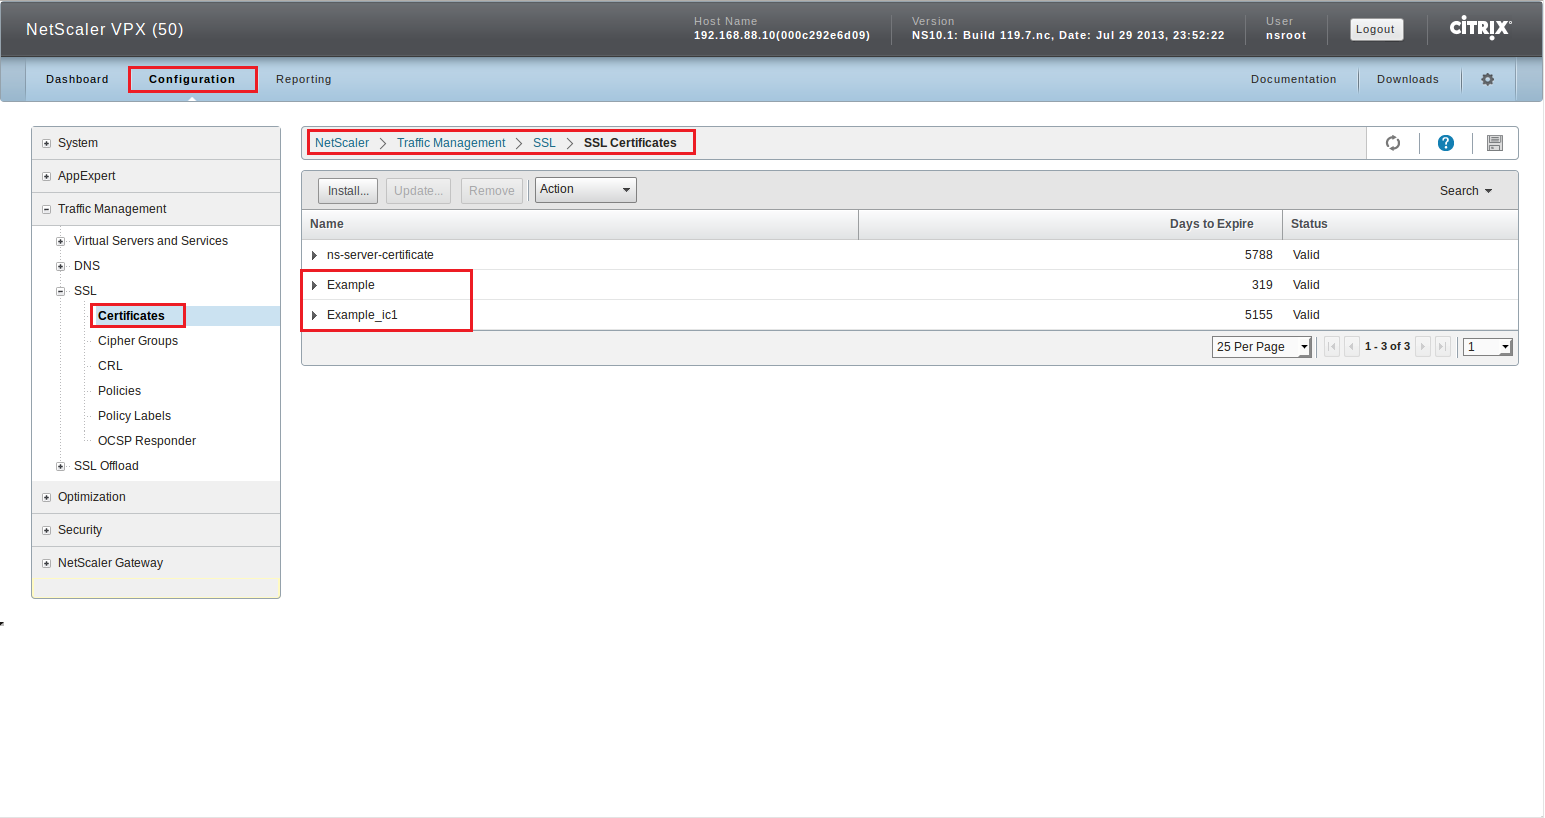
On the NetScaler > Traffic Management > SSL > SSL Certificates page, your SSL and Intermediate Certificates are added to the list of certificates.
Your SSL Certificate is listed by the name that you created for it during installation (i.e. Example) and the Intermediate Certificate is listed by that same name with _ic1 appended to it (i.e. Example_ic1). If you do not have the Certificate Bundle option, you see only your SSL Certificate (i.e. Example).
Certificate Bundle Note: If you do not have the Certificate Bundle feature, you need to install the DigiCertCA Intermediate Certificate before binding your SSL Certificate to a virtual server. See NetScaler VPX: How to Install the DigiCertCA Intermediate Certificate.
-
On the NetScaler > Traffic Management > SSL > SSL Certificates page, select your SSL Certificate (i.e. Example).
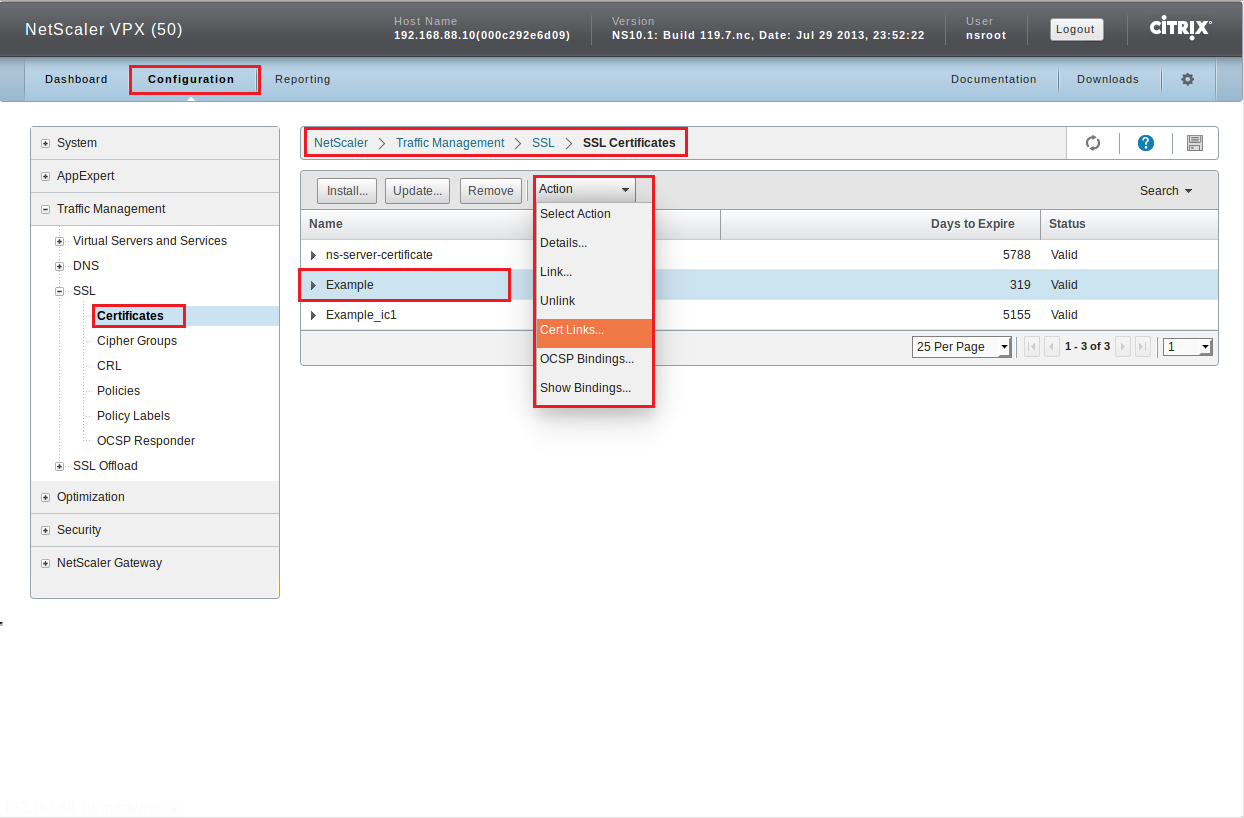
-
In the Actions drop-down list, select Cert Links.
-
In the SSL Certificate Links window, the _ic1 certificate should be listed as the CA Certificate Name for your SSL Certificate (i.e. Certificate Name: Example and CA Certificate Name: Example_ic1).
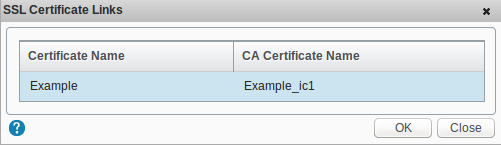
How to Verify the SSL and Intermediate Certificates Are Linked
iii. NetScaler VPX: How to Bind Your SSL Certificate to a Virtual Server
-
In the NetScaler console, on the Configuration tab, in the tree menu, expand NetScaler Gateway and then click Virtual Servers.

-
On the NetScaler > NetScaler Gateway > NetScaler Gateway Virtual Servers page, select the virtual server to which you want to bind your certificate and then click Open.
-
In the Configure NetScaler Gateway Virtual Server window, on the Certificates tab, in the Available section, select your SSL Certificate and then click Add.
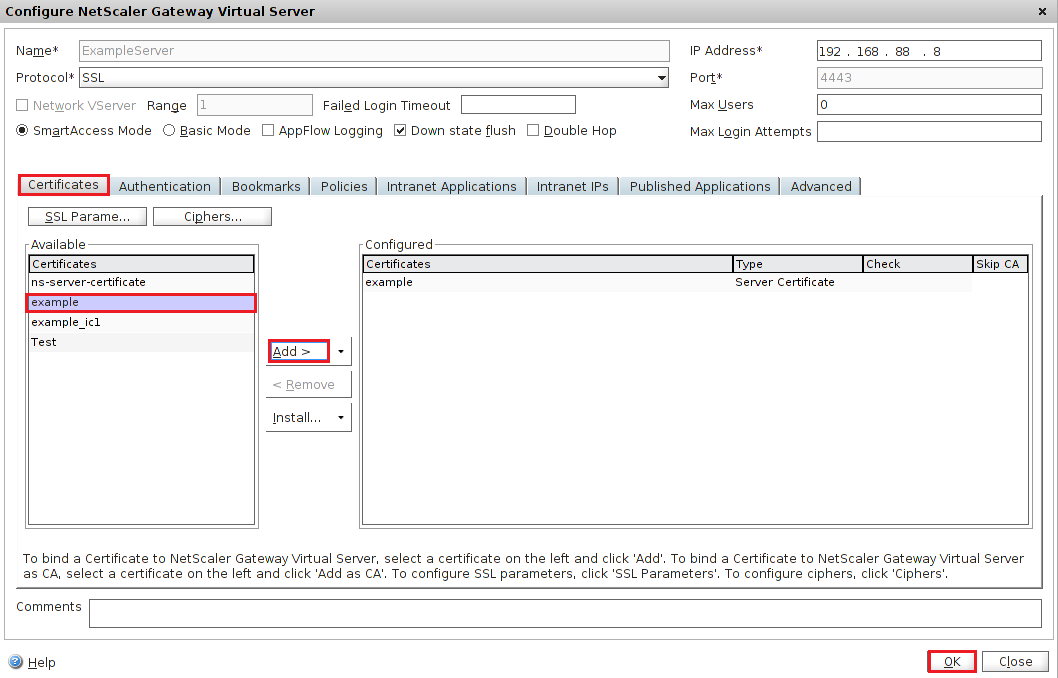
-
In the Configured section, select the old certificate (i.e. Test) used to configure the virtual server and click Remove.
-
Click OK.
-
On the NetScaler > NetScaler Gateway > NetScaler Gateway Virtual Servers page, in the upper right corner click the save symbol (diskette).
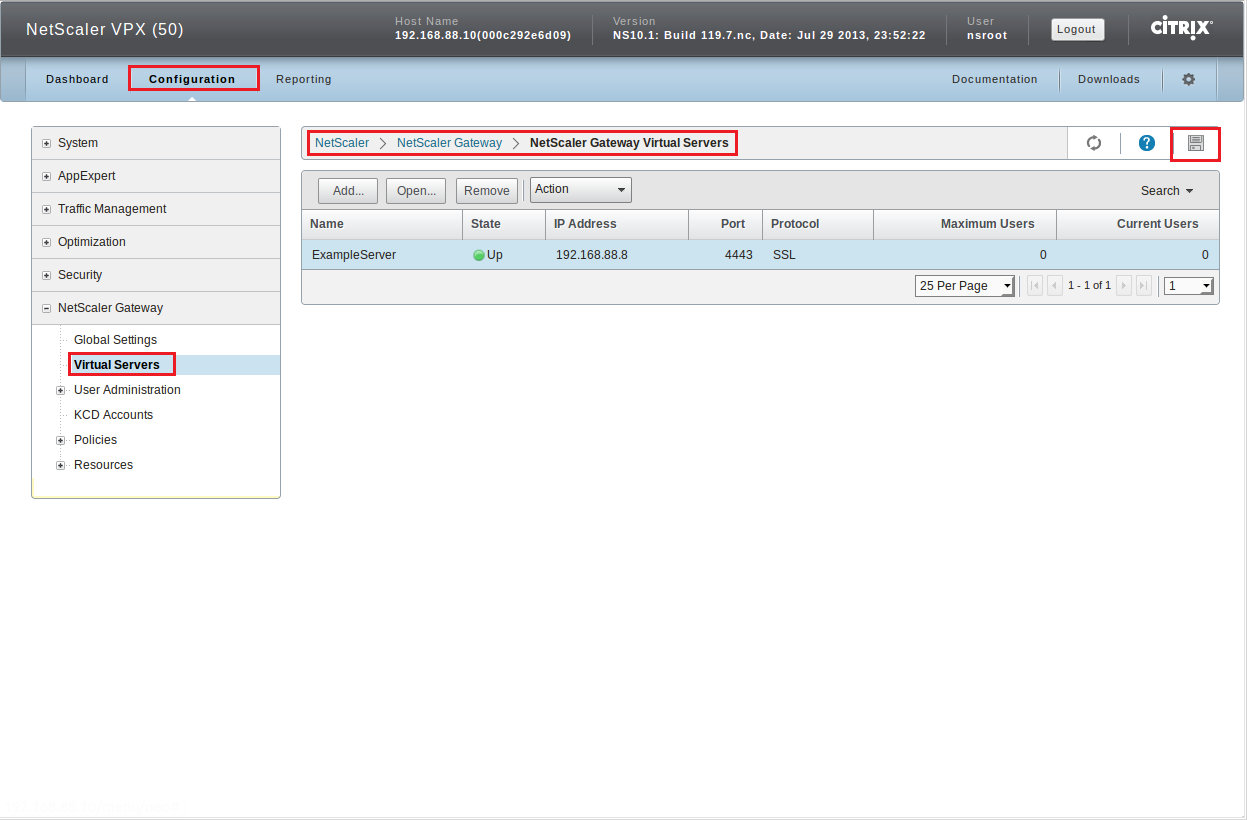
-
You have successfully installed and configured your Citrix NetScaler SSL Certificate.
Verifying Your Certificate is Configured Correctly
To verify that you correctly configure the SSL Certificate, use https to visit your website.
Test Your Installation
If your website is publicly accessible, our DigiCert® SSL Installation Diagnostics Tool can help you diagnose common problems.
Troubleshooting
-
‘Not sending intermediate certificate’ Error
If you received a ‘Not sending intermediate certificate’ error, you need to install the DigiCertCA intermediate certificate as a separate file and link your SSL Certificate to it. See NetScaler VPX: How to Install the DigiCertCA Intermediate Certificate.

-
No Certificate Bundle Feature
If your Citrix NetScaler VPX console does not contain the Certificate Bundle feature you need to install the DigiCertCA intermediate certificate as a separate file and link your SSL Certificate to it. See NetScaler VPX: How to Install the DigiCertCA Intermediate Certificate.
NetScaler VPX: How to Install the DigiCertCA Intermediate Certificate
If you have not installed your SSL Certificate, you need to that first. See, NetScaler VPX: How to Install Your SSL Certificate.
To install the DigiCertCA Intermediate Certificate and link your SSL Certificate to it, do the following:
-
Download the DigiCertCA Intermediate Certificate.
-
Install the DigiCertCA Intermediate Certificate.
-
Link your SSL Certificate to the DigiCertCA Intermediate Certificate.
NetScaler VPX: How to Link Your SSL Certificate to the Intermediate Certificate
-
Log into your DigiCert® Management Console.
-
On the My Orders tab, in the list of your current certificates, select the order number for your Citrix NetScaler VPX SSL Certificate.
-
On the Manage Your…Certificate - Order page, under your Server Certificate image, click Download.
-
In the Download Certificate section, click Download or Copy/Paste Individual Certificates.
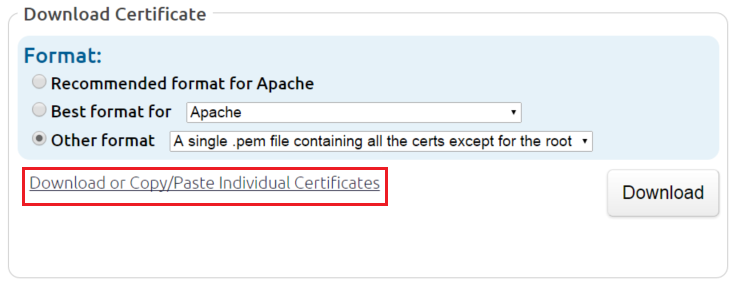
-
Click the Intermediate Certificate image.

-
Save the DigiCertCA.crt intermediate certificate file to your Citrix NetScaler VPX device.
-
Log into your NetScaler device console.
-
In the NetScaler console, on the Configuration tab, in the tree menu, expand Traffic Management and then click SSL.
-
On the NetScaler > Traffic Management > SSL page, under Tools, click Manage Certificates / Keys / CSRs.
-
In the Manage Certificates / Keys / CSRs window, click Upload to locate, select, and upload the DigiCertCA.crt file.
-
In the NetScaler console, on the Configuration tab, in the tree menu, expand Traffic Management > SSL and then click Certificates.
-
On the NetScaler > Traffic Management > SSL > SSL Certificates page, click Install.
-
In the Install Certificate window, enter the following information:
Certificate-Key Pair Name* Enter DigiCertCA. Certificate File Name* i. In the Browse drop-down list, select Appliance. ii. Click Browse to browse to and select the DigiCertCA.crt file (i.e. /nsconfig/ssl/DigiCertCA.crt). iii. Click Select and then click Open. Key File Name N/A (leave blank). Certificate Format Select PEM. The DigiCertCA.crt file is .pem formatted; it just uses a .crt extension. Password N/A (leave blank) Certificate Bundle • If you are using this instruction because you do not have the Certificate Bundle feature in your Citrix NetScaler VPX, you will not see this option. • If you are using this instruction because you received a ‘Not sending intermediate certificate’ error, DO NOT check this box. Notify When Expires Do not check this box. 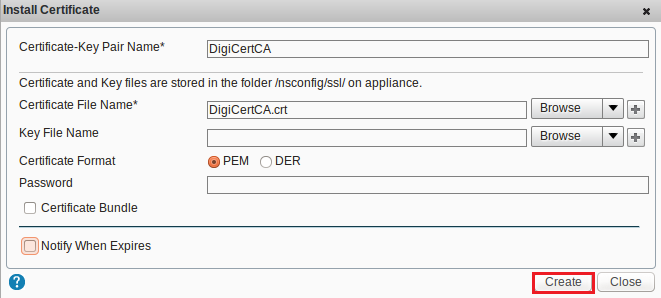
-
Click Create and then click Close.
-
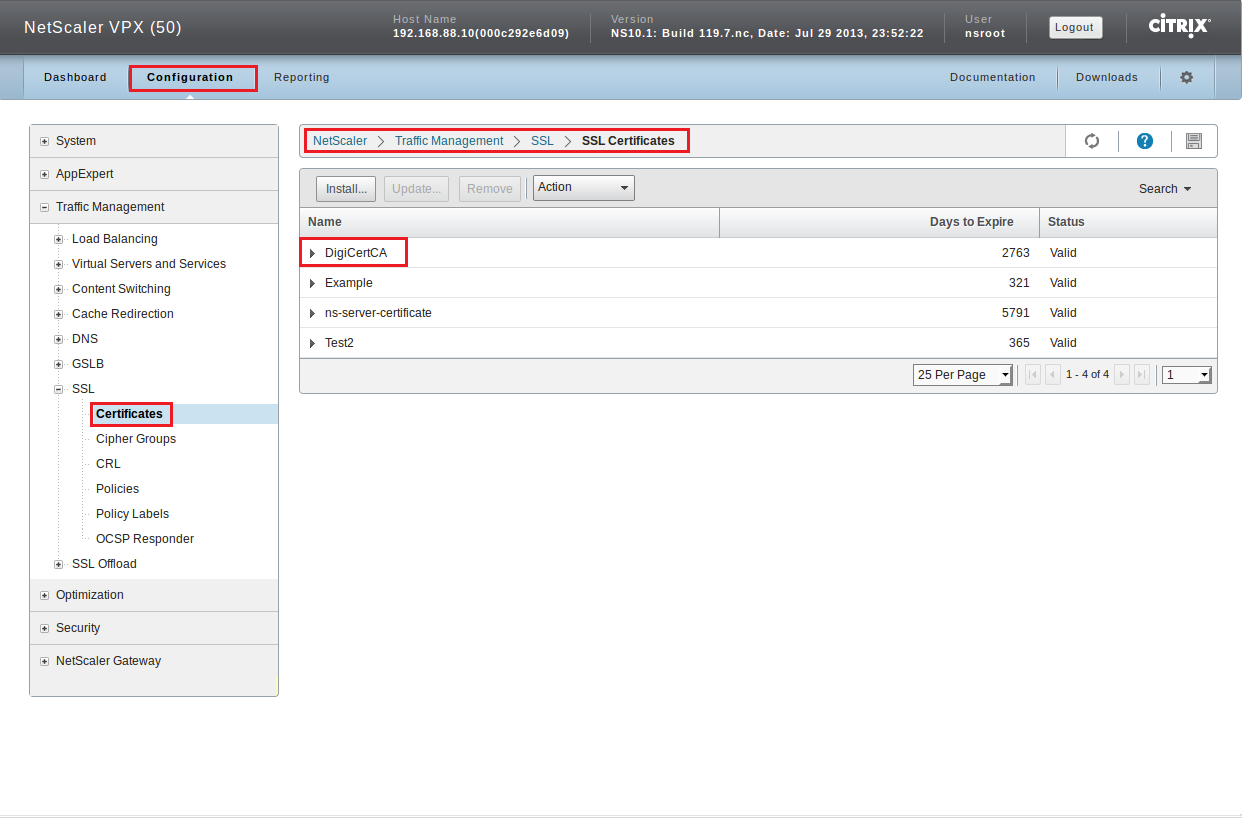
On the NetScaler > Traffic Management > SSL > SSL Certificates page, the DigiCertCA intermediate certificate is added to list of certificates.
You are ready to link your SSL Certificate to the DigiCertCA Intermediate Certificate.
-
On the NetScaler > Traffic Management > SSL > SSL Certificates page, select your SSL Certificate (i.e. Example) and then in the Actions drop-down list, select Link.
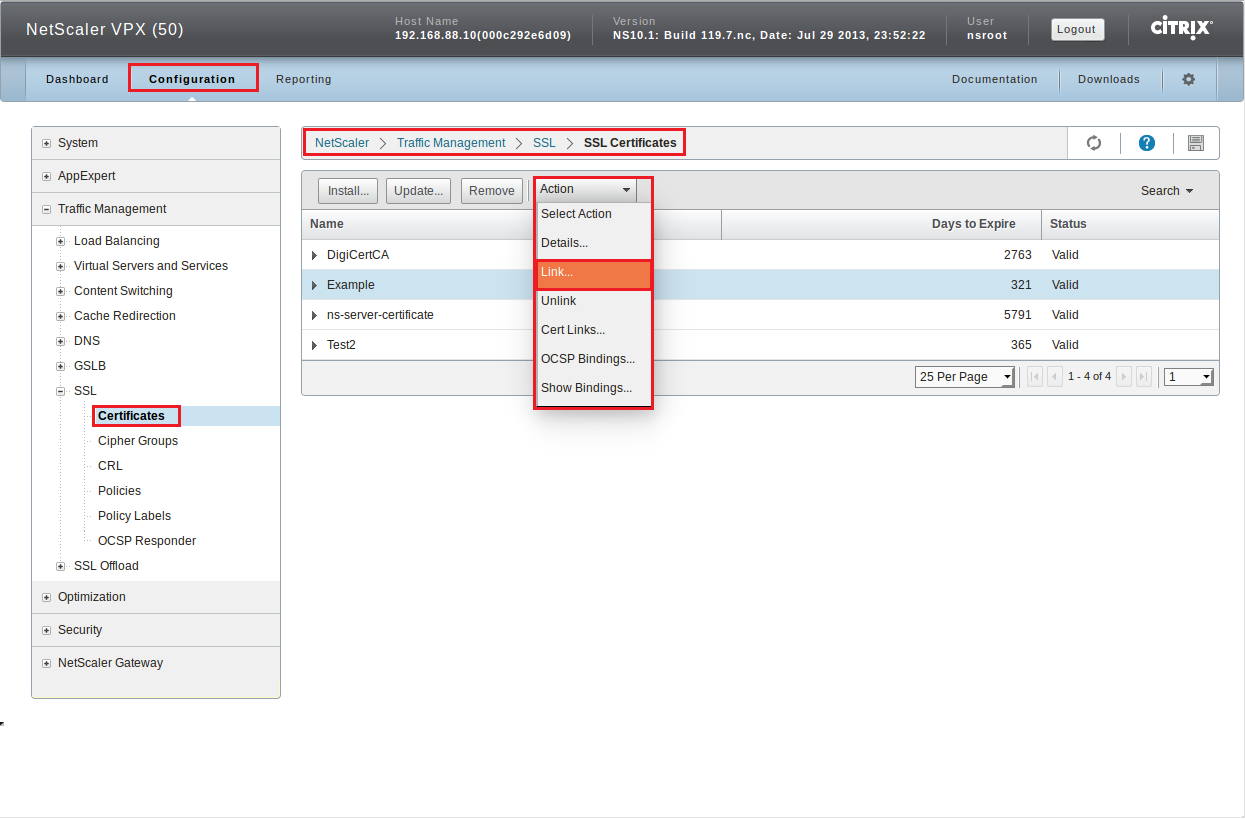
-
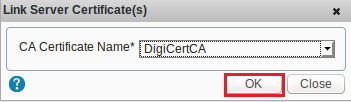
In the Link Server Certificate(s) window, in the CA Certificate Name* drop-down list, select DigiCertCA and then, click OK.
-
Your SSL Certificate is now linked to its intermediate certificate (DigiCertCA.crt).
You are ready to bind your SSL Certificate to a virtual server. See NetScaler VPX: How to Bind Your SSL Certificate to a Virtual Server.