

Internal name and reserved IP address certificates will expire by October 31, 2015. If you are reading this blog because you are knee-deep in replacing your publicly trusted internal name certificates, you have come to the right place. If you are just learning about replacing your internal name certificates, see our previous post Replacing Your Internal Name Certificates.
This post will cover how to reconfigure your Exchange server to use a publicly registered domain name. This process will only affect your Exchange Autodiscover settings, so mail clients will know to connect to Exchange using your registered domain name rather than an internal name. This will not actually change your server name or AD domain.
We recommend subscribing to this blog. We will keep it updated if additional information or changes are required. Also, please feel free to leave comments or questions. We will answer questions as they are received.
Prerequisites>>
Internal Name Tool>>
Exchange Management Shell (EMS)>>
Prerequisites for Reconfiguring Your Exchange Server
Before you reconfigure your Exchange Autodiscover settings to use a publicly registered domain name, you must complete the following prerequisites:
- Install and Enable Your Reissued Certificate
Install and enable your reissued certificate on all of your CAS servers. Below are links to instructions that can help you get your certificate installed:- Exchange 2013 SSL Installation Instructions
- Exchange 2010 SSL Installation Guide
- SSL Certificate Installation in Exchange 2007
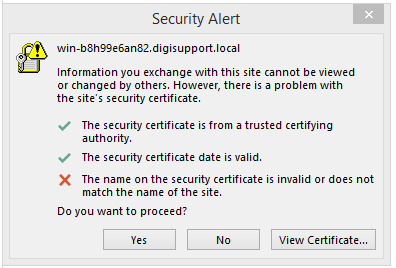
Note: Once you’ve enabled the new certificate, your clients will start getting certificate errors because they are still using a name that you’ve removed from the certificate to connect to the server.
- Verify Exchange Server Has Client Access Server Role
The server must have the Exchange Client Access Server role. Your custom Exchange setup may have multiple servers with this role.You only need to run the Internal Name Tool or Exchange Management Shell (EMS) commands on one CAS server, and it will update the configuration for all of them.
In the Exchange Management Shell, run the following commands to check which servers are CAS servers (servers with CAS role):
- To see a list of all CAS Servers, run the following command:
Get-ClientAccessServer
- To see the server name and a list of its roles assigned to it (e.g., Mailbox, ClientAccess), run the following command:
Get-ExchangeServer | fl Name, ServerRole
The output will look something like this:
Name : WIN-B8H99E6AN82
ServerRole : Mailbox, ClientAccess
- To see a list of all CAS Servers, run the following command:
- Verify the User Has the Organization Management Role
To ensure access to the required commands, the user who runs the Internal Name Tool or EMS commands must have the Organization Management role.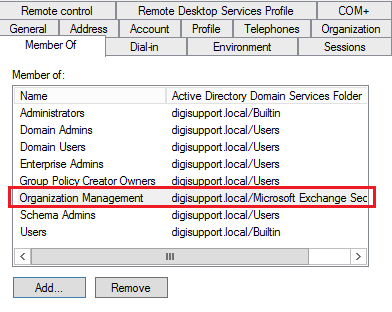
- Set Up a DNS Record
Set up DNS records to resolve the external domain names to the internal IP address that clients will use to access Exchange.For example, let’s say your internal clients connect to Exchange with an internal name, mail.internaldomain.local, which resolves to the private IP address 192.168.0.1. For clients to connect using a public domain name, like mail.domain.com, you will need to set up an internal DNS record to resolve mail.domain.com to the internal IP address 192.168.0.1.
- Set Up Client Access Array
If you plan to use a Client Access Array, we recommend that you set this up in advance with the domain name you are using when reconfiguring Exchange.
After you’ve completed all the prerequisites, you are ready to use the DigiCert Internal Name Tool or the Exchange Management Shell to reconfigure your Exchange server.
Internal Name Tool
Exchange Management Shell (EMS)
Internal Name Tool: Reconfigure Your Exchange Servers to Use Registered Domain Names
To reconfigure your Exchange Autodiscover settings, we recommend using the DigiCert® Internal Name Tool. We designed this tool specifically to make your move from internal names to registered domain names easy and less painful.
Using the Internal Name Tool to Reconfigure Exchange Autodiscover Settings
OutlookAnywhere Setting
How to Roll Back to Your Previous Autodiscover Settings
Troubleshooting
Using the Internal Name Tool to Reconfigure Exchange Autodiscover Settings
- Verify that you have completed all the prerequisites.
- On your Exchange Client Access Server (CAS), download the DigiCert Internal Name Tool to a location where you have write access, for example on your desktop.
Click here to download tool.
Note: The Internal Name Tool will generate a log file and two scripts in the same location from where you run the tool.
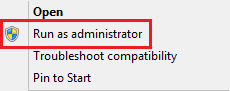
- Right-click on the Internal Name Tool and select Run as administrator.
- In the DigiCert Internal Name Tool section on the Welcome page, carefully read the explanation of what the tool will do, and then click Next.
- On the License Agreement page, carefully read the agreement, check I accept and agree to the license agreement, and click Next.
- On the Prerequisites page, verify that you have completed all the requirements and then click Next to begin analyzing your current Exchange server configuration.
- On the Analyze Exchange page, wait for the tool to finish analyzing our server (green checkmarks) and then click Next.
Note: If any of the items fails, see Troubleshooting.
- On the Configure Setting page, in the drop-down list, select the registered domain name from the certificate that you want configure the Exchange Autodiscover to use.
The drop-down list is populated with the names found in the certificate currently enabled on the IIS role of the CAS servers. If you don’t see your registered domain name in the list, you may need to check that the certificate is correctly installed and enabled on all your CAS servers.
Note: This domain name should be the domain name that clients will use to connect to Exchange.
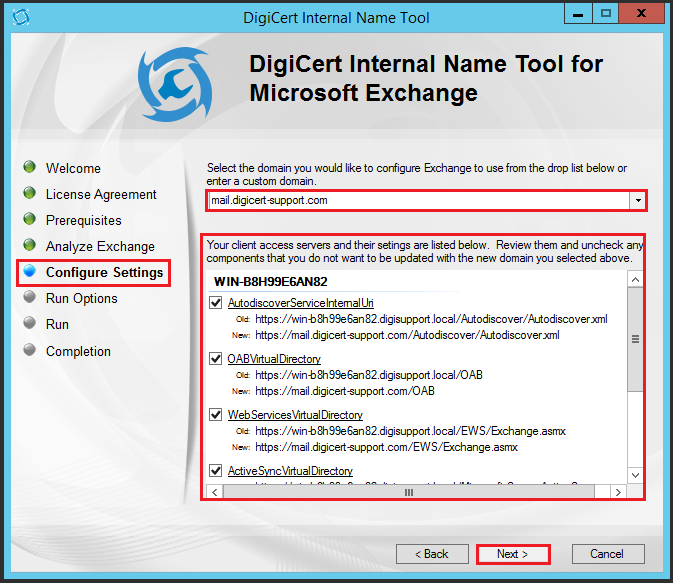
- Next, review your client access servers and their settings, uncheck components that you don’t want updated with the domain that you selected, and then click Next.
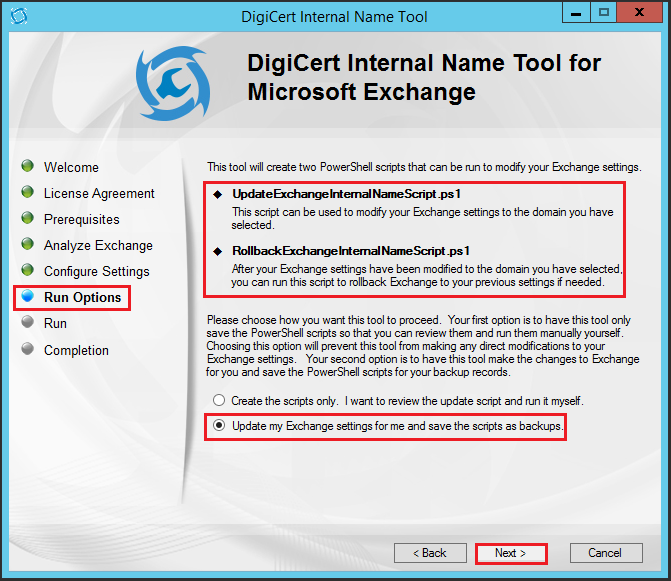
- On the Run Options page, review the PowerShell scripts that the tool will create, select Update my Exchange settings for me and save the scripts as backups, and then click Next.
- On the Run page, review the steps that the tool will complete and when you are ready to reconfigure your Autodiscover settings, click Execute.
Note: If any of the items fails, see Troubleshooting.
- On the Completion page, please note the following:
• Outlook clients may have to wait up to an hour to see the changes.
• A RollbackExchangeInternalNameScript.ps1 was created that you can use to roll back to your previous Autodiscover settings.
• The UpdateExchangeInternalNameScript.ps1 was created for your records.
• The DigiCertINTTool.log file contains all the operations performed by the tool. - You are done!
Your clients will connect to the Autodiscover service, learn the new settings, and connect to the Exchange server using the external name.
No more certificate name mismatch error!
- If you run into any problems that cannot be resolved, see Troubleshooting.
OutlookAnywhere Setting
In many Exchange environments, the OutlookAnywhere InternalHostname setting is not configured or does not need to be changed. If the above steps fixed your Exchange client certificate warnings, don’t worry about updating this setting.
For those who don’t know if the setting is needed in your environment, you can run a command to check and/or record the setting in case a roll back is needed.
Verify and Record
- Run the following command:
Get-OutlookAnywhere -Identity "HostName\Rpc (Default Web Site)" | fl InternalHostname, InternalClientsRequireSsl - The output from this command that you want to record may look something like this:
InternalHostname : internaldomain.local

InternalClientsRequireSsl : True - If the
InternalHostnameis blank, if theInternalHostnameis a publicly registered domain name, or ifInternalClientsRequiredSslisFalse, you probably don’t need to reconfigure this setting (i.e. run the “set” command for that setting).
Reconfigure OutlookAnywhere Setting
- After verifying and recording your OutlookAnywhere setting, run the following command to reconfigure it to use your server’s registered domain name:
Set-OutlookAnywhere -Identity "HostName\Rpc (Default Web Site)" –InternalHostname mail.yourdomain.com -InternalClientsRequireSsl $true
- You are done!
No more “The settings for OutlookAnywhere could not be read” errors!
How to Roll Back to Your Previous Autodiscover Settings
If necessary, after you use the DigiCert Internal Name Tool to reconfigure your Exchange servers, you can use the RollbackExchangeInternalNameScript.ps1 to roll back Autodiscover to your previous settings.
- Run Windows PowerShell as administrator.
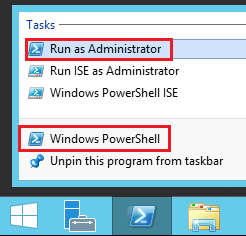
- In the command prompt, run the following command:
RollbackExchangeInternalNameScript.ps1 - You are done. Your Autodiscover settings should be rolled back.
Roll Back the OutlookAnywhere Setting
- If you had to update your OutlookAnywhere setting, you need to run the following command to roll back this setting:
Set-OutlookAnywhere -Identity “HostName\Rpc (Default Web Site)” –InternalHostname InternalHostname -InternalClientsRequireSsl $true
Change
"InternalHostname"to the name you recorded when running theGet-OutlookAnywherecommand. - Recycle IIS Application Pools
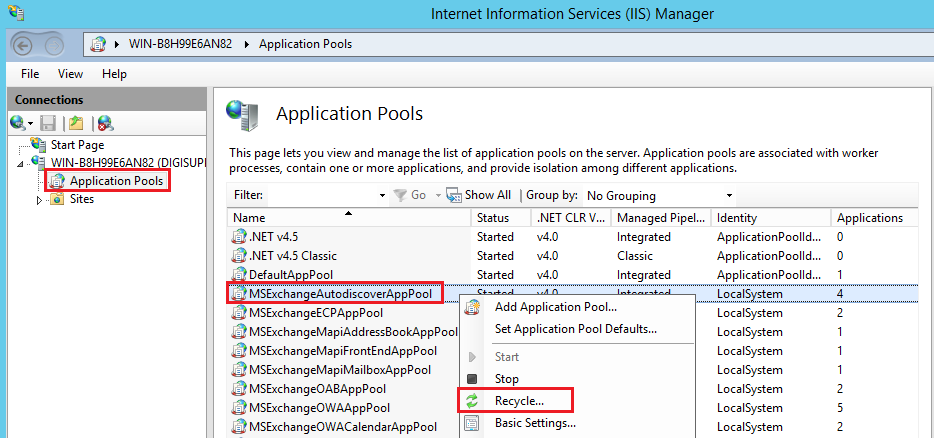
Finally, to force these commands to take effect, you must make IIS push your changes by recycling the application pools.
- Open IIS Manager and run as administrator.
In the Windows Start menu or from the Start screen, type inetmgr.
- In the Connections tree, expand “Your server name” > Application Pools.
- In the Application Pools center pane, right-click on MSExchangeAutodiscoverAppPool and then click Recycle.
- Open IIS Manager and run as administrator.
- You are done. Your OutlookAnywhere setting should be rolled back.
Troubleshooting
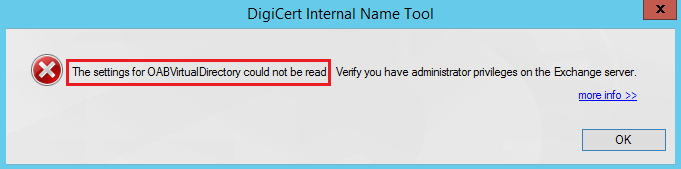
- The settings for OABVirtualDirectory could not be read.
If you encounter a “settings could not be read” error message, do the following:
1. Check your permissions. Specifically, check to make sure that you have the Organization Management role assigned to you. See Prerequisites for Reconfiguring Your Exchange Server.
2. Rerun the Internal Name Tool, making sure that you run it as administrator. See Using the Internal Name Tool to Reconfigure Exchange Autodiscover Settings.
- Prerequisites page failures
If any of your items fail and your problem is not covered in this Troubleshooting section, do the following:
1. Click the more info link to determine the cause.
2. If all else fails, use Google to research the error/warning.
3. Correct the problem.
4. Rerun the Internal Names Tool.
- Cannot resolve issues with the DigiCert Internal Name Tool
If you run into any problems that cannot be resolved, please try using the Exchange Management Shell to reconfigure your Exchange servers.
Exchange Management Shell (EMS): Reconfigure Your Exchange Servers to Use Registered Domain Names
If for some reason you cannot use the Internal Name Tool, you can use Exchange Management Shell (EMS) to reconfigure your Exchange Autodiscover and other settings.
Using the EMS to Reconfigure Exchange Settings
How to Roll Back to Your Previous Settings
Using the EMS to Reconfigure Exchange Settings
- Verify that you have completed all the prerequisites.
- On your Exchange Client Access Server (CAS), open Exchange Management Shell (EMS) and run it as administrator.
- Verify and Record Your Settings
Before you begin reconfiguring your Exchange server’s settings, you need to run some “get” commands so you can verify which settings actually need to be changed. This also gives you the opportunity to record your settings should you need to roll back to them for some reason.
Note: If any command returns blank or with a publicly registered hostname, you probably don’t need to reconfigure that setting (i.e. run the “set” command for that setting).
Run these commands:
-
Get-ClientAccessServer -Identity HostName | fl AutodiscoverServiceInternalUri -
Get-WebServicesVirtualDirectory -Identity "HostName\EWS (Default Web Site)" | fl InternalUrl -
Get-OabVirtualDirectory -Identity "HostName\oab (Default Web Site)" | fl InternalUrl -
Depending on your environment, you may need to run some additional commands:
-
Get-ActiveSyncVirtualDirectory -Identity "HostName\Microsoft-Server-ActiveSync (Default Web Site)" | fl InternalUrl -
Get-OwaVirtualDirectory -Identity "HostName\owa (Default Web Site)" | fl InternalUrl -
Get-EcpVirtualDirectory -Identity "HostName\ecp (Default Web Site)" | fl InternalUrl
The output from these commands that you want to record may look something like this:
-
AutoDiscoverServiceInternalUri : https://internalname/Autodiscover/Autodiscover.xml -
InternalUrl : https://internalname/EWS/Exchange.asmx -
InternalUrl : https://internalname/OAB -
InternalUrl : https://internalname/Microsoft-Server-ActiveSync -
InternalUrl : https://internalname/owa -
InternalUrl : https://internalname/ecp
Note: If any command returns blank or with a publicly registered hostname, you probably don’t need to reconfigure that setting (i.e. run the “set” command for that setting).
OutlookAnywhere Setting
In many Exchange environments, the OutlookAnywhere InternalHostname setting on your Exchange server is not configured. So if you didn’t configure it, don’t worry about updating this setting.
For those of you who did configure it or for those of you who don’t know if the setting was configured, you can run a command to check and/or record the setting (in case a roll back is needed).
- Run the following command:
Get-OutlookAnywhere -Identity "HostName\Rpc (Default Web Site)" | fl InternalHostname, InternalClientsRequireSsl - The output from this command that you want to record may look something like this:
InternalHostname : InternalHostname

InternalClientsRequireSsl : True - If the
InternalHostnameis blank, if theInternalHostnameis a publicly registered domain name, or ifInternalClientsRequiredSslisFalse, you probably don’t need to reconfigure this setting (run the “set” command for that setting).
-
- Reconfigure Your Exchange Server Settings
After verifying and recording your Exchange settings, run the following commands, as needed, to reconfigure your settings:
Note: If any of the “get” commands returned blank or with a publicly registered hostname, you probably don’t need to run the “set” command for that setting.
Run these commands:
-
- ClientAccessServer
Set-ClientAccessServer -Identity HostName -AutodiscoverServiceInternalUri https://mail.yourdomain.com/autodiscover/autodiscover.xml - WebServicesVirtualDirectory
Set-WebServicesVirtualDirectory -Identity "HostName\EWS (Default Web Site)" -InternalUrl https://mail.yourdomain.com/ews/exchange.asmx - OABVirtualDirectory
Set-OABVirtualDirectory -Identity "HostName\oab (Default Web Site)" -InternalUrl https://mail.yourdomain.com/oab
- ClientAccessServer
Depending on your environment, you may need to run some additional commands:
- ActiveSyncVirtualDirectory
Set-ActiveSyncVirtualDirectory -Identity "HostName\Microsoft-Server-ActiveSync (Default Web Site)" -InternalUrl "https://mail.yourdomain.com/Microsoft-Server-ActiveSync" - OWAVirtualDirectory
Set-OWAVirtualDirectory -Identity "HostName\owa (Default Web Site)" -InternalUrl "https://mail.yourdomain.com/owa" - ECPVirtualDirectory
Set-ECPVirtualDirectory -Identity "HostName\ecp (Default Web Site)" -InternalUrl "https://mail.yourdomain.com/ecp" - OutlookAnywhere
Set-OutlookAnywhere -Identity "HostName\Rpc (Default Web Site)" –InternalHostname mail.yourdomain.com -InternalClientsRequireSsl $true*Note: Depending on their configuration, you may not need to update this setting.
-
- Recycle IIS Application Pools
Finally, to force these commands to take effect, you must make IIS push your changes by recycling the application pools.
- Open IIS Manager and run as administrator.
In the Windows Start menu or from the Start screen, type inetmgr.
- In the Connections tree, expand “Your server name” > Application Pools.
- In the Application Pools center pane, right-click on MSExchangeAutodiscoverAppPool and then click Recycle.
- Open IIS Manager and run as administrator.
- You are Done!
Your clients will connect to the Autodiscover service, learn the new settings, and connect to the Exchange server using the external name.
No more certificate name mismatch error!
How to Roll Back to Your Previous Settings
If necessary, after you reconfigure your Exchange server settings, you can roll back to your previous settings.
- On your Exchange Client Access Server (CAS), open Exchange Management Shell (EMS) and run it as administrator.
- Roll Back Your Exchange Server Settings
After verifying and recording your Exchange settings, run the following commands, as needed, to roll back your settings. Refer to the details you recorded when running the “get” commands.
Run these commands:
-
- ClientAccessServer
Set-ClientAccessServer -Identity HostName -AutodiscoverServiceInternalUri https://internalname/autodiscover/autodiscover.xml - WebServicesVirtualDirectory
Set-WebServicesVirtualDirectory -Identity "HostName\EWS (Default Web Site)" -InternalUrl https://internalname/ews/exchange.asmx - OABVirtualDirectory
Set-OABVirtualDirectory -Identity "HostName\oab (Default Web Site)" -InternalUrl https://internalname/oab
- ClientAccessServer
Depending on your environment, you may need to run some additional commands:
- ActiveSyncVirtualDirectory
Set-ActiveSyncVirtualDirectory -Identity "HostName\Microsoft-Server-ActiveSync (Default Web Site)" -InternalUrl "https://internalname/Microsoft-Server-ActiveSync" - OWAVirtualDirectory
Set-OWAVirtualDirectory -Identity "HostName\owa (Default Web Site)" -InternalUrl "https://internalname/owa" - ECPVirtualDirectory
Set-ECPVirtualDirectory -Identity "HostName\ecp (Default Web Site)" -InternalUrl "https://internalname/ecp" - OutlookAnywhere
Set-OutlookAnywhere -Identity "Hostname\Rpc (Default Web Site)" -InternalHostname internalname -InternalClientsRequireSsl $true*Note: Depending on their configuration, you may not need to roll back this setting.
-
- Recycle IIS Application Pools
Finally, to force these commands to take effect, you must make IIS push your changes by recycling the application pools.
- Open IIS Manager and run as administrator.
In the Windows Start menu or from the Start screen, type inetmgr.
- In the Connections tree, expand “Your server name” > Application Pools.
- In the Application Pools center pane, right-click on MSExchangeAutodiscoverAppPool and then click Recycle.
- Open IIS Manager and run as administrator.
- You are done. Your settings should be rolled back.
Hello,
Thank you for the article. We got following Warning: The certificate configuration for one or more of the CAS servers could not be read. (Please see in attached picture).
Do you know how to fix it?
We have only one server where all three roles are installed and I have appropriate rights in AD.
Thank you
We have fixed it, by manually enter domain name in drop list on next page.
I was able to follow these steps without errors, but Outlook is still trying to access the local hostname for Autodiscover.
I also have this problem.
Me too.
Did you solved the Problem? We have the same Problem with all our customers.
The old hostname is still in autodiscovery.xml
In my case it was replication issue. When we apply Tool, we have to wait, before changes are replicated between all DC.
Same problem. Have you figured out a solution? I’m out of ideas!
No solution yet, but the more I look, it seems an Outlook issue and not on the Exchange server.
I agree with you Mark , need something to be done in Outlook? . the same thing happens , I followed the steps and “some” Outlook clients get the notice.
I have heard reports that new Outlook profiles don’t show this prompt.
I have done laboratory creating new profiles and removing exchange cache mode and the problem is the same. They are PC ‘s 120 and approximately 100 follows the problem
For me our Outlook clients they are still using the old internal name on RPC connector. So this next “Set-MailboxDatabase “Mailbox Database 0352856073″ -RpcClientAccessServer EX2010-1.domain.local” However from what I have read if you are running Exchange 2010 SP2 RU3 Outlook will auto discover the name change.
“Prior to Exchange 2010, when you moved mailboxes across servers, the Outlook RPC endpoint would update to point to the Mailbox server (or clustered Mailbox server instance) hosting the database where the mailbox resides. After the mailbox move was completed, the Outlook client user would be prompted with the “The Exchange administrator has made a change that requires you quit and restart Outlook” dialog. After restarting Outlook, the client would be connected to the new RPC endpoint.
With Exchange 2010, you may have noticed that when you moved mailboxes between AD sites, users did not receive this dialog. Furthermore, you may have noticed that users also did not have their RPC endpoint updated to reflect the RPC Client Access Server array associated with the mailbox database in the AD site where the mailbox now resides. This is because the old RPC endpoint does not return an ecWrongServer response to the client. The RPC endpoint accepts the connection; therefore, Outlook ignores the Autodiscover response because it has a working connection. In the event that the old RPC endpoint becomes inaccessible, Outlook would update its settings (Outlook 2003, on the other hand would not as it does not leverage Autodiscover). At any time you could force Outlook to use the new RPC endpoint by forcing a profile repair.”
When we initially deployed a couple years ago, I initially set our RPCClientAccessServer, OWA, ECP, OAB, and ActiveSync to use the public DNS name for both the internal and external URLs. This has not prevented this security alert from coming up now.
My GFI MailEssentials began to fail in the delivery of messages classified as SPAM in user folders . Apparently he can not access the Autodiscover, while all other Exchange services are correct.
I followed these directions and we no longer get cert warnings and email works. However, we can not view shared calendars or the global address book. The config was done about 16 hours ago, so I don’t think it would be a propagation issue. Any thoughts?
This is gold. Thanks Author!!!!!