Using the DigiCert® Certificate Utility for Windows to Create a CSR & Install Your SSL Certificate
![]()
These instructions assume that you have already configured the domain name for your cloud service application. For more information, visit Microsoft’s Windows Azure page, or contact Microsoft.
If you are looking for Windows Azure website instructions, see Windows Azure Website: Create CSR & Install SSL Certificate.
For a simpler way to create your CSRs (Certificate Signing Requests) and install and manage your SSL Certificates, we recommend that you use the DigiCert® Certificate Utility for Windows. For more information about our utility, see DigiCert® Certificate Utility for Windows.
-
To create your certificate signing request (CSR), see Windows Azure Cloud Services: Creating Your CSR with the DigiCert Utility.
-
To install your SSL Certificate, see Windows Azure Cloud Services: Using the DigiCert Utility & Windows Azure to Install Your SSL Certificate.
1. Windows Azure Cloud Services: Creating Your CSR with the DigiCert Utility
The DigiCert® Certificate Utility for Windows streamlines the CSR creation process. Because, the utility lets you generate the CSR with one click.
Windows Azure Cloud Services: How to Create Your CSR with the DigiCert Utility
-
On your Windows server, download and save the DigiCert® Certificate Utility for Windows executable (DigiCertUtil.exe).
-
Run the DigiCert® Certificate Utility for Windows.
Double-click DigiCertUtil.
-
In the DigiCert Certificate Utility for Windows©, click SSL (gold lock), and then, click Create CSR.

-
On the Create CSR page, enter the following information:
Certificate Type: Select SSL. Common Name: Enter the fully qualified domain name (FQDN) (i.e. www.example.com). You may also enter the IP address. Subject Alternative Names: If you are requesting a Multi-Domain (SAN) Certificate, type any SANs that you want to include. (i.e. www.example.com, www.example2.com, and www.example3.net) Organization: Type your company’s legally registered name (i.e. YourCompany, Inc.). Department: (Optional) Enter the department within your organization that you want to appear on the SSL Certificate. City: Type the city where your company is legally located. State: In the drop-down list, select the state where your company is legally located. If your company is located outside the USA, you can type the applicable name in the box. Country: In the drop-down list, select the country where your company is legally located. Key Size: In the drop-down list, select 2048. Provider: In the drop-down list, select Microsoft RSA SChannel Cryptographic Provider, unless you have a specific cryptographic provider. 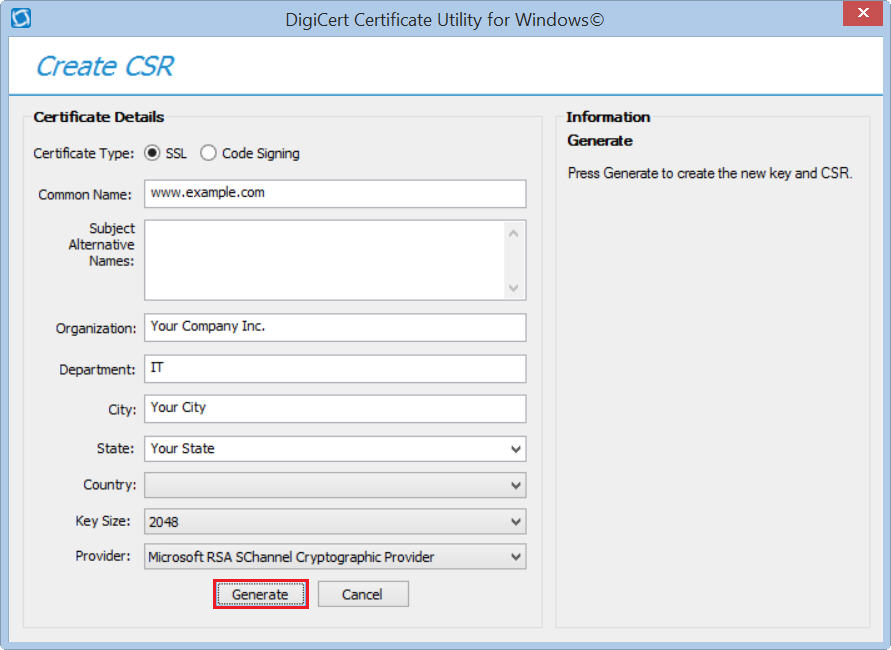
-
Click Generate.
-
On The certificate request has been successfully created page, do one of the following, and then, click Close:
Click Copy CSR. Copies the certificate contents to the clipboard. If you use this option, we recommend that you paste the CSR into a tool such as Notepad. If you forget and copy some other item, you still have access to the CSR, and you do not have to go back and recreate it. Click Save to File. Saves the CSR as a .txt file to the Windows server or workstation. We recommend that you use this option. 
-
Use a text editor (such as Notepad) to open the file. Then, copy the text, including the -----BEGIN NEW CERTIFICATE REQUEST----- and -----END NEW CERTIFICATE REQUEST----- tags, and paste it into the DigiCert order form.
-
After you receive your SSL Certificate from DigiCert, you can install it.
2. Windows Azure Cloud Services: Using the DigiCert Utility & Azure to Install Your SSL Certificate
![]()
If you have not yet used the DigiCert®' Certificate Utility for Windows to create a CSR and ordered your certificate, see Windows Azure Cloud Services: Creating Your CSR with the DigiCert Utility.
After receiving your SSL Certificate, you need to install it on your Microsoft server and then, you can configure it for your Windows Azure cloud services.
To install and configure your SSL Certificate, do the following:
-
Use the DigiCert Utility to import your SSL Certificate to your Windows server.
How to Import Your SSL Certificate Using the DigiCert Certificate Utility
-
Use the DigiCert Utility to export your SSL in a .PFX format.
How to Export your SSL Certificate Using the DigiCert Certificate Utility
-
Configure SSL for your Windows Azure cloud services.
i. How to Import Your SSL Certificate Using the DigiCert Certificate Utility
-
On the server where you created the CSR, open the ZIP file containing your SSL Certificate and save the contents of the file (i.e. your_domain_name.cer)
-
Run the DigiCert® Certificate Utility for Windows.
Double-click DigiCertUtil.
-
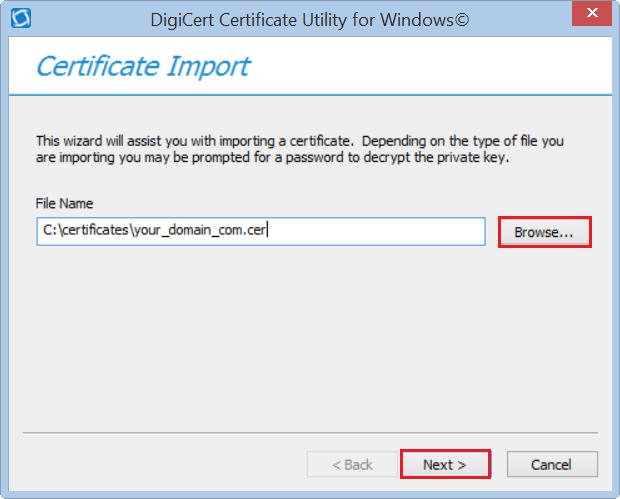
In DigiCert Certificate Utility for Windows©, click SSL (gold lock) and then, click Import.

-
In the Certificate Import wizard, click Browse to browse to the .cer (i.e. your_domain_com.cer) certificate file that DigiCert sent you, select the file, click Open, and then, click Next.
-
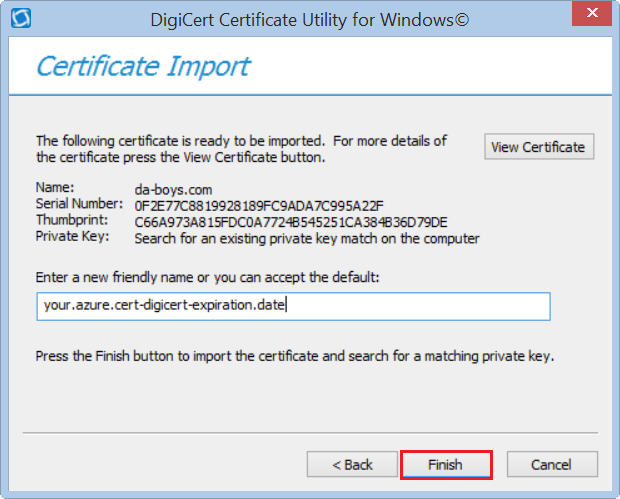
In the Enter a new friendly name or you can accept the default box, enter a friendly name for the certificate. The friendly name is not part of the certificate; instead, it is used to identify the certificate.
We recommend that you add DigiCert and the expiration date to the end of your friendly name, for example: azure.cert-digicert-expiration.date. This information helps identify the issuer and expiration date for each certificate. It also helps distinguish multiple certificates with the same domain name.
-
To import the SSL Certificate to your server, click Finish.
You should receive a message that the certificate was successfully imported.
-
You should now see your SSL Certificate in the DigiCert Certificate Utility for Windows©, under SSL Certificates.
You are now ready to export your SSL Certificate as a .pfx file.
ii. How to Export Your SSL Certificate Using the DigiCert Certificate Utility
After importing your SSL Certificate to your Microsoft server, you use the DigiCert Certificate Utility to export your SSL Certificate as a .pfx file.
-
Run the DigiCert® Certificate Utility for Windows.
Double-click DigiCertUtil.
-
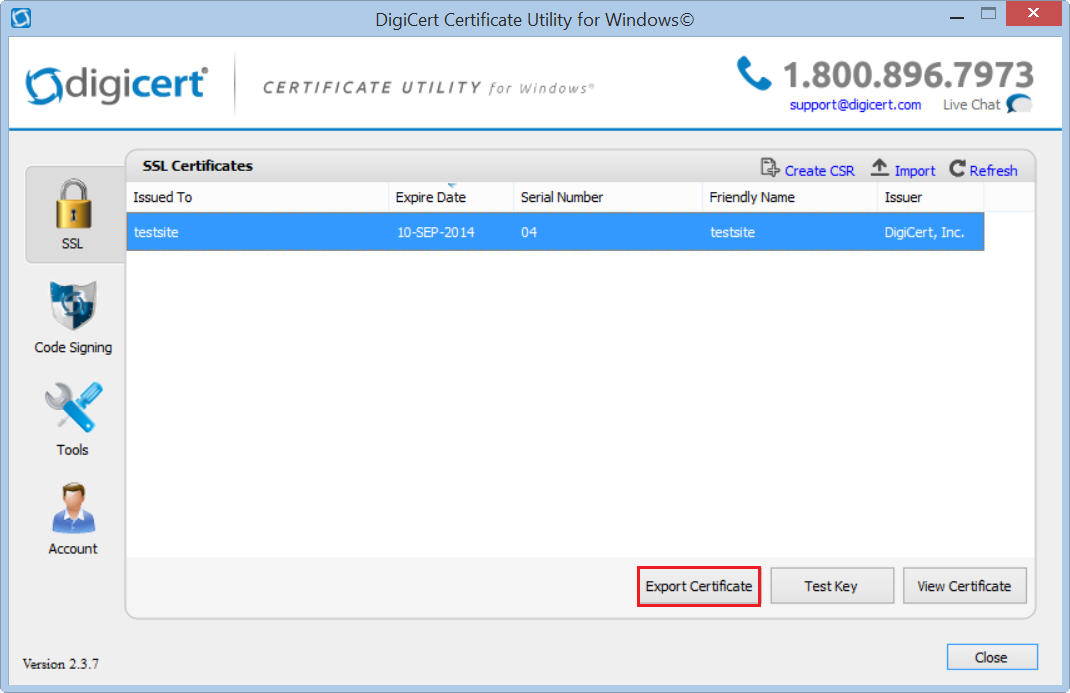
In DigiCert® Certificate Utility for Windows, click SSL (gold lock), select the SSL Certificate to export to a .pfx file, and then click Export Certificate.
-
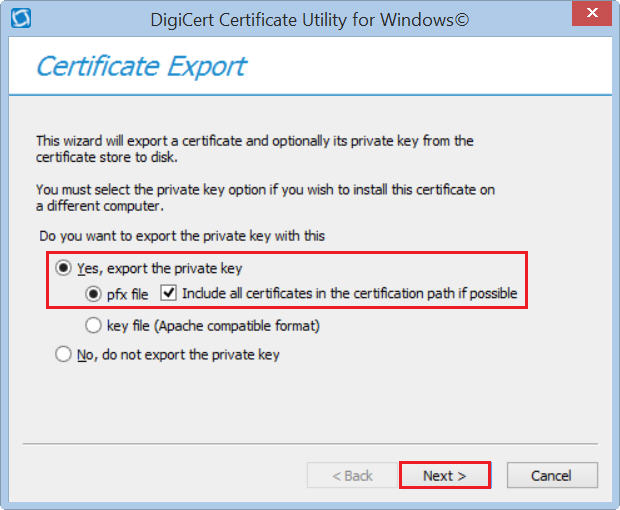
In the Certificate Export wizard, select Yes, export the private key, select pfx file, check Include all certificates in the certification path if possible, and then, click Next.
-
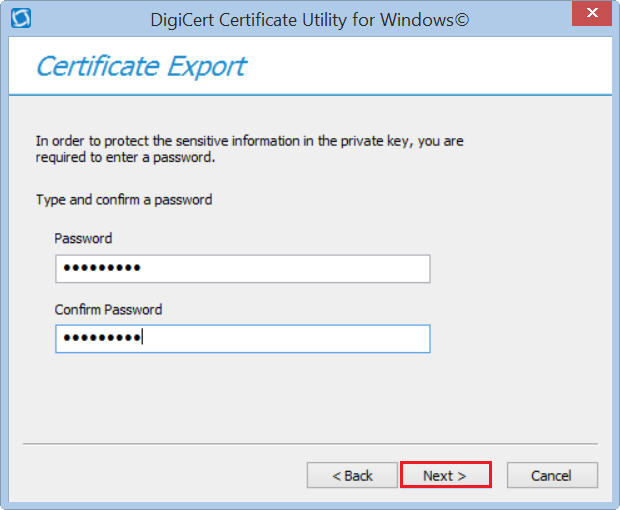
In the Password and Confirm Password boxes, enter and confirm your password, and then, click Next.
Note: This password is used when you import the SSL Certificate onto other Windows type servers or other servers or devices that accept a .pfx file.
-
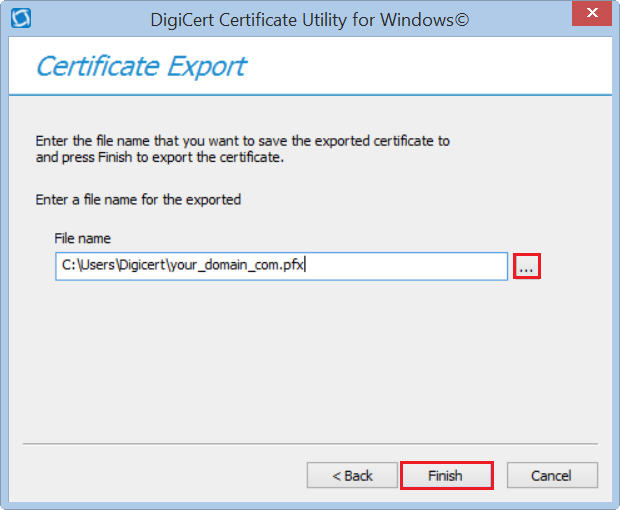
Next, click … to browse for and select the location where you want to save the .pfx file, and then, click Save.
-
To export the SSL Certificate with private key, click Finish.
-
After you receive the "Your certificate and key have been successfully exported" message, click OK.
Your SSL Certificate has been exported as a .pfx file.
iii. How to Configure SSL for Your Windows Azure Cloud Services
Once you have the .pfx file, you can use it to configure SSL for your Windows Azure cloud services.
To configure SSL for your cloud services, do the following:
-
Update the service definition and service configuration files.
How to Update the Service Definition and Configuration Files
-
Use the Management Portal to upload the deployment package and SSL Certificate to Windows Azure.
How to Upload the Deployment Package and SSL Certificate
-
Connect to your deployment using HTTPS.
How to Connect to Your Deployment with HTTPS
a. How to Update the Service Definition and Configuration Files
-
Open the service definition file (CSDEF).
-
In the WebRole section, add a Certificate section and include the following certificate information:
<WebRole name=”CertificateTesting” vmsize=”Small”>...<Certificates><Certificate name=”SampleCertificate”storeLocation=”LocalMachine”storeName=”CA" /></Certificates>...</WebRole>You use the Certificate section to name your certificate, to specify the store location, and to name the store in which you want to store it. In this example, the certificate was stored in the CA (Certificate Authority) store, which is a built-in store. The store can be a built-in store or a custom store. Other built-in stores include My, Root, Trust, Disallowed, TrustedPeople, TrustedPublisher, AuthRoot, and AddressBook.
-
Next, in the Endpoints section, add an InputEndPoint element to enable HTTPS.
<WebRole name=”CertificateTesting” vmsize=”Small”>...<Endpoints><InputEndpoint name=”HttpsIn” protocol=”https” port=”443”certificate=”SampleCertificates” /></Endpoints>...</WebRole> -
Next, in the Sites section, add a Binding element to add an HTTPS binding to map the endpoint to your website.
<WebRole name=”CertificateTesting” vmsize=”Small”>...<Sites><Site name=”Web”><Bindings><Binding name="HttpsIn" endpointName="HttpsIn" /></Bindings></Site></Sites>...</WebRole> -
Open the service configuration file (CSCFG), ServiceConfiguration.Cloud.cscfg.
-
In the Role section, add a Certificates section and include the following information:
Note: Replace the thumbprint value with the thumbprint value from your SSL Certificate. Replace the thumbprintAlgorithm value with the appropriate thumbprint algorithm value for your SSL Certificate.
<Role name=”Deployment”>...<Certificates><Certificate name=”SampleCertificate”thumbprint="9427befa18ec6865a9ebdc79d4c38de50e6316ff"thumbprintAlgorithm="sha1" /></Certificates>...</Role> -
Package your deployment to upload to Windows Azure.
Note: If you use cpack to package your deployment, do not use the /generateConfigurationFile flag. If you do, you will overwrite the certificate information that you just added.
b. How to Upload the Deployment Package and SSL Certificate
-
In a browser, open and log into the Windows Azure Management Portal.
-
In the Management Portal, click New, then click Cloud Service, and finally, click Custom Create.
-
In the Create a cloud service window, enter the URL, region/affinity group, and subscription.
-
Check Deploy a cloud service package now, and then click Next (the arrow pointing to the right).
-
In the Publish your cloud service window, under DEPLOYMENT NAME, enter the deployment name, under PACKAGE, browse for and select your package, and then, under CONFIGURATION, browse for and select your updated service configuration file (ServiceConfiguration.Cloud.cscfg).
-
Under Environment, click Production.
-
Check Add certificate now.
-
If any of your roles contain a single instance, check Deploy even if one or more roles contain a single instance.
-
Click Next (the arrow pointing to the right).
-
In the Add certificate window, under CERTIFICATE, browse for and select your SSL Certificate .pfx file.
-
Under PASSWORD, enter password that you used to export the certificate as a .pfx file.
-
Click attach certificate.
-
Under ATTACHED CERTIFICATES, verify that your SSL Certificate is listed.
-
To create your cloud service, click Complete (checkmark).
-
When the deployment status is Ready, you can proceed.
c. How to Connect to Your Deployment with HTTPS
-
In the Management Portal, select your deployment, and then, under SITE URL, click the URL link.
-
In your web browser, modify the URL to use https instead of http, and then, proceed to page.
Test Your Installation
If your website is publicly accessible, our DigiCert® SSL Installation Diagnostics Tool can help you diagnose common problems.
Troubleshooting
If you run into certificate errors, try repairing your certificate trust errors using DigiCert® Certificate Utility for Windows. If this does not fix the errors contact support.