
In today’s post we’ll go into detail on the first step you need to take to get ready for Brand Indicators for Message Identification (BIMI): How to get your logo into SVG format.
Preparing your logo: creating the SVG
To prepare for acquiring a VMC or CMC — and general BIMI-readiness — your logo must be in Scalable Vector Graphic (SVG) format. But here’s the rub: the SVG must adhere to the SVG Portable/Secure (SVG-P/S) profile, and there is no export template for vector applications like Adobe Illustrator today. That means you’ll have to create it using the following best practices.
Option 1: Do it yourself in Adobe Illustrator
Step 1: Transform pixels to vector format (‘.ai’, ‘.eps’, ‘.pdf’, ‘.svg’)
Many companies have logos created in Photoshop or other design software that is made up of pixels. This won’t work. Instead, you need to first convert your logo to vector format.
Many brand logos are easily convertible wordmarks using fonts and line art. But for some organizations with complex art, you may need to spend some time re-working the design to be vector compatible.
Step 2: Export as SVG Tiny 1.2
Once you have the logo in a vector format, you’ll need to start by exporting as a SVG Tiny 1.2 profile. In Adobe Illustrator® you can do that via the “Save As” dialog:
1. Double check that your image is vector-based (‘.ai’, ‘.eps’, ‘.pdf’, ‘.svg’).
2. Open your file in Adobe Illustrator.
3. Save your file by using the option “Save As.”
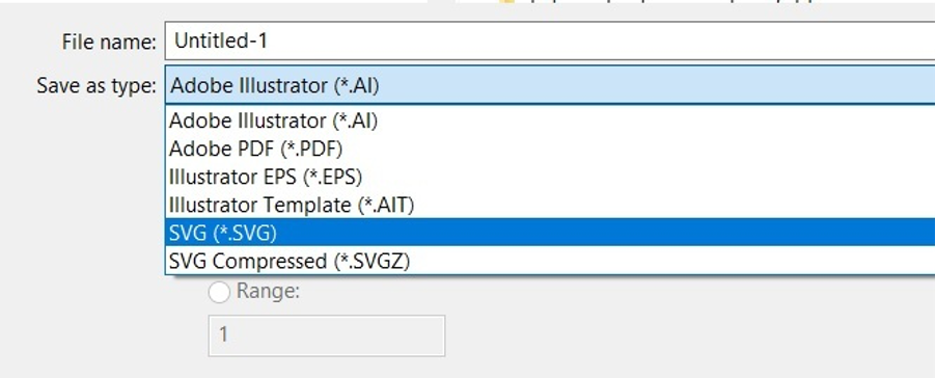
4. Once the dialog box is open, name the file and choose “SVG (svg)” from the dropdown “Format.”
5. Click on “Save” and wait for a new dialog box to open.
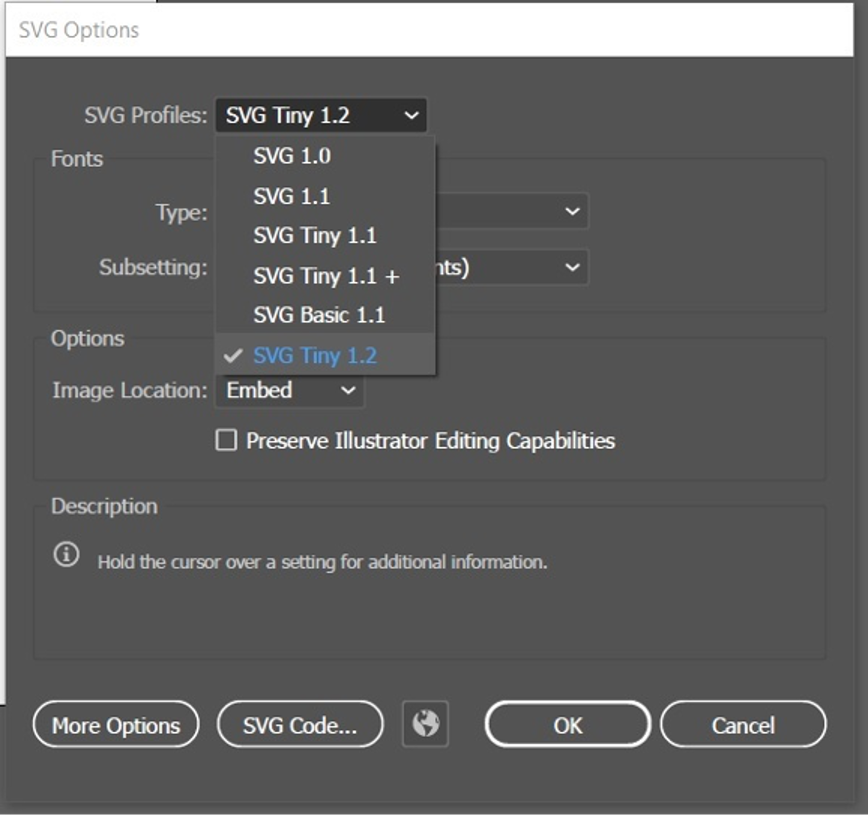
6. In the “SVG Profiles” dropdown, select “Tiny 1.2” and then click “OK.”
Step 3: Open your trusty text editor
Next, you’ll need to open your SVG file in a text editor (e.g., Notepad or Notepad++), or a code editor like Vim or Nano. As SVG files are text files, the most important point is that you can open, edit and re-save to a “txt” format with a “.svg” file extension.
After you open the file, there are a few edits you will need to make:
- While on the SVG file source, verify you see the following settings in the header:
xmlns=http://www.w3.org/2000/svg, version=”1.2, baseProfile=”tiny-ps“
There may be other information in the top of your file like the sample below, but these MUST be present.
For example, you may see a string like this:
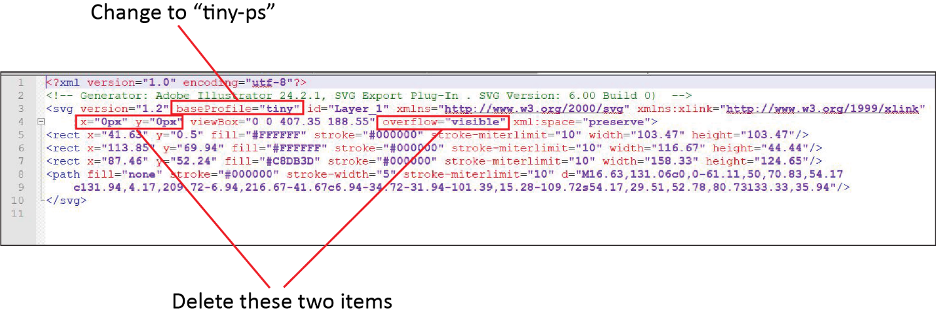
<svg version="1.2" baseProfile="tiny-ps" id="Layer_1" xmlns="http://www.w3.org/2000/svg" xmlns:xlink="http://www.w3.org/1999/xlink" viewBox="0 0 1080 1080“ xml:space="preserve">
If you exported from Illustrator, you’ll need to change the baseProfile to tiny-ps, and delete the x=, y= and overflow items.
2. Next, you’ll want to add the title element. We suggest hitting return after the xml:space=”preserve” item and put the title element there. Put your company name in this field.
3. Careful you don’t put the title item inside the graphic code itself. Like in this example screen shot below, right after the “=preserve” stuff on a new line is fine. But, if you go after the line that starts with then validation may fail.

4. Resave your file as text format, with SVG extension.
Step 4: Line endings must be LF
The SVG specification requires that line endings in the SVG file be Line Feeds or LF characters. The Illustrator SVG export tool includes CR LF. And, in some text editors the default is to use Carriage Returns or CR characters, or a combination of CR/LF. The specification requires the use of only LF characters.
We recommend using a text editor such as Notepad++ to visualize and do this conversion. We created a full KB article with screen shots to walk through this here, but while you’re in Notepad++ here are the steps.
Go to menu View → Show Symbol → Show End of Line you can see the CR LF characters visually.
Next from menu item Edit → EOL Conversion and select Unix (LF).
Step 5: Resave your file as text format, with SVG extension.
And you’re done.
Option 2: Use the BIMI working group’s graphic conversion tools
The BIMI working group has released graphic conversion tools to help format your logo as an SVG-P/S.
- Their tools include: Adobe Illustrator Export Script: A script that can be added to Adobe Illustrator (either Windows or MacOS) and offers the ability to convert an open SVG Tiny 1.2 file into SVG P/S format.
Tips for better display
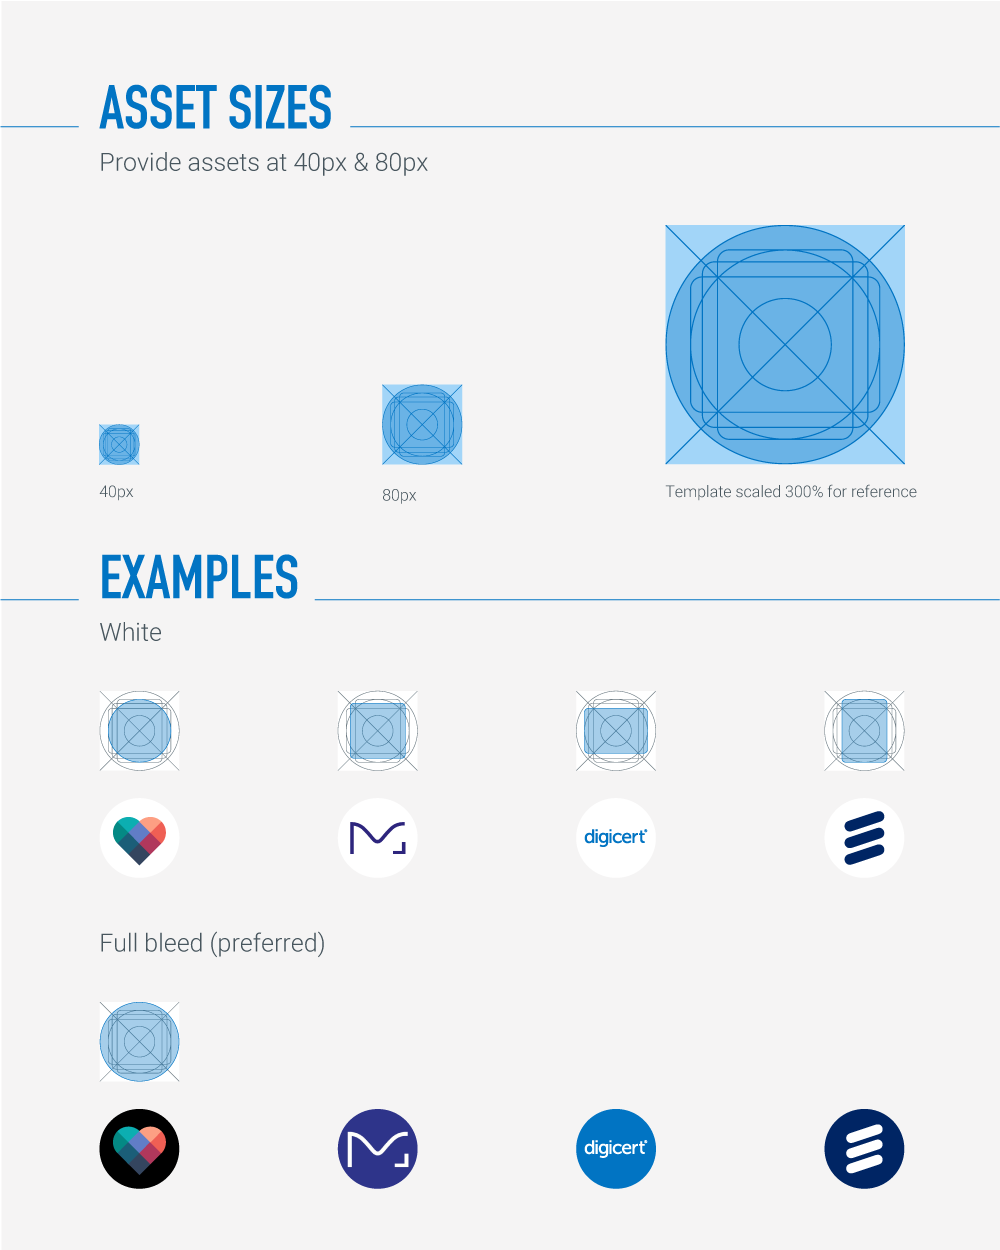
- Images are best with a square aspect ratio (1:1).
- The image should be centered so that it displays optimally in a square, a rounded square, or a circle.
- Non-transparent backgrounds are best, as rendering of transparency can be unpredictable.
The images below demonstrate how your SVG file may render in different mail clients. For a verified mark certificate (VMC) or common mark certificate (CMC) you must format your logo so it matches your registered trademark. For example, only include a circle in your SVG if your registered trademark includes it.


Featured Stories

PQC (Post-Quantum Cryptography)05-28-2026
DigiCert’s 2029 post-quantum infrastructure migration plan
.png)

Certificate Lifecycle Management04-24-2026
Certificate lifecycle management reaches an inflection point
-

DigiCert is a global leader in intelligent trust, securing people, data, and devices with AI-powered solutions built to stop threats today and prepare for a quantum-safe future.
-


-
© 2026 DigiCert, Inc. All rights reserved.
Legal Repository Audits & Certifications Terms of Use Privacy Center Accessibility Cookie Settings